


About
DIY Shabby Chic Velcro Wrist Restraints
Ever think about making these, because the pre-made ones either look uncomfortable or are crazy expensive?
Me too.
So I thought I'd give it a shot. I used nothing but scraps from other projects, so this didn't cost me anything.. but would still be really cheap for new materials.
I'm pleased with how they turned out but will probably make more once I find the right faux fur or something. Let me know what you think!
-
 Alma added Bondage Cuffs to Lingerie
11 Jul 12:07
Alma added Bondage Cuffs to Lingerie
11 Jul 12:07
-
 VillainousNinja added Bondage Cuffs to Goth/Punk
18 Oct 00:47
VillainousNinja added Bondage Cuffs to Goth/Punk
18 Oct 00:47
-
 Brit S. favorited Bondage Cuffs
23 Jun 00:47
Brit S. favorited Bondage Cuffs
23 Jun 00:47
-
 pinklips519 favorited Bondage Cuffs
20 Aug 16:39
pinklips519 favorited Bondage Cuffs
20 Aug 16:39
-
 Emily M. favorited Bondage Cuffs
23 Mar 08:57
Emily M. favorited Bondage Cuffs
23 Mar 08:57
-
 Lara L. favorited Bondage Cuffs
28 Feb 04:06
Lara L. favorited Bondage Cuffs
28 Feb 04:06
-
 pandanomz favorited Bondage Cuffs
08 Sep 19:12
pandanomz favorited Bondage Cuffs
08 Sep 19:12
-
 Bestial Nymph added Bondage Cuffs to ☥ Ravenheart ☥
08 Jun 13:31
Bestial Nymph added Bondage Cuffs to ☥ Ravenheart ☥
08 Jun 13:31
-
 ThatLittleWhiteRabbit favorited Bondage Cuffs
19 Mar 20:58
ThatLittleWhiteRabbit favorited Bondage Cuffs
19 Mar 20:58
-
 nina.eriksen.90834 added Bondage Cuffs to To-make
31 Jan 13:04
nina.eriksen.90834 added Bondage Cuffs to To-make
31 Jan 13:04
-
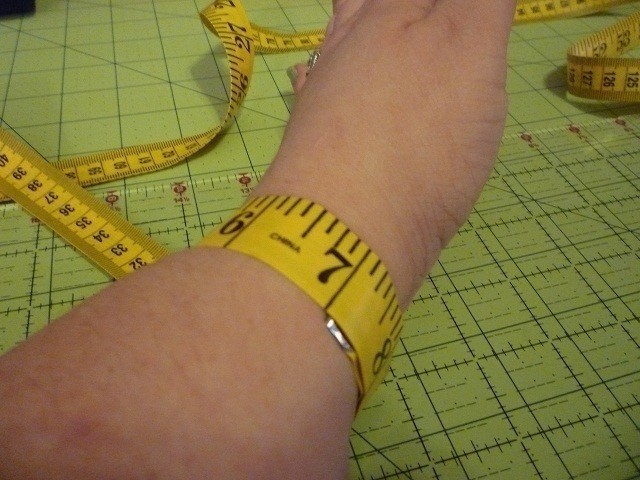
 Step 1
Measure around your wrist.
I got 7". We'll call this measurement "X". -
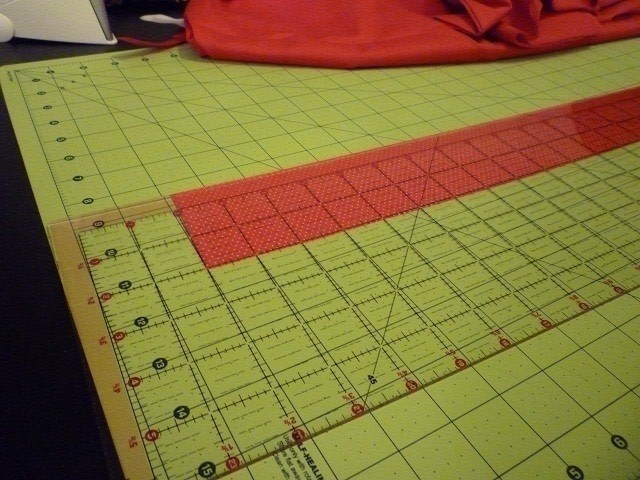
 Step 2
Measure out your pieces. You'll need:
two "bodies"
If you're using a thicker material such as vinyl or thick velvet you'll need two strips for each side that make up the 'body' and measure (X+2) by 6. Since X for me is 7 inches, mine would measure 9 x 6. If you're quilting the center, like I did you'll need a topside and a backside, and of course, batting.
Two "Straps"
You can use webbing or wide nylon chord, too. Just burn the edges after cutting to prevent unraveling. These should measure about (X+4) by 2. Since mine was 7", that makes my strip 11 by 2.
Optional Binding:
If you're making a quilted one like mine, you will also need enough binding for the circumference of both cuffs.
The fabric I used was exceptionally thin, so I doubled-up on it. -
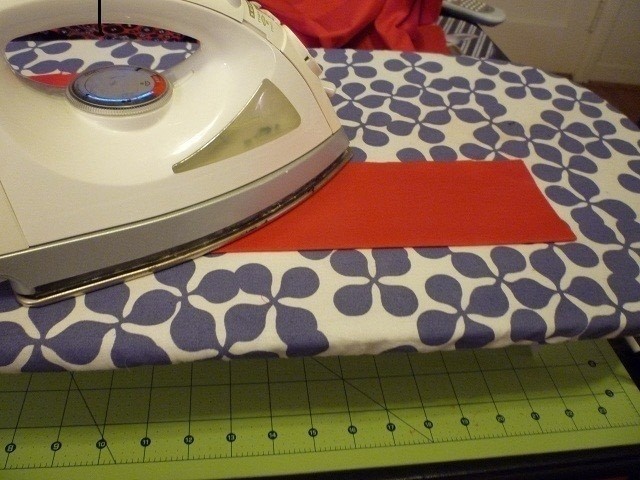
 Step 3
Iron everything flat.
If your 'bodies' are of a tougher material, iron the crease in the middle with the "right" sides together.
If you cut your straps rather than using a nylon strap, iron those in half with the "right" sides together.
Skip to # 9 unless you're doing the quilted version. -
 Step 4
If you're making the quilty one, don't forget the binding! I cut mine at about 2" wide. Iron your binding in half if you want, wrong sides together.
Double fold bias tape is also a nice option. -
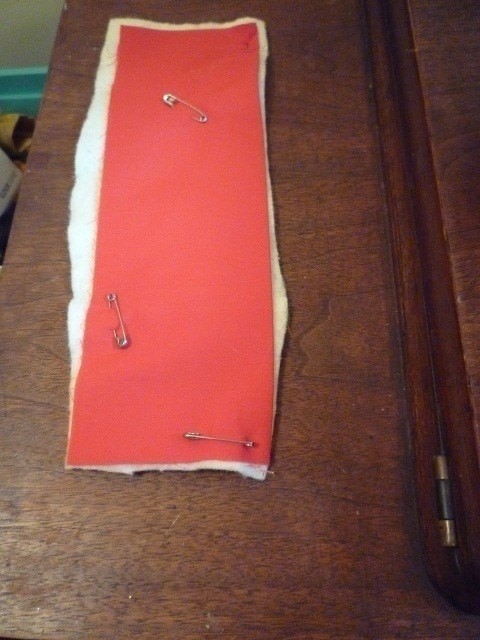
 Step 5
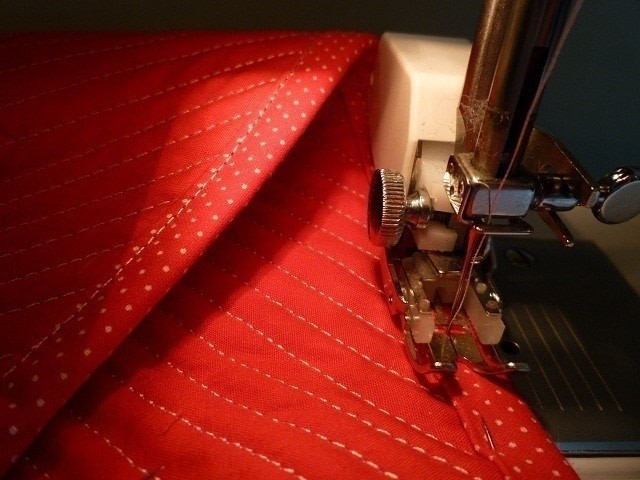
Prepare for top stitching: Pin the top, batting, and backing together, making sure all three layers are aligned.
-
 Step 6
Apply top stitching to both cuff bodies. This is a nice opportunity to experiment with freeform quilting since its a nice small piece and your work won't show too much.
-
 Step 7
Attach binding, all the way around. There are some really great youtube videos concerning a clean-looking binding and for joining the ends of your binding.
-
 Step 8
Ta-da!
You did this to the other side, too, right? -
 Step 9
If you're using a thicker (unquilted) material, stitch up the long, open side and turn it right-side-out. Press the body so that the seam runs right down the middle of one side. You will hide this seam with the thinner strip. Then, flip a small edge of the tube in on itself and sew it shut on both sides.
-
 Step 10
Attach the ROUGHER side of the Velcro to one side of a strip by stitching all the way around the perimeter. If you're using a wider strip, make an X through the center with straight stitch.
Velcro should be about 4"... I was using some scraps and butted two pieces together that measured about 3 3/4" -
 Step 11
Pin & stitch your strip to the body. Just stitch the perimeter of the Velcro - not the entire strip!
-
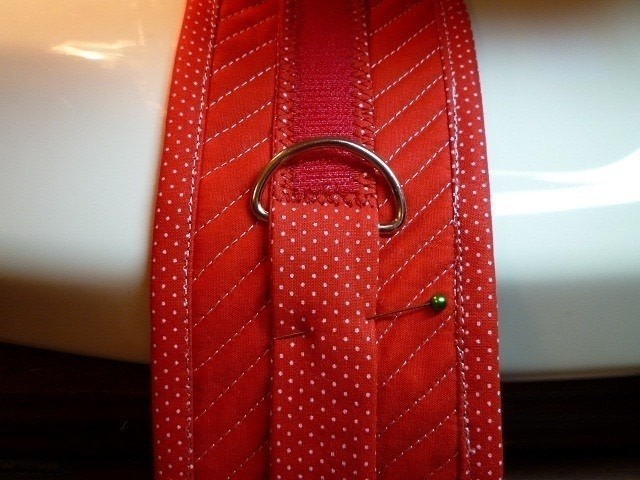
 Step 12
Slide the D ring up the strip to butt up against the Velcro seam.. continue sewing strip to the other half of the cuff.. leaving a little bubble in the strip over the D ring (so that when it's bent over a wrist, the cuff doesn't buckle). A length of the strip will hang over the edge of the cuff.
-
 Step 13
Flip the cuff over. Attach the FUZZY side of the Velcro to the other side of the strip. Again... on the *opposite* side of the cuff than the D ring.
Mine is two different colors because I was using leftovers from two different projects. -
 Step 14
... Trim all of your threads... Hopefully your thread matches your fabric, unlike mine.
-
 Step 15
You're done!


 1
Home Accessories »
Diy Jewelry Box
1
Home Accessories »
Diy Jewelry Box


Thanks for posting this how to, I am excited >^<
thanks for the tutorial!
very cool. totally not the bad illness look of the others.LOL
i have made some myself , but i noticed that i had to use something else so i bought the black protectings for skaters and it looks cool too, less expensive, i weare it only at night and when the inflammations are to bad during the day.
well done, i must think of making this.
thank you for your great tute and the sharing, really love it!!!!!;-D