


About
Add a bouquet to your boots!
I saw the best sweater knit leggings recently. The picture showed them worn with boots and it looked as if a bunny was peeking out of the top of the boot. Unfortunately, the bunny leggings are only in children's sizes. I was disappointed until I realized that I could do a block print and make a version in my size. Yay! I'm included.
-
 Key West Witch favorited Block Print Leggings
07 May 11:11
Key West Witch favorited Block Print Leggings
07 May 11:11
-
 Kimya J. favorited Block Print Leggings
21 Apr 03:04
Kimya J. favorited Block Print Leggings
21 Apr 03:04
-
 VillainousNinja added Block Print Leggings to Make plz
24 Jun 17:26
VillainousNinja added Block Print Leggings to Make plz
24 Jun 17:26
-
 Dani T. favorited Block Print Leggings
03 Oct 20:59
Dani T. favorited Block Print Leggings
03 Oct 20:59
-
 Kajee favorited Block Print Leggings
17 Sep 10:32
Kajee favorited Block Print Leggings
17 Sep 10:32
-
 Momoka favorited Block Print Leggings
23 Aug 00:47
Momoka favorited Block Print Leggings
23 Aug 00:47
-
 Rachel B. added Block Print Leggings to DIY Stockings and Legwarmers
30 Apr 04:29
Rachel B. added Block Print Leggings to DIY Stockings and Legwarmers
30 Apr 04:29
-
 Kristi P. favorited Block Print Leggings
21 Mar 16:08
Kristi P. favorited Block Print Leggings
21 Mar 16:08
-
 Chudames favorited Block Print Leggings
21 Mar 00:45
Chudames favorited Block Print Leggings
21 Mar 00:45
-
 ale_corason favorited Block Print Leggings
16 Feb 07:40
ale_corason favorited Block Print Leggings
16 Feb 07:40
-
 Step 1
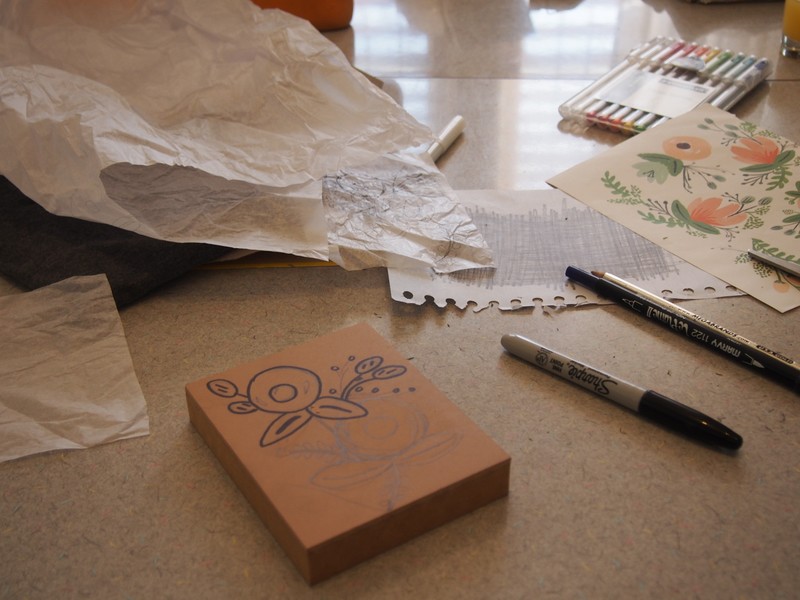
The first thing you need to do is get your materials together. I had everything from the speedball block printing kit, the leggings I wanted to print, some scrap cardboard, an inspiration image, pencils, and markers.
I decided that I wanted to make my block a bouquet of flowers and that I wanted to do something similar to the Rifle Paper Wildflower print. -
 Step 2
Here are the rest of the materials just so you can see everything that was used. For now though, all you need is the the block cutter (upper right corner), a block (I used the larger linoleum one, but the pink rubber block cuts quicker), and if you want, the black tray can be used to hold the block steady by hooking over the table edge.
-
 Step 3
The first step to making a block is to decide what you want on it. You can draw an image of your own or find something that you want to transfer. I wanted to use the design from my wrapping paper. The easiest way for me to transfer and image is by using carbon paper, but I couldn't find mine. You can also use a pencil to color in the back of your image, lay it on the block and then trace over it. As you can see from the picture, I tried the graphite transfer and some tracing paper, but I wasn't making progress with either. I decided just to draw directly on the linoleum block with a pencil. The pencil eraser works on the block and unless you press hard, it shouldn't dent the surface. So I did some practice drawing and flower arranging on scrap paper. When I had the image I wanted on the block, I used a marker to go over the lines I wanted for carving. You probably shouldn't use a black Sharpie; it might stain the first few prints if you use lighter ink. I would recommend a lighter color of marker, washable marker, or washing the Sharpie lines before printing.
-
 Step 4
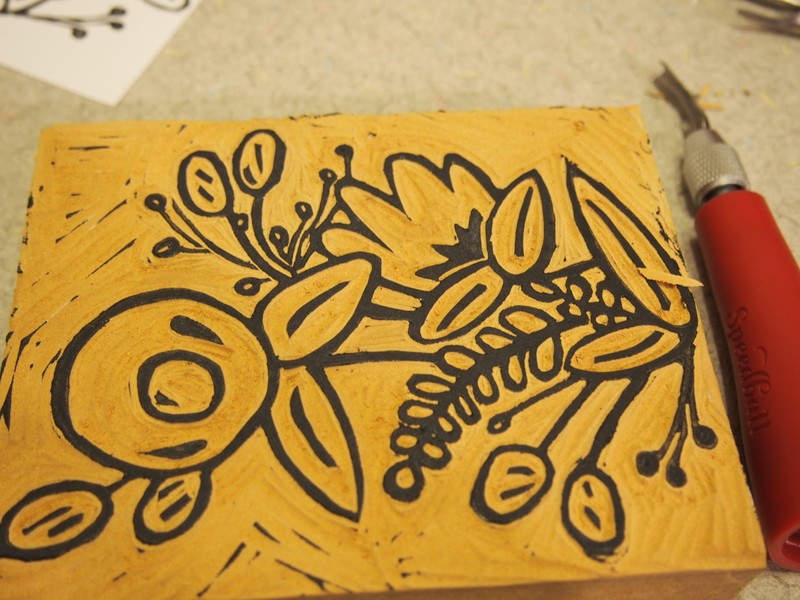
I finished drawing my block. You can see the pencil marks, but those aren't going to matter. Now it's time to carve! You can use the black tray to hold the block in place while you carve, but I just sat mine on the table and it didn't move around (using the tray is probably better though). The linoleum cutter comes with 4 blades stored in the handle. There are 3 v shapes and 1 u shape. Choose your blade and screw it into the handle. I decided to start with the smaller areas around my drawing. I mostly used the middle sized v gouge around my lines and for the really thin areas, I used the smaller V gouge.
-
 Step 5
I am very slow at this part. Carving the block took a while for me. Block carving time also depends on the design you choose; more detail = more time. I like to use controlled, flowing motions when I carve and it's easier to make multiple passes with the cutter than to try to remove too much material at once. When I finished removing material around the lines of my image, I switched to the larger gouges to go faster. The small v gouge would sometimes bind in the handle, but I used jewelry pliers to pull it free and everything was fine.
-
 Step 6
My block is finished! Once the block was done I did some test prints. You can use the paper that comes in the kit or anything you have laying around.
-
 Step 7
Choose your ink and squirt some on the metal tray. Run the roller through it and try to get it spread out and even on the roller. You are supposed to hear a crackle as you roll the ink on the tray if you have the right amount. Once the roller is covered, run it evenly across your block. I would do it a few times in various directions.
-
 Step 8
After I did my test print, I found some high spots on the block (those random bits of black ink). I used the gouge and removed the high spots so they wouldn't transfer over when I printed on fabric.
-
 Step 9
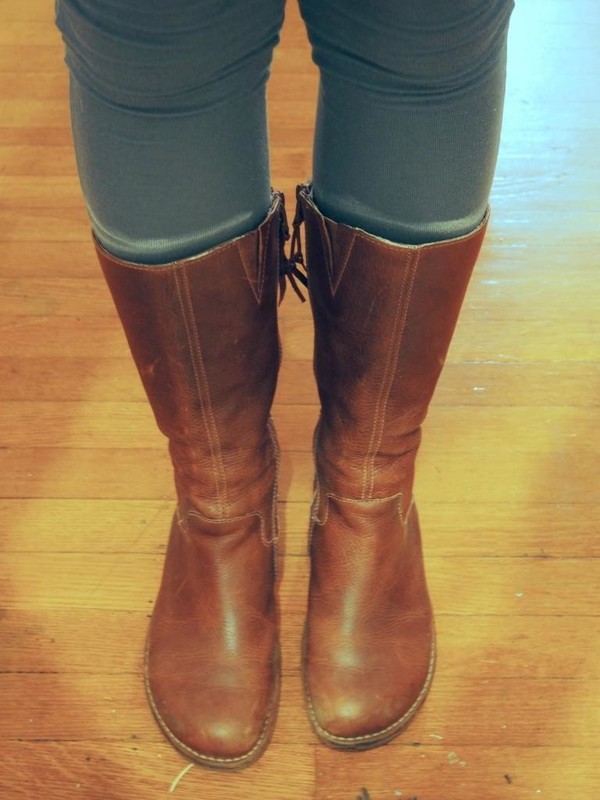
Put on your leggings and your boots. Use chalk or anything that will come out easily and mark the top of the boots on the fabric. This line is your guide for printing.
-
 Step 10
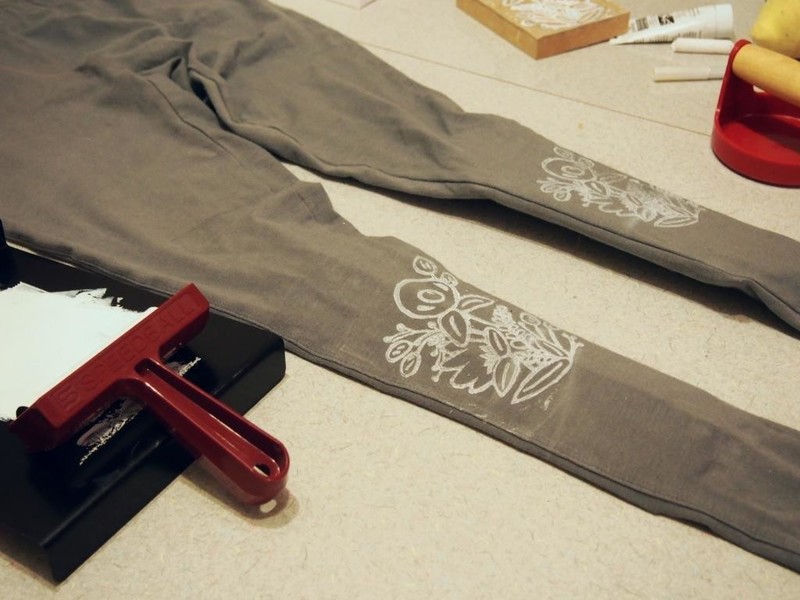
Alright, put your leggings on a flat surface. Slide some cardboard or newspaper in the leg and make sure it's behind the printing area so the ink doesn't bleed through. Now you should look at the placement of your block. The chalk line is the top of my boot and I wanted it to look like the flowers were coming out (so part of the image will be covered by the boot). I decided where I wanted the image to go and I used the chalk to mark the sides of the block to correspond with the chalk line from the boot. Ink your tray and roll your block.
-
 Step 11
Carefully place your inked block on your tights being sure to line the chalk marks (the red arrow is pointing to my mark). Use the baren to evenly apply pressure all over the block. I noticed that I was better at applying pressure to the edges of the block, but not always the middle. Be sure to move all over the block so the entire image transfers. Gently peel the block away. Now do the other leg.
-
 Step 12
Now you have printed tights. The directions say to let it dry over night, but mine took longer. I gave it 2 days and then I wiped away the chalk. These are also okay for washing, but the ink has to cure first. The instructions for that are included. Now you are free to be a walking boot bouquet.


 1
Home Accessories »
Diy Jewelry Box
1
Home Accessories »
Diy Jewelry Box

