


About
Tutorial: Beaded Fringe
Quite some time ago (isn’t it funny how quickly tech gadgets are outdated!?) I sent in these little cases for Quilting Arts Magazine for the “Glam-To-Go for Gadgets” article. They didn’t use the case I actually spent the most time making – no worries. It’s perfect for showing you one of my favorite techniques to play with – beaded fringes!
-
 Key West Witch favorited Beaded Fringe
21 Aug 05:04
Key West Witch favorited Beaded Fringe
21 Aug 05:04
-
 Mistress Nora of Madness favorited Beaded Fringe
09 May 23:24
Mistress Nora of Madness favorited Beaded Fringe
09 May 23:24
-
 Sal M. favorited Beaded Fringe
03 Feb 22:52
Sal M. favorited Beaded Fringe
03 Feb 22:52
-
Betty M. commented on Beaded Fringe
19 Jan 13:38
-
Betty M. favorited Beaded Fringe
19 Jan 13:37
-
 gloomy-smiles favorited Beaded Fringe
18 Jan 03:18
gloomy-smiles favorited Beaded Fringe
18 Jan 03:18
-
Wild A. favorited Beaded Fringe
17 Jan 21:35
-
 Crafterella featured Beaded Fringe
13 Jan 23:00
Crafterella featured Beaded Fringe
13 Jan 23:00
-
 Carla B. favorited Beaded Fringe
11 Jan 02:58
Carla B. favorited Beaded Fringe
11 Jan 02:58
-
 Lyric K. published her project Beaded Fringe
10 Jan 09:00
Lyric K. published her project Beaded Fringe
10 Jan 09:00
You Will Need
-
 Step 1
Make your knot. Thread your needle, bring it in through the case and out on the edge of the satin stitching. Leave the tail of the thread hanging out. Wrap the thread (not the tail end) three times around the tip of the needle, hold the wrap with your thumb and pull the needle through. You should have a secure knot now. I often make at least one more knot in close to the same place just to be extra secure.
-
 Step 2
Load your beads onto the needle. Add seed beads until your fringe is about as long as you wish it to be then add your bigger bead and one more seed bead. The seed bead on the end is your anchor. Slide all of the beads to the end of the thread.
-
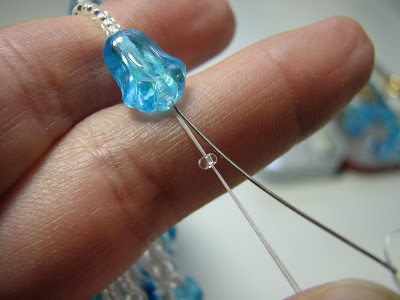
 Step 3
Anchor your fringe. This is the only tricky part – and it really isn’t hard. Slide that last seed bead away from the line of beads then send your needle right back through your whole line of beads. I find it easiest to do if I bend the line of beads over my finger, holding the thread taut. This lines up the beads in a row and holds the thread tight along the bottom of each hole. That way you have room to get the needle back up through the whole line.
-
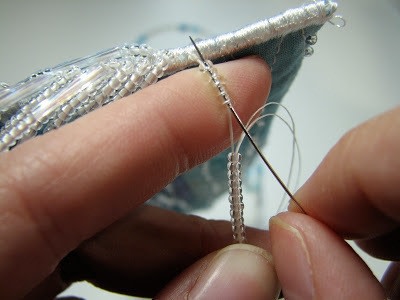
 Step 4
You might not be able to get the needle all the way through your line of beads in one shot. No worries. Just do it a bit at a time, holding that thread taught to it easier to slide the needle through.
-
 Step 5
Push your needle into the satin stitching, right under your fringe and come out where you want the next fringe to start. Continue adding fringe until you think you’re done. Notice here that my fringe isn’t the same – I like it funky. Sometimes my big bead is in the middle, sometimes there are more seed beads on the end than just one anchor. Mix it up and make it fun. (And yes, I am an artist and my cuticles and nails ALWAYS look that bad!)
-
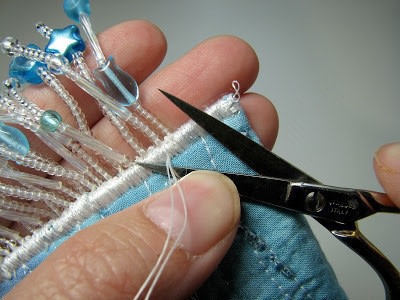
 Step 6
Make a knot right next to the last fringe in the same way you did at the beginning. In fact, make two knots. Come to think of it, make a knot and just keep going (not starting with a new thread each time) every three or four fringes just to be safe. I truly dislike the sound of a million tiny beads scattering across the floor as my child yanks on my fringes. At the end, after your last knot, send your needle up through the satin stitching and come out anywhere. Trim the tail off and you’re done.
Hope you enjoyed it! Go add some beady fringe to something! They make wonderful swishing noises as they move and swing around.


Great job.