![[ówt krì] - 7 Dots Studio . Free tutorial with pictures on how to make a mixed media in under 60 minutes by creating and papercrafting with watercolor, paper, and stencil. How To posted by Riikka Kovasin. in the Art section Difficulty: Simple. Cost: Cheap. Steps: 9](https://images.coplusk.net/project_images/204796/image/2018-05-14-142015-7dssept.jpg)
![[ówt krì] - 7 Dots Studio . Free tutorial with pictures on how to make a mixed media in under 60 minutes by creating and papercrafting with watercolor, paper, and stencil. How To posted by Riikka Kovasin. in the Art section Difficulty: Simple. Cost: Cheap. Steps: 9](https://images.coplusk.net/project_images/204797/image/2018-05-14-143845-7dsseptd1.jpg)
![[ówt krì] - 7 Dots Studio . Free tutorial with pictures on how to make a mixed media in under 60 minutes by creating and papercrafting with watercolor, paper, and stencil. How To posted by Riikka Kovasin. in the Art section Difficulty: Simple. Cost: Cheap. Steps: 9](https://images.coplusk.net/project_images/204798/image/2018-05-14-143853-7dsseptd2.jpg)

About
[ówt krì] - 7 Dots Studio
My husband is a musician and a recording artist. He works under several names but what I find the most intriguing is his first project under which he has given out two CDs to date. His style is dark ambient so his works might not be everybody’s cup of tea. To be honest, even I need a certain mind set to listen to a whole album, but what I admire is his drive and his passion. I have had the privilege to see him bloom, from an experimenting, hesitant young man he has grown into a performer keeping live shows and organizing events. And he continues to experiment and grow, both artistically and as a performer.
-
 Riikka Kovasin published her project 7 Dots Studio Layout
24 May 09:00
Riikka Kovasin published her project 7 Dots Studio Layout
24 May 09:00
You Will Need
-
 Step 1
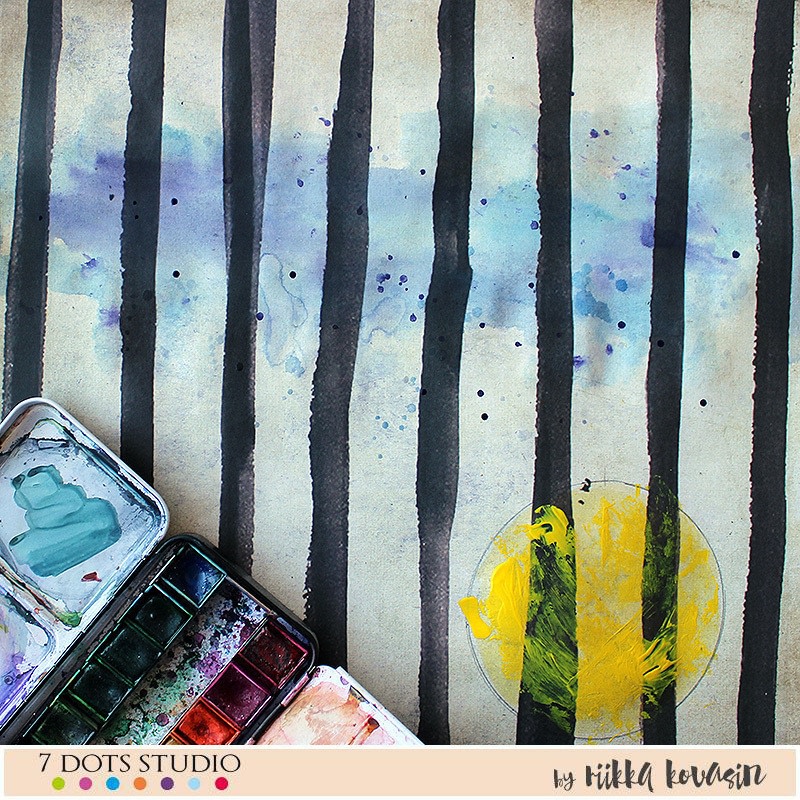
I started by creating the seed part using a pencil to draw the outline and then thick acrylic paint for the coloring. Instead of using a regular brush to apply the paint I used a silicone brush to give the shape some texture.
-
 Step 2
Then I added the blue segment on the top of the page using watercolors. First, I made the paper wet and then added the color on top to get a hazy, blurred effect. Then I dried the layer and after that added some splashes.
-
 Step 3
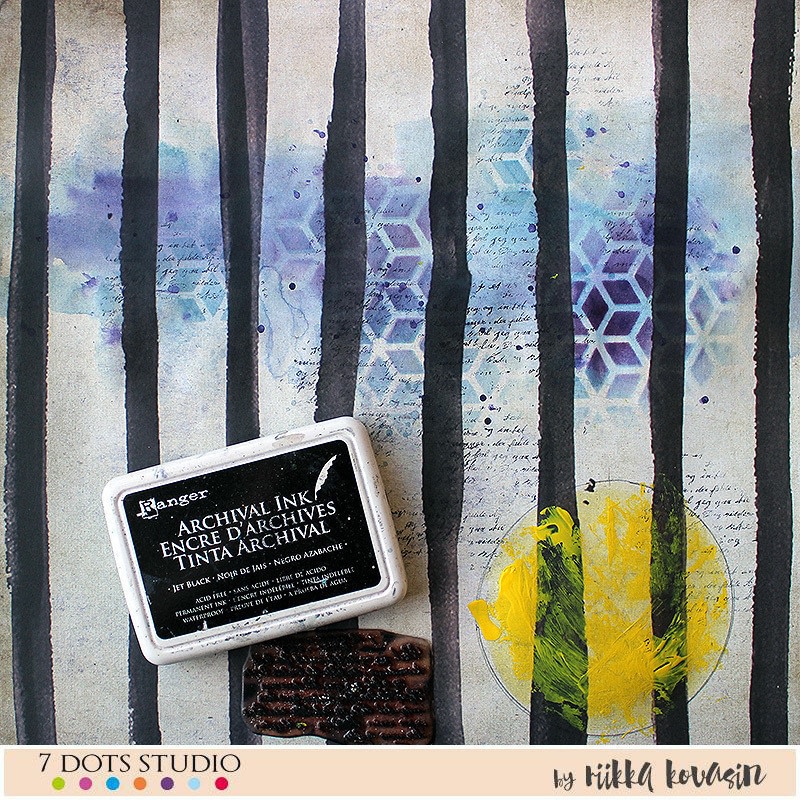
Next I added a hint of pattern to the blue part by using a stencil and two inks.
-
 Step 4
Then some stamping to tie the elements together. I used just one stamp and one ink this time and stamped across the blue area as well as the yellow one and the space in between.
-
 Step 5
My next task was to make the actual seedling you can also see in the cover of the CD. I die cut the leaves out of white cardstock and used the piece of cardstock as a stencil. I used both a white marker and embossing pen together with white powder to make the plant. I also added some white “splashes” by sprinkling white embossing powder to the paper and heating it from underneath.
-
 Step 6
I then adhered the die cut leaves or stems to the page and also added the thorns to the seed. I sketched the thorns using a golden pencil but also used a golden acrylic paint to make some of the thorns more visible. I also added some golden splashes using the paint.
-
 Step 7
Next was layering time! I cut some pieces of patterned paper and layered them behind the photo. I attached the layers together using a stapler. I mounted the photo on top of the cluster with foam dots and the whole thing to the page using the same dimensional things.
-
 Step 8
Embellishing time! To mimic the circular shape of the seed I added a lot of circle embellishments to the page, stickers, die cuts and a flair button. I also added a strip like sticker to the other side of the photo and a couple of text stickers as well.
-
 Step 9
The finishing touches to the page came with foam letter stickers, the journaling and a couple of additional golden pencil lines. I drew these to balance the composition out.
I hope you like the step by step and find it inspiring! Thank you for visiting today!