About
What could be better than silver leaf to represent a cold blooded animal.
For this 3rd papercut, I chose a pattern representing a crocodile seen in profile with its mouth open. This pattern is not too complicated to cut, to complicate a bit of this project, I chose to re-create a silver leaf background for more texture and reflection. It is different from classic papercut techniques but adds a lot to the end result.
-
 Arnaud P. published his project 3. Silver Croc
30 Jun 09:00
Arnaud P. published his project 3. Silver Croc
30 Jun 09:00
-
 Step 1
Draw your pattern right side up on tracing paper, it is important to trace it and cut it upside down.
-
 Step 2
Once your transferred pattern, if the drawing is not visible enough on black paper, feel free to draw it again with your pencil. Do not scoot your pattern on a stand.
-
 Step 3
You can start your cutting, nothing very complicated about this one compared to the previous one, however, take your time to make beautiful cuts. Remember to keep the "flying" parts below the neck and the top of the head.
-
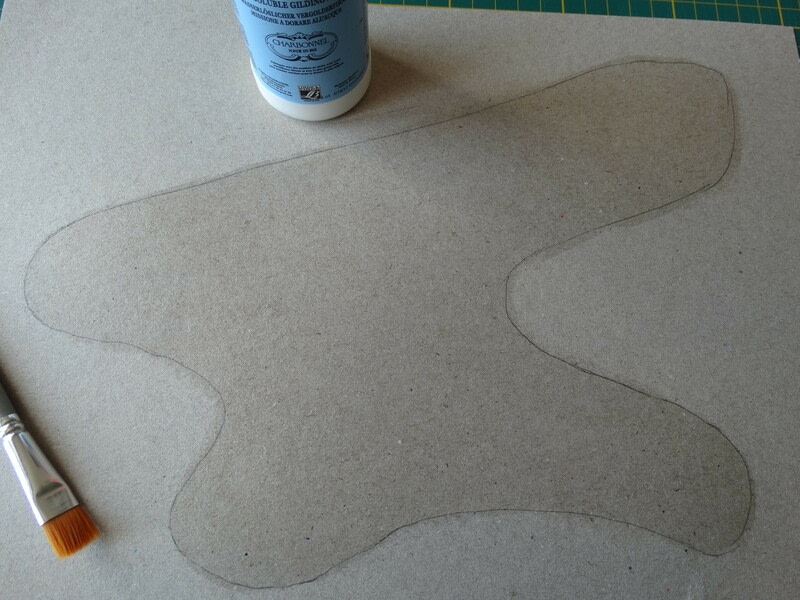
 Step 4
Your papercut totally cut out, you will be able to prepare the silver leaf background. Using your drawing on tracing paper, simply draw a shape in which the whole pattern fits with a little margin, this will be your application's area of the Silver leaf. Redraw this shape on your cardboard sheet.
-
 Step 5
Apply the glue for gilding with a brush and follow the instructions for use on the pot. After 30min, your glue is ready to receive the Silver leaf.
-
 Step 6
Cut your silver leaf with a smooth knife and apply it with a large brush. With a small hard-headed brush, gently press the silver leaf so that it adheres all over the support.
-
 Step 7
Clean the excess silver leaf until you have only the leaf stuck.
-
 Step 8
Positioned your pattern on your silver background and glue the ends together so that the whole be united. You just have to glue the "flying" parts of the neck and from the head to their exact locations, for that use tracing paper.
-
 Step 9
Your papercut now finished, you will need to frame it to protect it from the wear and tear of time.