1950’s Button Up Skirt
Extract from Sew Over It Vintage • By Lisa Comfort • Published by Ebury Press

About
Sew Over It Vintage
This skirt is based on the classic full-circle skirts of the 1950s – designed to give you the nipped-in waist that was first introduced by Dior’s New Look. The skirt can be made out of light- or medium-weight woven fabrics such as cotton and wool.
Measurements required
1. Tie a ribbon around your waist so it settles in the right place. Measure around your waist at this point.
2. From the ribbon, measure the length you would like the skirt to be.
See page 13 for guidance on measuring.
LEVEL: intermediate
-
 Luna D. favorited 1950’s Button Up Skirt
24 Apr 17:02
Luna D. favorited 1950’s Button Up Skirt
24 Apr 17:02
-
 Sam T. favorited 1950’s Button Up Skirt
14 Aug 10:09
Sam T. favorited 1950’s Button Up Skirt
14 Aug 10:09
-
Daina S. favorited 1950’s Button Up Skirt
26 Oct 20:06
-
Sidney S. favorited 1950’s Button Up Skirt
03 Sep 22:30
-
 Tracy J. added 1950’s Button Up Skirt to Dress / Skirt
27 Apr 16:20
Tracy J. added 1950’s Button Up Skirt to Dress / Skirt
27 Apr 16:20
-
 Biblionic added 1950’s Button Up Skirt to To-make list
02 Nov 18:18
Biblionic added 1950’s Button Up Skirt to To-make list
02 Nov 18:18
-
Biblionic favorited 1950’s Button Up Skirt
02 Nov 18:18
-
 Kyara S. favorited 1950’s Button Up Skirt
04 Oct 10:40
Kyara S. favorited 1950’s Button Up Skirt
04 Oct 10:40
-
 Miss Captain Cosplay added 1950’s Button Up Skirt to Hedy Lamarr (In Progress)
20 Sep 05:04
Miss Captain Cosplay added 1950’s Button Up Skirt to Hedy Lamarr (In Progress)
20 Sep 05:04
-
 Clairvoyant favorited 1950’s Button Up Skirt
10 Jun 08:30
Clairvoyant favorited 1950’s Button Up Skirt
10 Jun 08:30
You Will Need
-
 Step 1
Drafting the pattern
BACK Skirt
1. Take measurement ¶ and divide by π (Pi 3.14) and then divide by 2. This gives you the radius of your waist.
2. Draw a right angle on a large piece of paper. Label the corner A.
3. From A, measure across the horizontal line using your radius measurement in step 1 and label this B. Do the same on the vertical line, labelling it C.
4. At regular intervals, in the space in between B and C, mark this measurement, creating a smooth curve. Join these points in a curved line. Label this ‘WAIST’.
5. Then from points B and C, extend the line so that it measures the length of the skirt ·, creating points D and E.
6. From waist BC, measure at regular intervals between D and E, using measurement ·, creating a smooth curve, as done in step 4. Label ‘HEM’.
7. Add 1.5 cm (5⁄8 in) to line CE and label this ‘CENTRE BACK’. -
Step 2
FRont Skirt
8. Trace off around B, C, D and E on a new piece of paper, excluding the seam allowance and extension at line CE. Label line CE ‘CENTRE FRONT’.
9. Add 8 cm (3¼ in) to line CE. Extend the waist and hemlines in a straight line to meet this new line. This creates your button overlap.
10. Measure out from C, 2 cm (1 in) and mark with a notch F.
To finish
On both front and back skirts.
11. Add a 1.5 cm (5⁄8 in) seam allowance to BD. Label this edge ‘SIDE SEAM’.
12. Add a 1 cm (½ in) seam allowance to the hem.
13. Add a 1.5 cm (5⁄8 in) seam allowance to the waist.
14. Label the pattern ‘FRONT AND BACK SKIRT, CUT TWO PAIRS’.
15. The grainline should be parallel to the centre front and back. -
Step 3
Waistband
16. Taking measurement ¶ add 7 cm (2¾ in) and draw a horizontal line that length. Then square down 12 cm (4¾ in) at either end and join with parallel lines, creating a waistband strip.
17. Put a notch at 1.5 cm (5⁄8 in) from both ends.
18. The grainline can be parallel to the shorter or longer ends but remember to consider directional printed fabric.
Cutting out
19. Front skirt – cut one pair.
20. Back skirt – cut one pair.
21. Waistband – cut one in fabric and one in interfacing.
22. Cut two extra strips of interfacing 6 cm (2½ in) wide as long as the skirt length. -
 Step 4
Making
The seam allowance is 1.5 cm (5⁄8 in)
Interfacing
23. Interface the waistband.
24. Iron the strip of interfacing to the centre front edges of the skirt.
Joining the skirt pieces
25. Keeping the back pieces right sides together, pin along the centre back edge and stitch together. Overlock or zigzag the seams together. Press the seams to one side.
26. Lay the back right side up on the table and then place the front pieces right sides down on top, aligning the side seams. Pin and stitch together. Overlock or zigzag the seams together. Press the seams towards the back.
27. Overlock or zigzag the centre front edges separately. Fold over 6 cm (2½ in) on both centre front edges, wrong sides together, using notch F as a guide. This will be in line with the edge of the interfacing and press flat. -
 Step 5
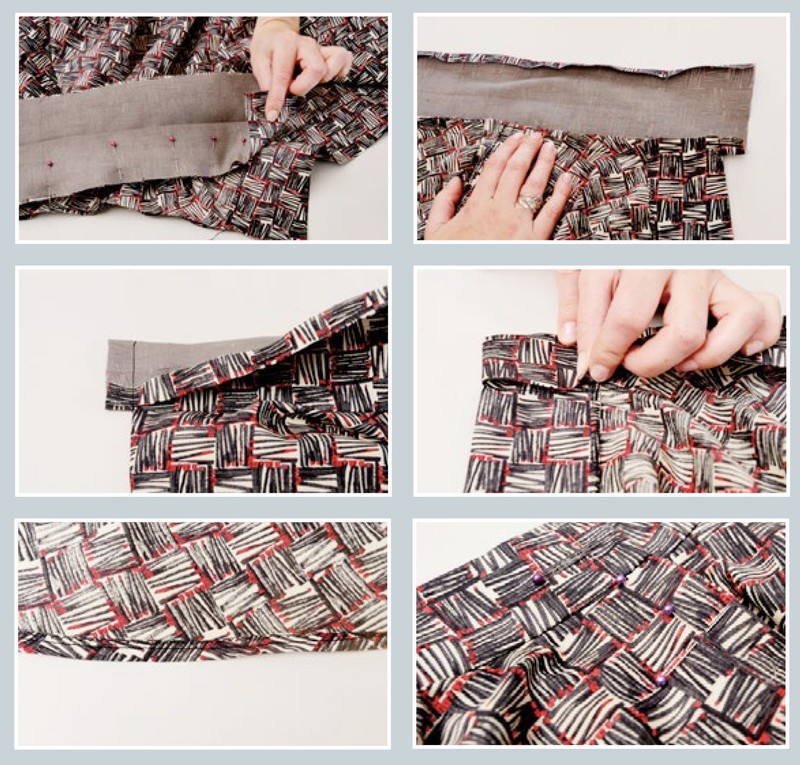
Attaching the waistband
28. Fold the waistband in half and at the fold make a notch to mark the centre back.
29. Then fold the centre back notch to the ends of the waistband to find the side seams – mark with further notches.
30. Fold the waistband in half along the length wrong sides together and press the fold flat.
31. Pin the notched edge of the waistband to the skirt, right sides together, aligning the seams on the skirt to the notches. The front edges of the skirt should match with the 1.5 cm (5⁄8 in) notches at the end of the waistband. Stitch in place and press the seam up towards the waistband.
32. Fold over 1 cm (½ in) of the unstitched edge and press flat.
33. To finish the ends, fold the waistband right sides together, aligning the folded edges of the unstitched waistband edge with the waist seam. Stitch closed with a 1.5 cm (5⁄8 in) seam allowance.
34. Trim down to 5 mm (¼ in) and clip the corner and turn through. Press flat.
35. To finish the waistband, fold over the unstitched, folded edge – it should sit 5 mm (¼ in) over the seam line (waistband and skirt seam). Pin in place from the inside and then take the pins out, one at a time, and put them on the outside of the waistband (as you will be sewing from this side).
36. From the right side of the skirt, sink stitch, catching the waistband on the inside of the skirt. -
Step 6
Hem
37. Overlock or zigzag the hem all the way round. Press up by 1 cm (½ in) and edgestitch in place. -
Step 7
Buttonholes
38. The waistband is secured by a button. Stitch the buttonhole horizontally, starting 2 cm (¾ in) from the end of the waistband.
39. The other buttonholes are stitched vertically, 2 cm (¾ in) from the folded edge. I have spaced mine 7 cm (2¾ in) apart. Mark the position with tailor’s chalk.
40. Once you have stitched your buttonholes, pin the front edges together creating a 4 cm (1½ in) overlap and mark where the buttons should go. Sew on your buttons. I used covered buttons in a matching fabric.
41. Give the skirt a final press.