


About
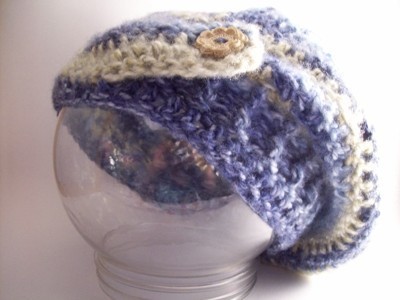
Funky, Fun Beret
This has been on my list of things to make for awhile and I finally sat down a made one. I made the pattern up as I went but I think it turned out amazing. This is my first beret and my fourth crocheted hat. I had no idea how to do ribbing before going into this project, but quickly learned following how tos online. The button tab just kind of happened following an idea that I thought could possibly work and well it did...It is definately slouchy and comfortable. The stitches I used were dc, fpdc, & bpdc (both of which I had no idea of until today) for the ribbing.
I was thinking of adding a brim which I might do with the second one I make. I am addicted
Would love to hear your opinions....
I will try to answer any questions you may have with the pattern. I still have a lot to learn when it comes to writing up a crochet pattern. I will be working on another one so I will have pictures of how to do the band and tab. I used Acrylic brushed yarn with a K hook. I am unsure of the gauge as I kind of winged it.
-
Step 1
Chain 5 Join to form ring
-
Step 2
Rnd. 1 Ch 3, Dc 12 in ring
Rnd. 2 Ch 3, 2 Dc in each Dc of the previous round (24) Join(sl st to beginning ch)
Rnd. 3 Ch 3, *2 Dc in next stitch, Dc next. Repeat from * to beginning (36). Join
Rnd. 4 Ch 3, Dc next, 2 Dc in next stitch *Dc next 2 stitches, 2 Dc in next stitch (48). Repeat from * to beginning. Join
-
Step 3
Rnd. 5 Ch 3, Dc next 2 stitches, 2 Dc in next *Dc next 3, 2 Dc. Repeat from * to beginning. Join
Rnd. 6 Ch 3, Dc next 3 stitches, 2 Dc in next *Dc next 4, 2 Dc. Repeat from * to beginning. Join
Rnd. 7 Ch 3, Dc next 4 stitches, 2 Dc in next *Dc next 5, 2 Dc. Repeat from * to beginning. Join
Rnd. 8-9 Ch 3, Dc in each stitch. Join to form round.
-
Step 4
Rnd. 10 Ch 3, Dc next stitch, skip next *Dc next 4 stitches, skip next one. Repeat from * to beginning. Join
Rnd. 11 Ch 3, Dc in each Dc from previous round. Join
Rnd. 12 Ch 3, Dc in each Dc from previous round. Join
Rnd. 13 Ch 3, Dc next stitch, Skip next *Dc next 3, Skip next. Repeat from * to beginning. Join
Rnd. 14 Ch 3, Dc in each Dc from Previous round. Join
-
Step 5
Rnd. 15 Ch 12, turn
Rnd. 16 Dc in each chain (11)after you are back to the beginning of chain….Dc next stitch, fpdc next *bpdc in next, fpdc next. Repeat from * until you get to the last stitch in which you will Dc
Note: you will go all the way around and end where you started the chain. (Not crocheting the chain)Rnd. 17 Ch 2 turn. Dc next, bpdc (back post double crochet) next *fpdc next, bpdc next. Repeat from * until you get to the last 11 in which you will Dc each.
Rnd. 18 Ch 2 turn. Dc next 11. Dc next, fpdc next *bpdc next stitch, fpdc next stitch Repeat * until there is one stitch left, Dc last
Rnd. 19 Dc all the way around, catching the beginning to the tab. Fasten off.
Attach a button to the tab, sewing it to the hat as well.
-
Step 6
Brim and pictures coming soon coming soon....
Comments


