


About
Create this bold statement necklace using ribbons
I love this statement necklace. It was so much fun to make and looks awesome! Hope you like the project!
-
 crochetmommie added Ribbon Coil Necklace to Jewelry Tutorials
07 Oct 10:34
crochetmommie added Ribbon Coil Necklace to Jewelry Tutorials
07 Oct 10:34
-
 Mignon D. favorited Ribbon Coil Necklace
20 Jan 21:44
Mignon D. favorited Ribbon Coil Necklace
20 Jan 21:44
-
 Jacqulene C. favorited Ribbon Coil Necklace
12 Dec 20:42
Jacqulene C. favorited Ribbon Coil Necklace
12 Dec 20:42
-
raleigh b. added Ribbon Coil Necklace to crafts
03 Dec 02:29
-
Marilyn K. favorited Ribbon Coil Necklace
28 Nov 21:20
-
 Romana S. favorited Ribbon Coil Necklace
21 Nov 13:20
Romana S. favorited Ribbon Coil Necklace
21 Nov 13:20
-
 Step 1
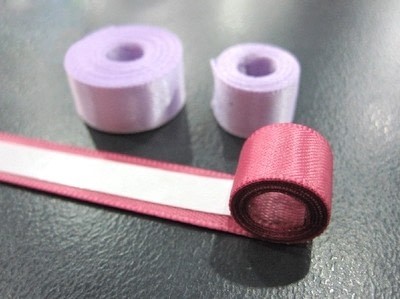
Cut your ribbons into length of 1m, 75cm, 50cm or 25cm.
Stick a piece of double sided tape to one side of the ribbon. Try to get the tape to line up with the point where first coil starts. If you put tape where there will be no ribbon to join to it it will just stick the ribbon to the pencil. Use a pencil to wrap the ribbon around. This will maintain a universal hole size for each of the coils. Of course there are no rules so if you want them to have different size holes use different size objects. :) -
 Step 2
Take the paper off the strip of double sided tape and start rolling.
Keep the ribbon as straight as you can. This will give you the best possible result in the end. -
 Step 3
Once you have enough layers of ribbon stuck together remove the ribbon from the pencil. This will make sure the ribbon is not stuck to the pencil (learned that one the hard way...) Also if the pencil, like mine, has flat sides taking the coil off and rolling it by hand will smooth out any flat edges caused by the sides of the pencil.
Tip: Use small amounts of tape at a time. If you make to much of the ribbon sticky all at once it can get pretty hard to control.
-
 Step 4
Start alternating colours. Follow the same steps for all of the coils you make. Work out roughly how big you want your piece to be and just keep making coils until you have enough. :)
Tip: When you get to the end of the ribbon for one coil put the tape on the ribbon and then cut of the end. This will prevent the end of the ribbon from fraying. But we have another trick for that later on too...
-
 Step 5
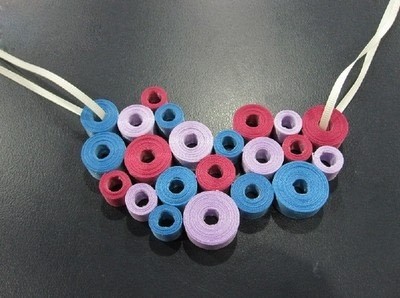
Arrange the coils onto your protective plastic. Now is your chance to move them around and work out how you want them all to fit together. There are no rules! What ever you think looks good is how they should be arranged. :)
-
 Step 6
Glue time! UHU all purpose is amazing! It doesn't soak into the ribbon which means it doesn't leave any yucky water-marky looking bits which a lot of other glues do.
To stick the coils together put the first bit of glue on the end of the ribbon. This will stop the ends from coming loose if your tape decides not to hold. Then work out where that coil is being placed in the formation and put glue at any point where the piece will be joining to the others. -
 Step 7
Once the coils are all stuck together and the glue has dried simply thread ribbon through the two furthest points of the piece. This will now form the necklace. Alternatively you could use other threads or chain. I wanted to keep the ribbon theme going to I went for a thin cream grossgrain ribbon.
FINISHED!


 1
Origami Clothes »
Money Origami Hat
1
Origami Clothes »
Money Origami Hat
 2
Envelopes »
Green Collage Envelope
2
Envelopes »
Green Collage Envelope
 3
Digital Artwork »
How To Turn A Picture Into A Line Drawing In Photoshop
3
Digital Artwork »
How To Turn A Picture Into A Line Drawing In Photoshop
 4
Pumpkins »
Pumpkin Plushie
4
Pumpkins »
Pumpkin Plushie
 5
Envelopes »
Blue Collage Envelope
5
Envelopes »
Blue Collage Envelope
