


About
Pedigree Dogs in Needlefelt
This little pug’s body is made using the same H-frame as the labrador retriever, but here the legs are outstretched in an appealing resting pose typical of the breed.
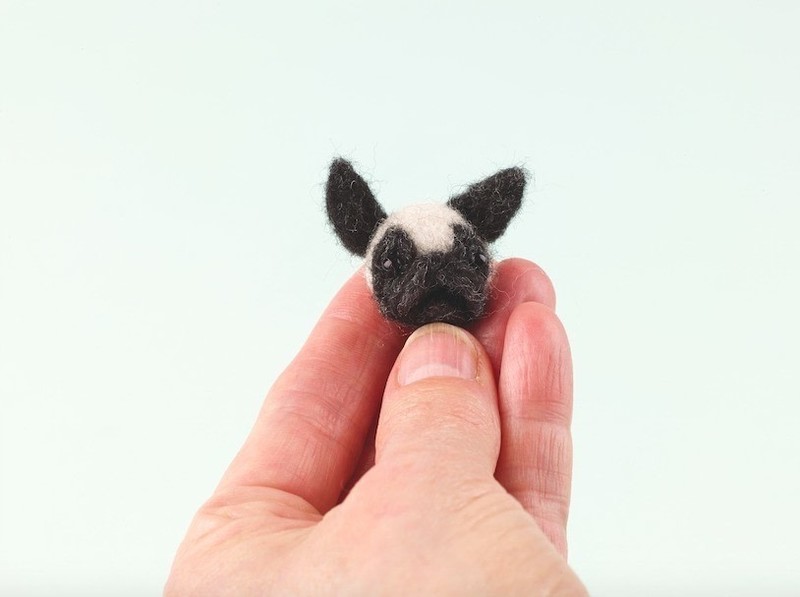
Using the correct technique it is possible to needle detailed pads on even the tiniest feet. The typical pug forehead is a challenge for even the most experienced needle felter, but with the aid of a reverse felting needle, softly wrinkled skin is more easily achievable.
Size
10cm (4in) long, 4.5cm (1¾in) high
Difficulty level
Expert
Tags
Downloads
- 107854_2F2015-03-16-155008-Pug.ai 1.05 MB [ Download ]
-
 Lotusburger favorited Pug
11 Jan 13:10
Lotusburger favorited Pug
11 Jan 13:10
-
 Karen W. favorited Pug
04 Dec 17:20
Karen W. favorited Pug
04 Dec 17:20
-
 Luke Stephens favorited Pug
02 May 04:11
Luke Stephens favorited Pug
02 May 04:11
-
 Ikon K. favorited Pug
05 Oct 10:28
Ikon K. favorited Pug
05 Oct 10:28
-
 Matthew Lorenz favorited Pug
04 Aug 07:54
Matthew Lorenz favorited Pug
04 Aug 07:54
-
 Elena B. added Pug to dog plushies
27 Dec 20:53
Elena B. added Pug to dog plushies
27 Dec 20:53
-
Elena B. favorited Pug
27 Dec 20:52
-
 Bette C. favorited Pug
12 Nov 01:09
Bette C. favorited Pug
12 Nov 01:09
-
Brenda A. favorited Pug
26 Jun 07:43
-
 Carl G. favorited Pug
06 Sep 06:50
Carl G. favorited Pug
06 Sep 06:50
You Will Need
-
 Step 1
Making an H-frame
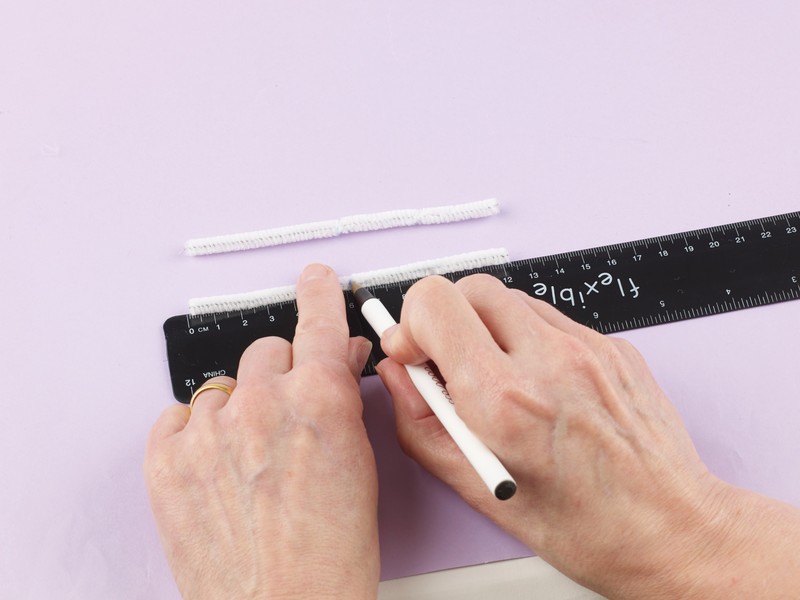
An H-frame can be used to make a flexible armature for your dog, which will allow you to pose him or her as you wish. If a dog has slender legs, to avoid pipe cleaner fluff poking through the thin layer of wool, trim the fluff from the wires.Cut two 12cm (4¾in) lengths of pipe cleaner and use a pen to make a mark halfway along each.
-
 Step 2
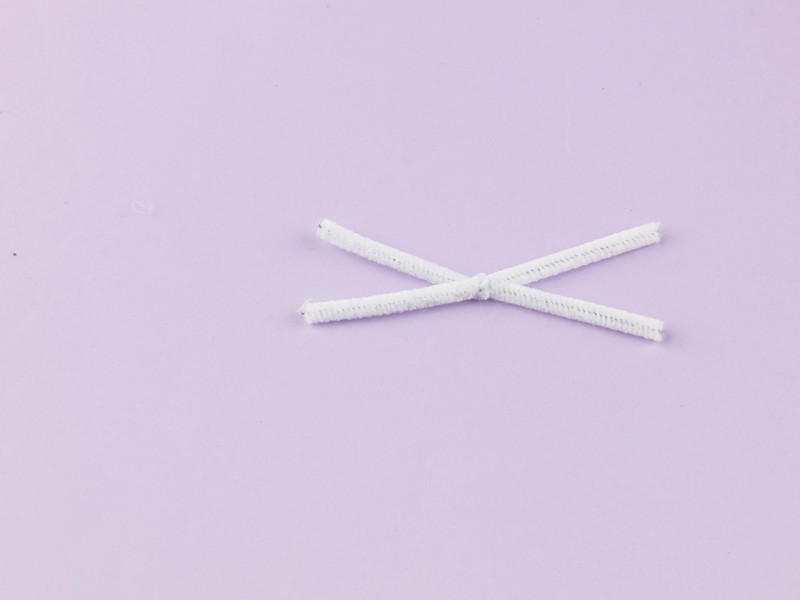
Lay the lengths across each other and twist them together at the mark.
-
 Step 3
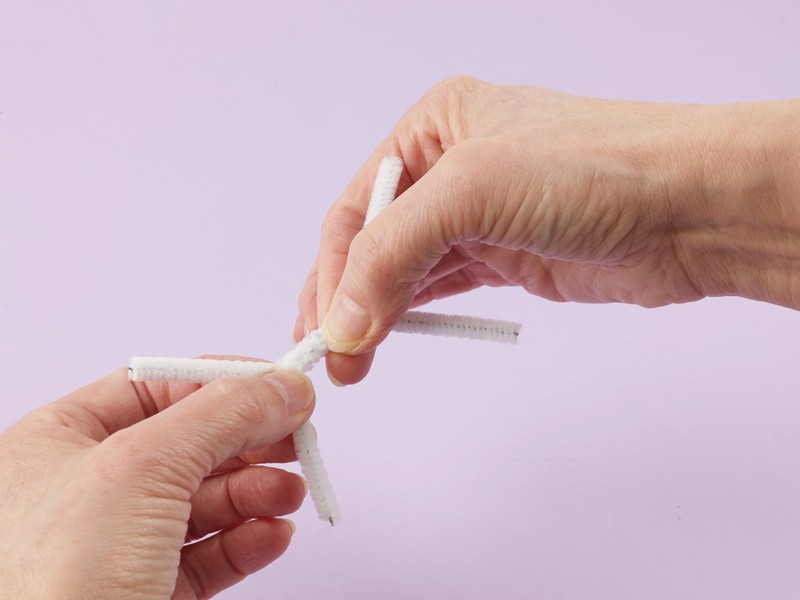
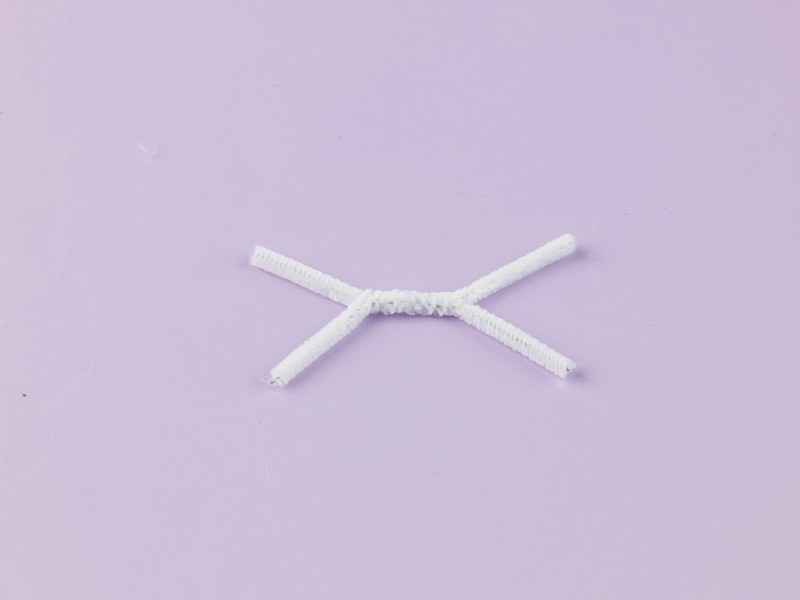
Make three small tight twists to the right of the centre, and four on the left side.
-
 Step 4
Bend the ends up to form right angles as shown. These will be your dog’s legs. The shorter ones are the front legs, and the longer ones the rear legs.
-
 Step 5
Lay the H-frame over the template (see below) and use the pen to mark the feet. Bend the wires over using pliers, then check the size. Trim if necessary, using heavy scissors or wire cutters.
-
 Step 6
Use the pliers to flatten the wires against the legs. This prevents the sharp ends poking out of your finished dog.
-
 Step 7
An example h-frame template
Once you have made your H-frame, lay it over the project template to check the size is correct.
When you bend the wires over, the fluff on the pipe cleaner can make the leg look longer than it is. Ignore the fluff, and measure only the wire core. -
 Step 8
Templates for the Pug
All templates are shown at actual size when printed, or when viewed at full size on a computer. Dotted lines indicate the edge of shapes where loose wool (wavy lines) gradually becomes a part of the overall shape. -
 Step 9
Basic body shape templates
These templates show the basic shapes of the body. Compare the pieces you make with these to ensure the sizes are correct.Rear legs positioning (from above)
Use the carders to mix together two measures of vanilla merino with two measures of white Southdown wool to make four whole measures of a light vanilla mix. This allows for a little extra.
-
 Step 10
Make an H-frame (see above) using the chenille sticks and the template, then needle felt a 1⁄16 measure of light vanilla wool into a disc using the fine felting needle. Keep the outside rough and fluffy, and the inside tighter.
-
 Step 11
Make four discs in total, and use the standard needle to felt a disc on to each foot of the H-frame, using the thicker centres as the base of the foot in each case.
-
 Step 12
Working one at a time, wrap an 1⁄8 measure of light vanilla wool around each leg and use the fine needle to needle felt it in place. Once all the legs are wrapped and felted, wrap and needle felt one complete measure of light vanilla wool around the body.
-
 Step 13
Use the standard felting needle to start to make a ball from one measure of light vanilla wool. Change to the fine felting needle once it holds together, and make sure it is very densely felted.
-
 Step 14
Attach and secure a pair of 4mm beads to the ball as eyes. Because the head is so firm, you will likely not need to fill the back of the head as it will not distort. Cover the thread on the back of the head by scratching the wool around over it.
-
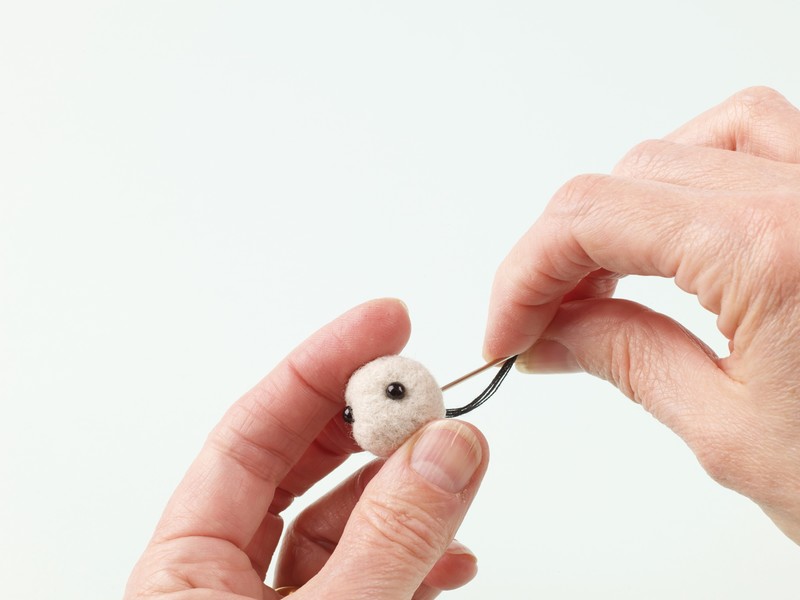
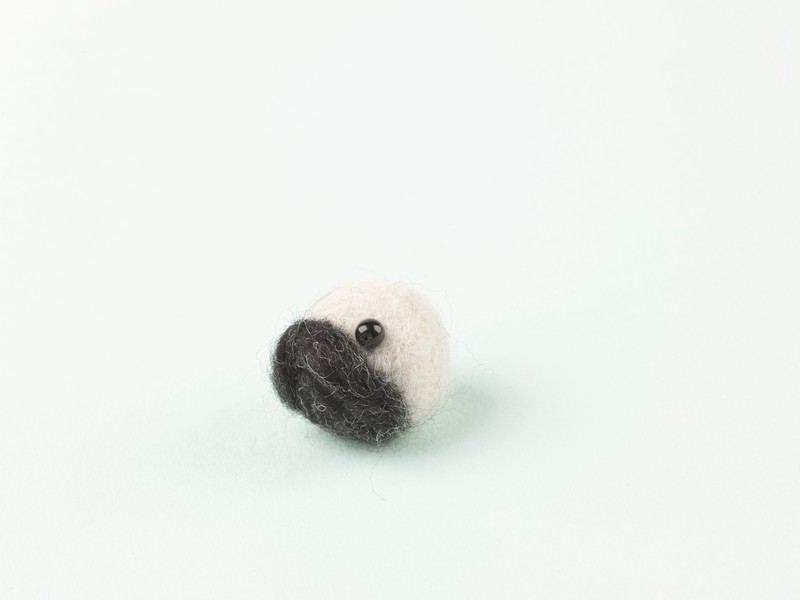
 Step 15
Use the standard felting needle to attach an 1⁄8 measure of charcoal mix to the front of the face as a muzzle. Use the fine felting needle to felt it onto the front of the head and shape it.
-
 Step 16
Pull and pile an 1⁄8 measure of charcoal mix wool into a 6cm (23⁄8in) length. Twist the wool in the middle and attach the centre where the nose will be placed with the standard felting needle. It will look a little like a moustache.
-
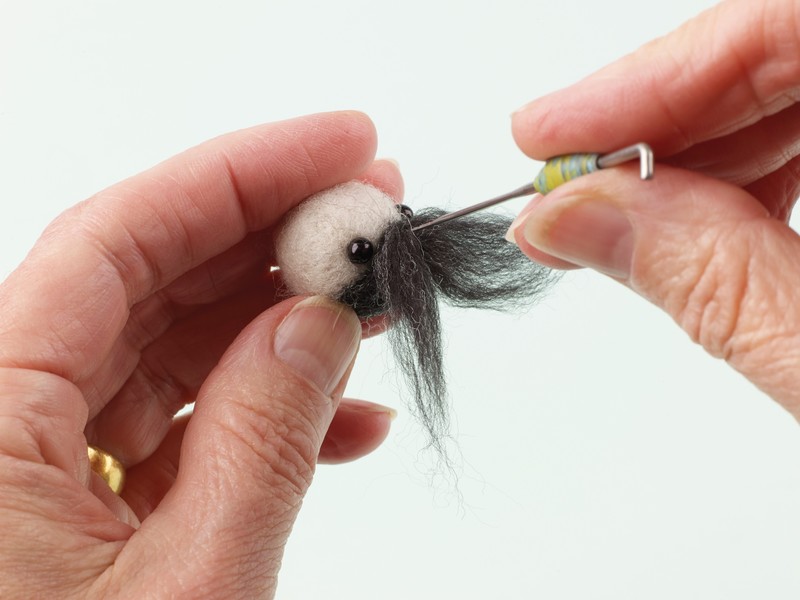
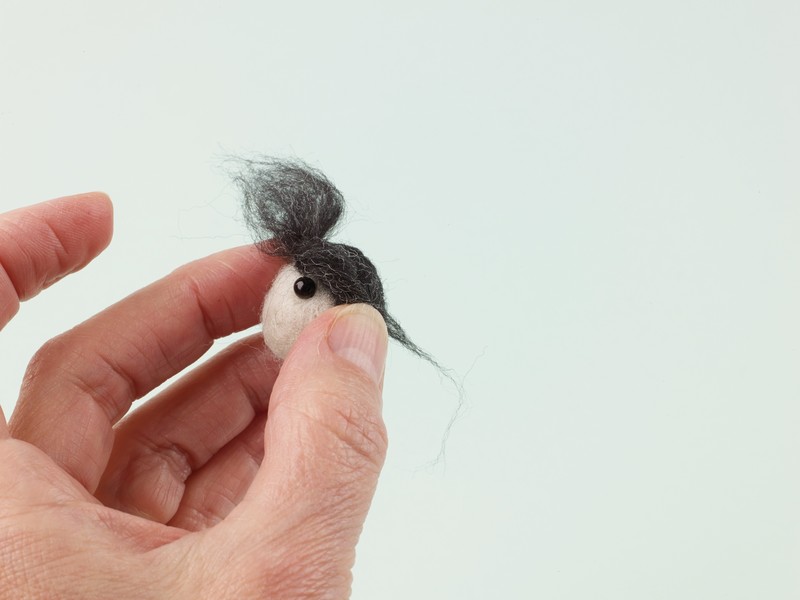
 Step 17
Twist one end of the ‘moustache’ and draw it down the side of the muzzle so that it forms a bulge that runs down the side of the muzzle.
-
 Step 18
Holding the moustache bulge in place, use the fine felting needle to build the swell into one side of the upper jaw. Make sure that you stay within the line of the muzzle; do not take the wool over onto the rest of the head.
-
 Step 19
Repeat on the other side, felting into the crease from underneath to strengthen it.
-
 Step 20
Add dark patches around the eyes, using the fine felting needle and a 1⁄32 measure of the charcoal mix wool for each patch. Each patch should slant over the eye and join the muzzle, as shown.
-
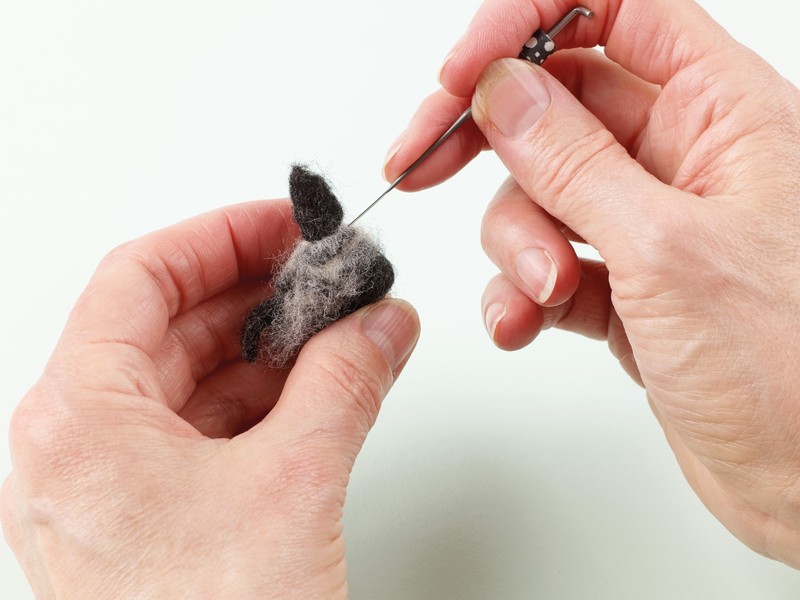
 Step 21
Referring to the template for size, make two ears from the charcoal mix. You will need approximately a 1⁄16 measure of wool for each ear. Shape the front and back edges, and leave the other loose.
-
 Step 22
Use the standard felting needle to implant the loose edge onto the side of the head, then attach the second ear on the other side (see inset).
-
 Step 23
The ears are not shaped yet; we are using them to help guide us for the shaping we are about to add.
-
 Step 24
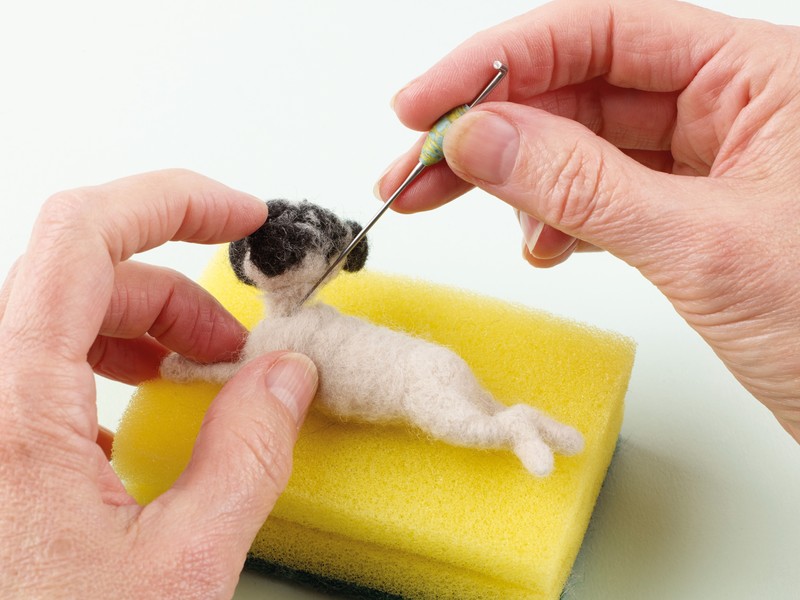
Using a 1⁄32 measure of the charcoal wool mix and the fine felting needle, add a central stripe running upwards between the eyes from the muzzle. Needle this firmly and from the sides to form a solid, slightly ridged, shape. Using more 1⁄32 measures, add two more curved stripes running from near where the central stripe ends, round the ears, and down the sides of the face.
-
 Step 25
Use the reverse felting needle to work over the stripes to mix the wool and draw it out (see inset), then do the same around the edges of the eye patches.
-
 Step 26
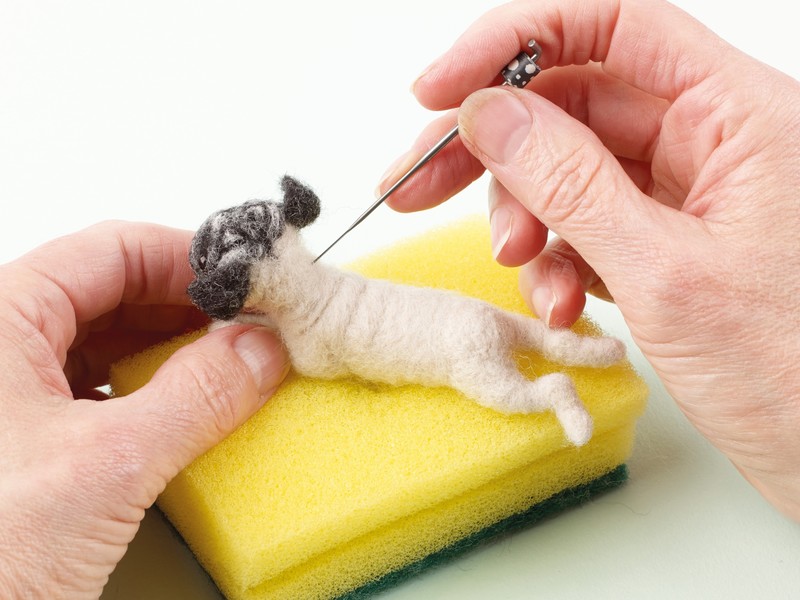
Working stripe by stripe, fold the loose wool back over the head stripes and use the fine felting needle to work it back in. This draws the loose wool back into the head over the stripe, blending it in and reinforcing the ridge. This is the beginning of the distinctive wrinkles of the pug.
-
 Step 27
When you come to the eyes, fold the loose wool away from the edge of the black patch and felt it back in close to the original edge. This creates a small wrinkle around each eye.
-
 Step 28
Begin to produce a crease that runs right along where the muzzle meets the rest of the head. Pull out a stripe that runs all the way from the points where the furthest parts of the eyepatches meet the muzzle on either side.
-
 Step 29
Work deep with the standard reverse felting needle to draw out light fur from the area (see inset), then use the fine felting needle to loop the drawn-out fur back in, creating a white ridge across the muzzle. Work it back in from all directions to create the distinctive shape.
-
 Step 30
Use small amounts of loose black wool to add fine stripes that run alongside the main stripes, highlighting them and further emphasising the wrinkles. Needle the fibres in with the fine felting needle. You will need approximately a 1⁄32 measure of black wool in total.
-
 Step 31
The black stripes surround two triangular areas on the head. Add a tiny spot of black in these using a little loose black wool and the fine felting needle (see inset).
-
 Step 32
Felt these in deeply. Next, use the standard reverse felting needle and draw out the colours from deep within the ball to make these triangles stand out more.
-
 Step 33
Using the fine felting needle and tiny loose touches of the light vanilla wool mix, add highlights across the lighter areas of the head and face. Less is more.
-
 Step 34
Keep these highlights on the highest parts of the ridges, not down in the wrinkles.
-
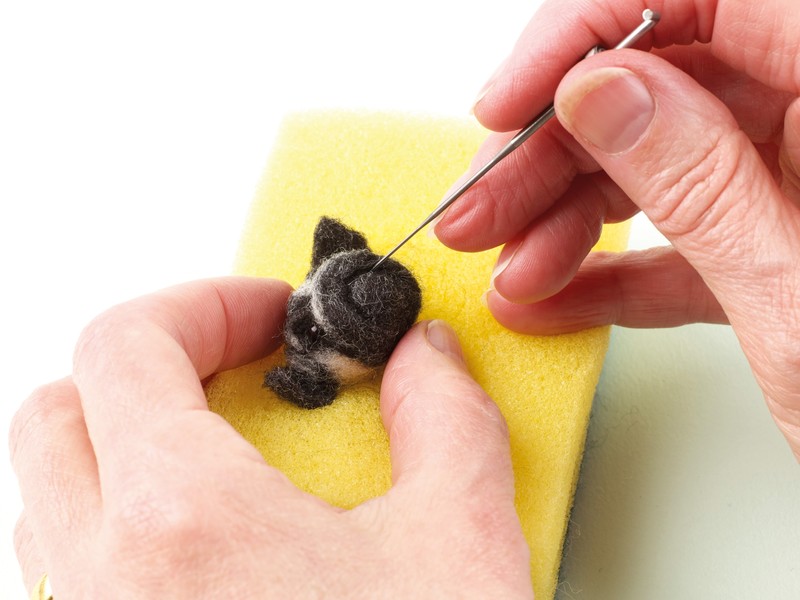
 Step 35
Add a pure white flash above where the nose will sit using the fine felting needle and a tiny touch of pure white Southdown wool; then add two small dots of pure black merino wool in the upper inner corners of each eye patch as shown.
-
 Step 36
Make a thread from a tiny amount of black merino and felt it into place as the mouth using the fine felting needle. Work the wool into and under the mouth crease you made in steps 10 and 11. Accentuate the line by repeatedly jabbing the needle in along the bottom of the line.
-
 Step 37
Shape the ears by working the standard felting needle deep into the point where it joins the head. The ears will gradually curl over into a cupped shape. Use the fine felting needle to work any loose wool that emerges back into the ear. Put the head to one side for the moment.
-
 Step 38
Take the H-frame and bend the front and back legs down. Using the fine needle, add a ¼ measure of the light vanilla wool mix to the bottom to add shaping to the body. With this shaping in place, add an 1⁄8 measure to the shoulders (front legs) and thighs (tops of the rear legs). Use the template as reference for shaping.
-
 Step 39
Still using the fine needle continue developing the shaping, adding a ¼ measure of the light vanilla wool mix to the chest, another across the back and another to the underside.
-
 Step 40
Bend the front legs out straight forwards, and the back legs out at an angle as shown. Wrap a 1⁄32 measure of the light vanilla wool mix around the bend in one of the rear legs and use the fine felting needle to develop the shaping around the joint.
-
 Step 41
Use a 1⁄32 measure of the light vanilla wool mix to develop the joint on the other back leg in the same way, then add the fat shaping. Using the light vanilla mix and the fine felting needle throughout, needle felt a 1⁄16 measure onto either flank around his tummy, then pull and pile a 1⁄16 measure into a 5cm (2in) length and lay it across his back from shoulder to shoulder as a little roll of fat. Needle felt this in place to form a ridge, then felt another behind it in exactly the same way. Use the felting needle to accentuate the fold between the ridges.
-
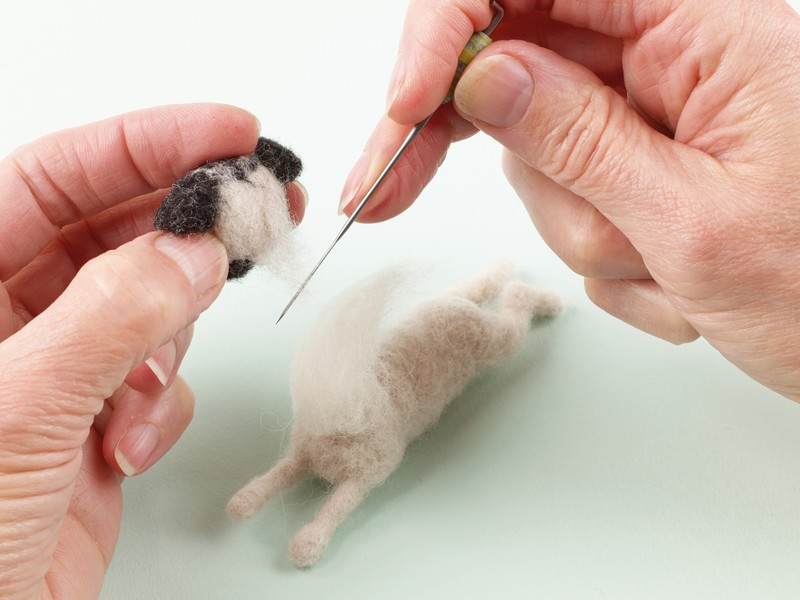
 Step 42
Use the standard felting needle to implant an 1⁄8 measure of the light vanilla wool mix into the neck area, leaving plenty of loose wool free. Pull some loose strands out of the back of the pug’s head.
-
 Step 43
Using the standard felting needle and the loose wool from both sides, implant the head securely onto the body.
-
 Step 44
Wrap a ¼ measure of light vanilla wool mix round the join between the head and the neck, then use a fine felting needle to felt a chubby neck. Felt in another 1⁄8 measure on the back of the head and down the neck.
-
 Step 45
Use the stick technique to make a 4cm (1½in) tail using a cocktail stick, a ¼ measure of the light vanilla wool mix and the fine felting needle. Use the standard felting needle to gently tease out the end.
-
 Step 46
Implant the tail using the standard felting needle.
Tip
If any gaps appear while bending the legs, add webs of light vanilla wool mix and felt in to cover them, using the fine felting needle. -
 Step 47
Curl the tail over and use the fine felting needle to lightly tap the loose wool at the end of it back into the base of the tail. This will lightly hold it in a curled position.
-
 Step 48
Use the fine felting needle to add a 1⁄16 measure of the light vanilla mix around each of the rear feet to bulk them up a little, then add some detail on the base of each of the feet as shown; one larger central bean-shaped pad, and four surrounding smaller round pads. Use the fine felting needle to needle small amounts of charcoal mix into place before cutting them off flush with the foot. It is the ends of the charcoal wool that appear as toe pads.
-
 Step 49
Use the standard felting needle to make a hole in the muzzle for the polymer clay nose nose to fit into, just below the white ridge.
-
 Step 50
To finish, scratch the back of the nose with the point of a needle to roughen it, then apply fast-acting white glue to the back and place it over the hole.
Appealing pugs
You can choose dark- or light-coloured wrinkles. If you choose to have very light-coloured wrinkles, as in the pug on the right-hand side here, use the same vanilla mix as on the body. Pure white is only suitable for small highlights.
Carefully work along the ridges with thin webs of wool. If they get flattened, lift them by inserting an embroidery needle. If you want sharp definition, add more black to the furrows.


Comments

 1
Envelopes »
Green Collage Envelope
1
Envelopes »
Green Collage Envelope
 2
Origami Clothes »
Money Origami Hat
2
Origami Clothes »
Money Origami Hat
 3
Pumpkins »
Pumpkin Plushie
3
Pumpkins »
Pumpkin Plushie
 4
Envelopes »
Blue Collage Envelope
4
Envelopes »
Blue Collage Envelope
 5
Digital Artwork »
How To Turn A Picture Into A Line Drawing In Photoshop
5
Digital Artwork »
How To Turn A Picture Into A Line Drawing In Photoshop


