


About
Colorful Union Jack Make-up Case
Riley Blake Designs flag fabric makes creating a one of a kind make-up bag super easy. 1 fabric panel has 8 different flag options, so the combinations are endless!
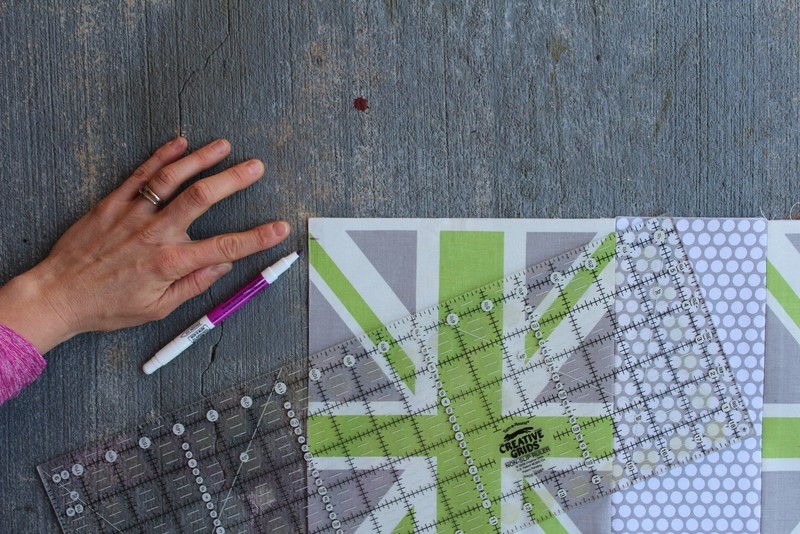
Cut and fuse the fabric first:
1) Outside / Union Jack flag fabric – Cut out 2 flags. Cut 2 rectangles measuring 11 7/8″ x 8 7/8″ [ Leave approx 3/8" seam allowances on the sides and NO seam allowances on the top and bottom]
2) Outside / Bottom – Cut 1 rectangle measuring 11 7/8″ x 5″
3) Lining – Cut 2 rectangles measuring 11 7/8″ x 10 3/4″
4) Zipper tabs – Cut 2 rectangles measuring 5″ x 2 1/2″
5) Fusible – Cut the fusible to match the 2 Union Jack pieces and the bottom
6) Iron the fusible to each flag and also the bottom piece. Remember to iron to the wrong side of the fabric.
-
 Alma added Diy.. Make A Union Jack Cosmetic Case to Bags, Wallets...
18 Jun 20:00
Alma added Diy.. Make A Union Jack Cosmetic Case to Bags, Wallets...
18 Jun 20:00
-
 Whitney I. favorited Diy.. Make A Union Jack Cosmetic Case
12 Aug 09:02
Whitney I. favorited Diy.. Make A Union Jack Cosmetic Case
12 Aug 09:02
-
 Rocio T. favorited Diy.. Make A Union Jack Cosmetic Case
14 Mar 15:55
Rocio T. favorited Diy.. Make A Union Jack Cosmetic Case
14 Mar 15:55
-
Caron K. favorited Diy.. Make A Union Jack Cosmetic Case
23 Dec 08:17
-
Caron K. added Diy.. Make A Union Jack Cosmetic Case to Zipper Pouches
23 Dec 08:17
-
chelsea g. favorited Diy.. Make A Union Jack Cosmetic Case
27 Aug 06:18
-
 Kate H. favorited Diy.. Make A Union Jack Cosmetic Case
03 Mar 22:31
Kate H. favorited Diy.. Make A Union Jack Cosmetic Case
03 Mar 22:31
-
 melinda.hotte added Diy.. Make A Union Jack Cosmetic Case to going to make
07 Oct 06:30
melinda.hotte added Diy.. Make A Union Jack Cosmetic Case to going to make
07 Oct 06:30
-
 Liz Morales favorited Diy.. Make A Union Jack Cosmetic Case
13 Sep 17:12
Liz Morales favorited Diy.. Make A Union Jack Cosmetic Case
13 Sep 17:12
-
 almostmedieval favorited Diy.. Make A Union Jack Cosmetic Case
27 Aug 21:30
almostmedieval favorited Diy.. Make A Union Jack Cosmetic Case
27 Aug 21:30
-
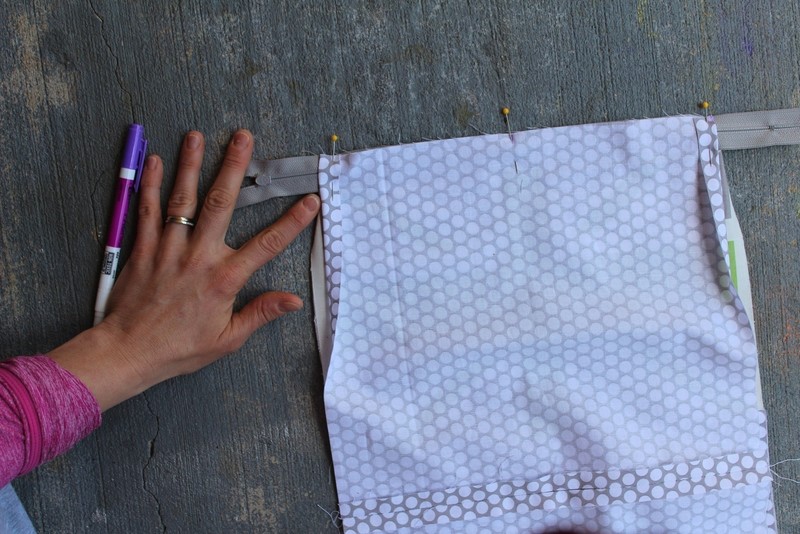
 Step 1
Sew the bottom to each outside flag piece. Place right sides together and pin along the short side. Place into your sewing machine and stitch together using a 1/2″ seam allowance.
-
 Step 2
Sew the lining together along the bottom edge. Place right sides together and pin along the short side. Place into sewing machine and stitch together using a 1/2″ seam allowance. Note – Leave a 3 – 4″”opening in the middle of the seam.
-
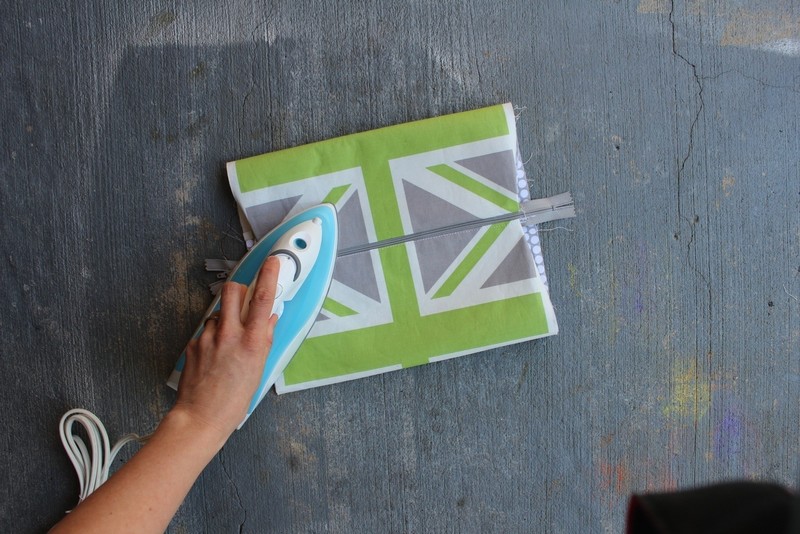
 Step 3
Using a disappearing ink pen, mark a notch at the top edge 1/2″ inwards from the side seam. Finger press the seam allowance under. Repeat this step for all seam allowances.
-
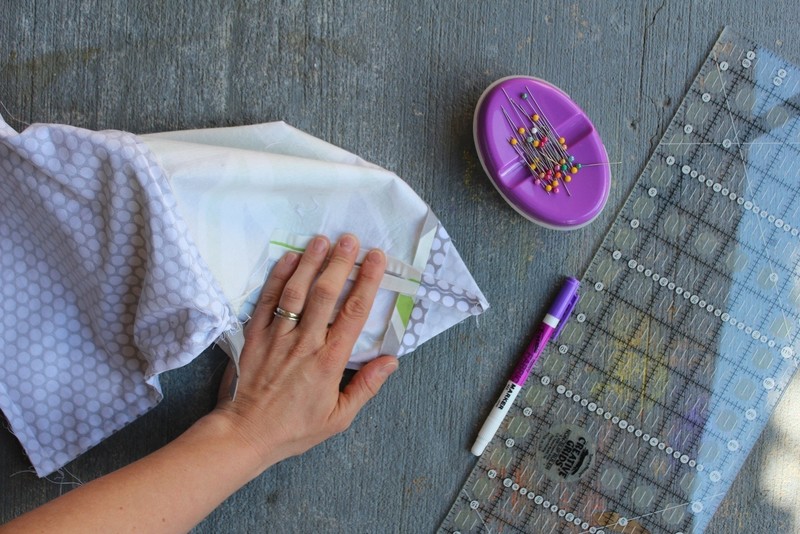
 Step 4
Fold the zipper in half and mark the middle with a disappearing fabric ink pen. Do the same for the flag pieces and mark a line at the top edge. This will help with the zipper alignment. Repeat for the lining.
-
 Step 5
Place the flag right side up on your work surface. Lay the zipper onto the flag fabric with the zipper pull at the left. Match at the ink lines. Make sure to keep the side seams turned under 1/2″. Pin the zipper in place.
-
 Step 6
Lay the lining piece on top of the zipper. This sandwiches the zipper. Reposition the pins. Place into sewing machine and stitch zipper in place. Carefully press the seam. Open and press again. Edgestitch along the zipper.
-
 Step 7
Turn the fabric around so that zipper/teeth are facing up again. Repeat the previous step to attach the zipper to the other side [sandwich the zipper between the flag and lining fabrics]. If this seems awkward, you are doing it correctly!
-
 Step 8
The zipper is almost complete. Turn bag so that it is right side out.
-
 Step 9
Lay flat and press the seams at the zipper. Be careful to NOT melt the zipper. Open the zipper, place into sewing machine and edgestitch the other side.
-
 Step 10
Turn the pouch wrong side out again. The outside bag is facing one way and the lining bag is facing another way. Right sides should be facing each other. Pin along the side seams. Important step – Match the flags at the side seams and the bottom seam also needs to line up! Pin, pin, pin.. Place your sewing machine. Stitch side seams together with a 1/2″ seam allowance. It might get a bit tricky when you get near the zipper/top edge.. Continue and stop sewing the side seams together when you get approximately 1/4″ – 1/2″ away from the zipper. Try to stitch as close to the top as possible and remember to back stitch. Repeat for the other side and lining. Press the seams with an iron. Open the seams and press again.
-
 Step 11
Time to make the boxed corners. Keep the cosmetic bag inside out with the lining at one and and the outside portion at another end. Start with the outside/flag fabric. Place on your work surface. Wiggle the fabric around so that the side seams are facing upwards. Make a point and also make sure that the sides sit at a 45 degree angle. Finger press any wrinkles out. Measure 2″ upwards from the tip and mark a dashed line with a disappearing ink pen [Note - The seam should hit at the seam where you stitched the bottom to the front flag]. Pin. Place into sewing machine and stitch following the dashed/seam line. Backstitch. Repeat for the other side and again for the lining fabric. Press.
-
 Step 12
Lay flat onto your work surface again. Carefully cut off the tip with the rotary cutter. Leave a 1/2″ seam allowance. Repeat for all corners.
-
 Step 13
You are on the homestretch… Find the opening that was created in the lining and pull the entire bag throughout itself. You are turning the bag right side out. Wiggle the corners into place. Pull the tab into the middle. Place the bag into the sewing machine and stitch over zipper at each end. Cut off zipper.
-
 Step 14
Time to make the zipper tabs. I promise we are almost finished! Fold the tab in half lengthwise. Finger press. Fold each side back towards the fold. You are basically creating a “W”. Press with an iron. Place into your sewing machine and stitch each side with a scant 3/8″seam allowance.
-
 Step 15
Turn each tab right side. Wiggle the corners into place and press with an iron. Squeeze the zipper at each end and slide the tab into place. Pin. Place into your sewing machine and edge stitch around the outside of the tab. Remember to backstitch along the zipper side. Lastly, pull out the lining and stitch the opening closed. You can hand stitch or machine stitch it closed.. I am too lazy to hand sew, so I always like to run it through my machine.


 1
Origami Clothes »
Money Origami Hat
1
Origami Clothes »
Money Origami Hat
 2
Envelopes »
Green Collage Envelope
2
Envelopes »
Green Collage Envelope
 3
Digital Artwork »
How To Turn A Picture Into A Line Drawing In Photoshop
3
Digital Artwork »
How To Turn A Picture Into A Line Drawing In Photoshop
 4
Pumpkins »
Pumpkin Plushie
4
Pumpkins »
Pumpkin Plushie
 5
Envelopes »
Blue Collage Envelope
5
Envelopes »
Blue Collage Envelope
