


About
Beautiful pillow based on the Celtic knot called "Witness To Your Splendor"
-
 Deb E. favorited Witness To Your Splendor Pillow
02 Dec 23:50
Deb E. favorited Witness To Your Splendor Pillow
02 Dec 23:50
-
Tiffany G. favorited Witness To Your Splendor Pillow
06 Dec 01:26
-
 Amalie added Witness To Your Splendor Pillow to Home
19 Feb 00:32
Amalie added Witness To Your Splendor Pillow to Home
19 Feb 00:32
-
dw512qu w. added Witness To Your Splendor Pillow to things to make
29 Nov 01:13
-
dw512qu w. favorited Witness To Your Splendor Pillow
29 Nov 01:13
-
 Amanda S. favorited Witness To Your Splendor Pillow
16 May 21:53
Amanda S. favorited Witness To Your Splendor Pillow
16 May 21:53
-
Sandy M. favorited Witness To Your Splendor Pillow
26 Jan 15:25
-
 amanda.shillito favorited Witness To Your Splendor Pillow
10 Dec 09:45
amanda.shillito favorited Witness To Your Splendor Pillow
10 Dec 09:45
-
 slplain favorited Witness To Your Splendor Pillow
08 Oct 22:52
slplain favorited Witness To Your Splendor Pillow
08 Oct 22:52
-
 Magnolia R. favorited Witness To Your Splendor Pillow
31 Aug 02:22
Magnolia R. favorited Witness To Your Splendor Pillow
31 Aug 02:22
-
 Step 1
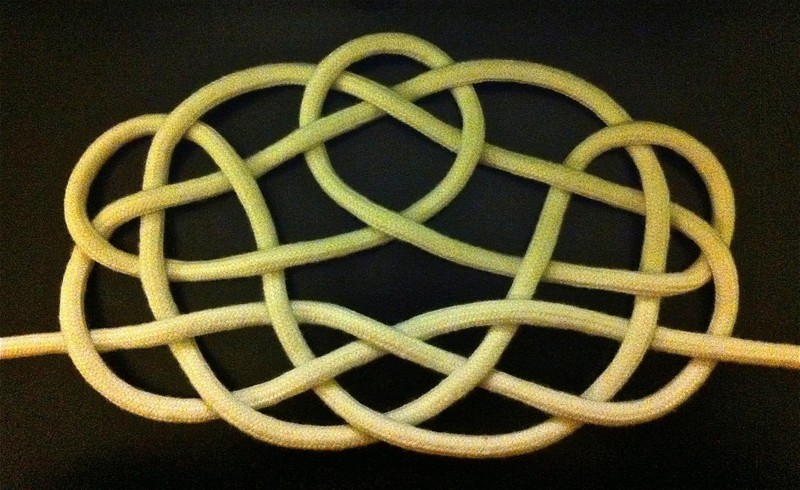
This pillow is based on a celtic knot called "The Witness to Your Splendor."
The knot pictured here was tied by me, but I must give credit for learning how to tie this knot to J.D. Lenzen who has published two instructional books on knots: Decorative Fusion Ties - and - Paracord Fusion Ties. He also puts out regular tutorials on a YouTube channel called: "Tying It All Together - Knots."
You can view J.D. Lenzen's tutorials at the link below (although you will probably need to cut and paste the link into your browser):
http://www.youtube.com/user/TyingItAllTogether
The specific tutorial for The Witness To Your Splendor knot can be found at the following link. (You'll need to cut and paste this link also into your browser -- make sure there are no spaces between any characters when you paste the link).
http://www.youtube.com/watch?v=gq-OSuLbh1k&feature=plcp
You should watch the video tutorial and practice tying this knot with some stiff cord or rope first prior to attempting to tie the knot out of fabric tubing.
J.D. Lenzen explains the meaning of this knot as follows:
"The Witness to Your Splendor (WTYS) Knot is a piece to be tied for and given to someone whose beauty is profound and overwhelming. Someone you couldn't imagine living without, and feel grateful for knowing everyday. Someone whose support for, and participation in, your life, could be summarized as yes...to everything you are. Someone you're willing to grow old with, laugh with, and dream beside, even if it's a dream from which neither one of you wake."
When I discovered the meaning behind this knot, and that it was given as a gift to a significant other, I wanted to make a large one to give to my husband that could be displayed on the wall or as an interior door wreath, but rather than using a large rope, I wanted to make a fabric robe (so to speak). I just winged it on the approximate length of the fabric tubing needed to tie this ornate knot and fortunately it worked out on my initial attempt. Yay! My original idea for a door wreath morphed into a decorative pillow, however, once I finished. The final knot came out a bit larger than I had aniticpated, but it looks great as a pillow. Now that I know it is possible to tie a knot out of a fabric tube, I want to go back and try to make this in a smaller size so it can be displayed as a door wreath.
Overall, I'm really happy with how this turned out. So below are instructions for making the fabric tubing so you, too, can make your own wreath or pillow once you get a hang of how to tie the Witness To Your Splendor knot.
-
 Step 2
Pick your fabric. You will be making a tube and stuffing it with polyfill, so make sure the fabric is thick enough to hide the polyfill while not being too stiff and inflexible to bend into the knot design.
You will need a lengthy strip of fabric measuring:
6 yards (5.4864 meters) long
by
5 1/2 inches (13.97 cm) wideFor my pillow, I chose a medium weight cotton fabric with a music note theme that had been sitting in my craft closet for the past 7 years!
-
 Step 3
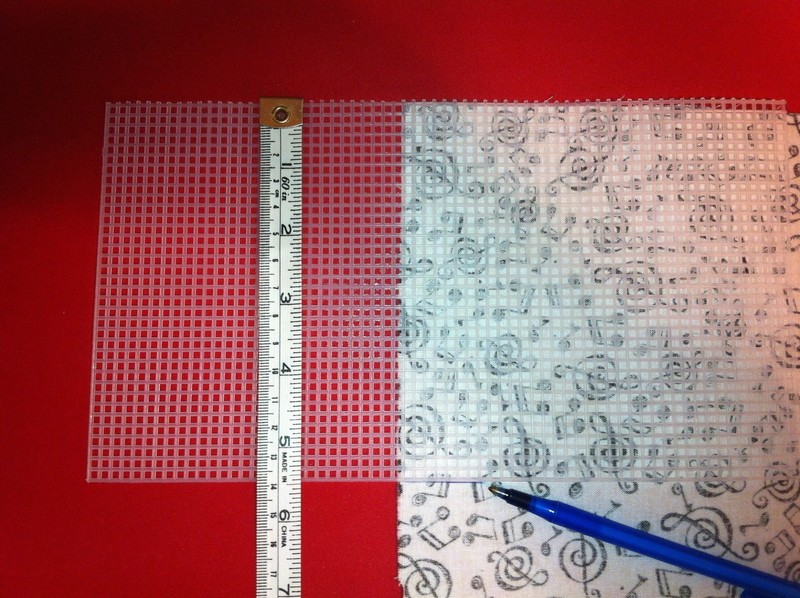
Lay out your fabric (good side down) and cut it to the following measurements.
6 yards (5.4864 meters) long
by
5 1/2 inches (13.97 cm) wideTo speed up the measuring process, I made a template out of plastic canvas (mesh) that was at the correct width. I simply aligned the template with the top of the fabric, and drew a line across the bottom of the template so I could come back later and quickly cut along the pen/pencil mark. The pen/pencil mark will be on the backside of the fabric plus will also disappear into the seam you will be sewing.
-
 Step 4
After cutting the fabric, fold it in half (good side on the interior) and pin the cut edges together down the entire length of the soon-to-be fabric tube. Don't cheat on the pinning. This will keep the fabric aligned on the edge when you start sewing the seam.
-
 Step 5
Sew a 1/4 inch (0.635 cm) seam down the entire length of the fabric removing the pins of course before you sew over them. You will end up with a very long fabric tube that is 2 1/2 inches (6.35 cm) wide.
-
 Step 6
After making the tube, press the seam so the fabric lays flat on either side of the seam.
-
 Step 7
If you feel all fumble-fingered trying to get the fabric tube laid out so you can press the seam down the center, try inserting a measuring stick or a similar item to help you position the fabric on your ironing board.
-
 Step 8
After pressing the seam, turn the fabric tube right side out. It helps if you attach a big safety pin on the end of the tube to help you feed the fabric along as you are turning it right side out. (Thanks to another crafter for the "tip" on using a safety pin to turn the fabric tube right side out).
-
 Step 9
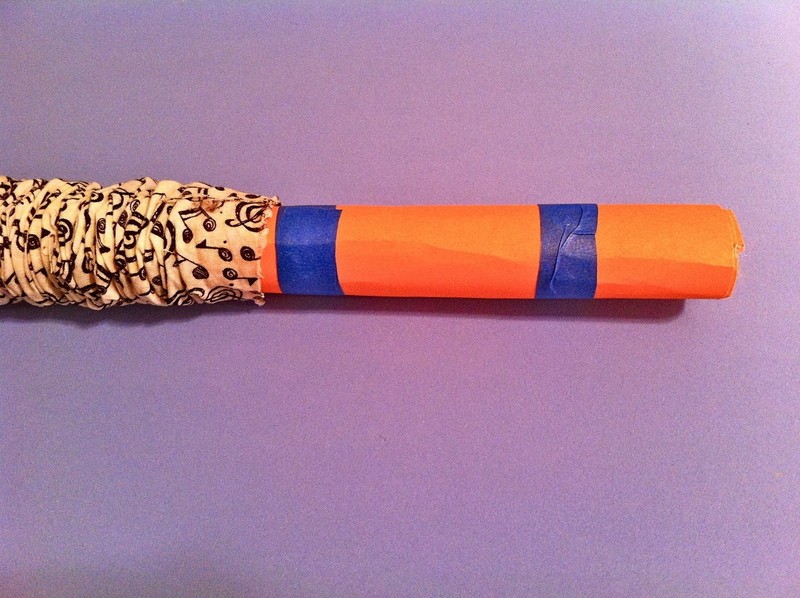
To assist you in stuffing the fabric tube with polyfill, you need to find or make a cardboard tube that is slightly smaller in circumference than the fabric tube.
You may be able to find a cardboard tube from a roll of gift wrap that fits. Or just make your own tube by rolling up and taping some poster board. To help form the tube for my project, I wrapped poster board around a broom handle.
The cardboard tube needs to be just long enough for you to tightly scrunch up the entire length of the fabric over it as shown in the photo. I needed a cardboard tube 28 inches long (71.12 cm) for the fabric I was using.
-
 Step 10
Secure one end of the fabric tube (tie it off with string or a rubber band), and then begin stuffing very small pieces of polyfill into the other end. After stuffing in a few inches, use a stick or dowel to push the polyfill down the cardboard tube until it starts filling the fabric tube at the other end.
Note: Make sure the stick or dowel you use is longer than the cardboard tube!
Stuffing the fabric tube is most time intensive part of this entire project. It will take you a while to do this correctly. Don't try to use large pieces of polyfill to make this part of the project go faster as your fabric tubing will end up lumpy and uneven. You need to use small pieces of polyfill and stuff them into the fabric tubing just a few inches at a time.
Even though the fabric will start to slide off the end of the cardboard tube as you begin to stuff it, try to keep the cardboard tube bumped up to the last section that was packed with polyfill so you don't end up with gaps as you work your way up the entire length of the fabric tube.
You'll want the fabric tube to be slightly firm, but flexible enough to tie into the knot pattern later.
-
 Step 11
Once you have finished filling the fabric tube, fold in the cut edges about 1/4 inch (0.635 cm). Using a needle and thread, do a running stitch around the circumference of the tube (as shown in the tube on the left), and then pull the thread to gather the fabric together (as shown in the tube on the right). Make a few stitches around the gathered fabric to finish off the end.
-
 Step 12
Now that your fabric tube is complete -- you'll have to watch J.D. Lenzen's tutorial on YouTube to help you tie the "Witness To Your Splendor" Celtic knot. Here is the link again to the Tying It All Together video tutorial on this knot.
http://www.youtube.com/watch?v=gq-OSuLbh1k&feature=plcp
-
 Step 13
Once you have successfully tied your knot pillow, you'll want to tack the two lose ends to an adjoining tube to secure the design and to ward off any individuals intent on untying your handiwork.
Enjoy your masterpiece!


Comments


