

About
save money by turning regular shrink film into inkjet shrink film
Inkjet Shrink film is costly! You can use the regular fives time cheaper kind to create your own inkjet shrink film.
NOTE: This will not work on laser printers
-
 Patricia B. commented on Turn Cheap Shrink Plastic Into Printable Inkjet Shrink Plastic
25 Mar 21:29
Patricia B. commented on Turn Cheap Shrink Plastic Into Printable Inkjet Shrink Plastic
25 Mar 21:29
-
Laura P. favorited Turn Cheap Shrink Plastic Into Printable Inkjet Shrink Plastic
26 Mar 18:56
-
 Sarah Sylvia S. favorited Turn Cheap Shrink Plastic Into Printable Inkjet Shrink Plastic
18 Jul 21:25
Sarah Sylvia S. favorited Turn Cheap Shrink Plastic Into Printable Inkjet Shrink Plastic
18 Jul 21:25
-
 Elena B. favorited Turn Cheap Shrink Plastic Into Printable Inkjet Shrink Plastic
25 Jan 21:34
Elena B. favorited Turn Cheap Shrink Plastic Into Printable Inkjet Shrink Plastic
25 Jan 21:34
-
Barbara M. favorited Turn Cheap Shrink Plastic Into Printable Inkjet Shrink Plastic
28 Sep 02:47
-
 mmotse03 favorited Turn Cheap Shrink Plastic Into Printable Inkjet Shrink Plastic
24 Jul 04:29
mmotse03 favorited Turn Cheap Shrink Plastic Into Printable Inkjet Shrink Plastic
24 Jul 04:29
-
Elizabeth s. favorited Turn Cheap Shrink Plastic Into Printable Inkjet Shrink Plastic
20 Mar 23:46
-
Cassandra C. favorited Turn Cheap Shrink Plastic Into Printable Inkjet Shrink Plastic
16 Jan 06:25
-
 Shayla F. entered her project Turn Cheap Shrink Plastic Into Printable Inkjet Shrink Plastic to Secret Santa
06 Jan 05:39
Shayla F. entered her project Turn Cheap Shrink Plastic Into Printable Inkjet Shrink Plastic to Secret Santa
06 Jan 05:39
-
 Val t. favorited Turn Cheap Shrink Plastic Into Printable Inkjet Shrink Plastic
03 Jan 03:16
Val t. favorited Turn Cheap Shrink Plastic Into Printable Inkjet Shrink Plastic
03 Jan 03:16
-
 Step 1
You will need to start with any regular ole' shrink film. The knock offs work as well. Actual shrinky dink brand paper is more costly.
-
Step 2
You will need an image. I made this fast in photo shop just for this example.
-
 Step 3
You're going to have to sand that shrink film. I used 400 grit because that is what I use on my Blythe doll's faces and it's oh so delicate. Run it vertically and horizontally, all over the shrink film. You're going to need to make some texture for your printer to place ink into it.
-
Step 4
Shake and blow off any excess plastic shavings. They could ruin your image and printer. Make sure you are printing with an inkjet printer. If you have a laser printer don't even try this. This shrink film will get too hot for your printer and you will ruin it.
-
 Step 5
Print your image. Let it dry for a few hours, maybe even a day. I touched mine the second it printed and it smeared the ink and mucked it up. This is fixable for the most part. If you do this use a soft paintbrush and blend it back (I did mine after I cooked it...because I didn't wait for it to dry anyways).
-
Step 6
Cut your image out
-
 Step 7
Cook it. Follow the regular directions you would normally do with shrink film. Be careful not to smear the ink still.
EXTRA STEP Mine looked too wavy ^ (even after placing a book over it) because I'm impatient.
The cool thing about this is that if yours looks like this above. Put it back in the oven for less than 30 seconds. Place a heavy book back over it. -
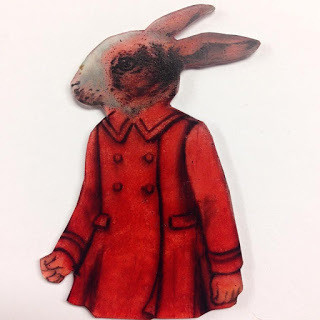
 Step 8
The end result: beautiful. I blended in the smeared red area at this moment. And now I'll let it dry. To finish these guys you can use a clear acrylic spray, then maybe a thin coat of mod podge...or even resin. Imagine the possibilities.


Comments


