


About
Take your tea bags with you in organised style!
A unique project I dreamed up the other day when thinking:
"what am I going to put my tea bag in"!?
-
 02jhseaby added Tea 'Book' Organiser to Try
08 Jun 15:49
02jhseaby added Tea 'Book' Organiser to Try
08 Jun 15:49
-
02jhseaby favorited Tea 'Book' Organiser
08 Jun 15:49
-
 piefacetoldmeso favorited Tea 'Book' Organiser
06 Aug 22:36
piefacetoldmeso favorited Tea 'Book' Organiser
06 Aug 22:36
-
 Miss_Fit added Tea 'Book' Organiser to Purses, Bags, and Wallets
29 May 02:14
Miss_Fit added Tea 'Book' Organiser to Purses, Bags, and Wallets
29 May 02:14
-
 KozmicBlues added Tea 'Book' Organiser to Anti-aburriment
18 Mar 20:09
KozmicBlues added Tea 'Book' Organiser to Anti-aburriment
18 Mar 20:09
-
 karen w. favorited Tea 'Book' Organiser
26 Jan 05:50
karen w. favorited Tea 'Book' Organiser
26 Jan 05:50
-
 Vany Wundersam added Tea 'Book' Organiser to To-make list
11 Sep 10:00
Vany Wundersam added Tea 'Book' Organiser to To-make list
11 Sep 10:00
You Will Need
-
 Step 1
* First draw and cut out a 7.5 x 21cm (3 x 8inch) rectangle out of your felt.
* Repeat this on 4 different felt colours.
**How many you cut out is up to you, but the more you cut out the more 'pockets' you will have at the end.
I only wanted 4, so only cut out 4 rectangles from 4 different colours. -
 Step 2
* Fold the bottom of the rectangle up 8.5 cm/3.5 inch and pin.
This will be your pocket!
* Repeat this step on all 4 pockets.
-
 Step 3
I then cut out a crescent shape at the top of the piece that you just folded up.
(see picture)This makes it easier to remove the teabag :D
Repeat this on all 'pockets'
-
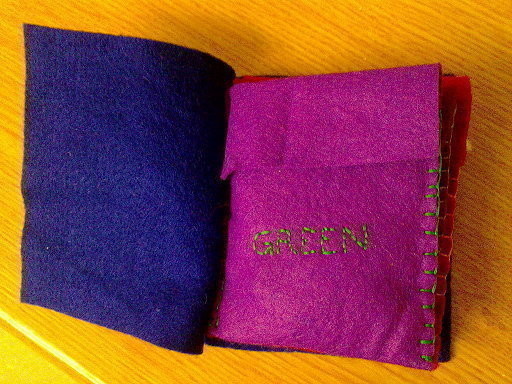
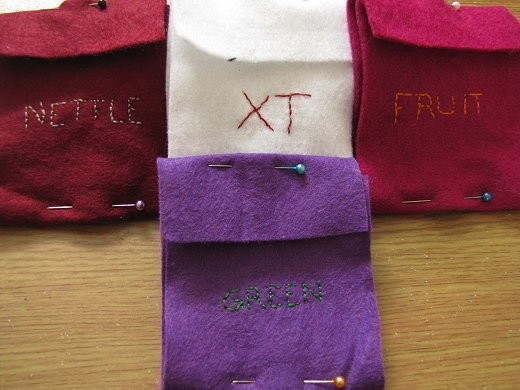
 Step 4
I then embroidered some names of the fronts of my 'pockets'
*Green
*Nettle
*Fruit
*XT('XT' in love of X files- as in 'unknown tea')
-
 Step 5
Then stitch the sides of the 'pocket'
I used blanket stitch and used same thread as I used to stitch the name.
-
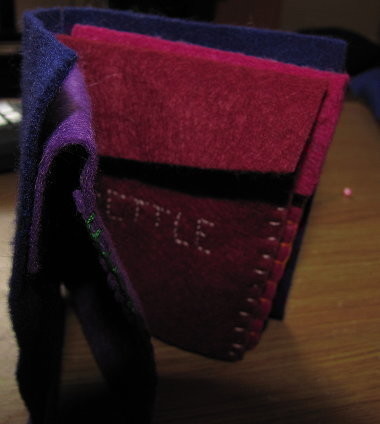
 Step 6
Stitch all the pockets together by pinning them and just stitching whip stitch or a simple binding stitch used for books.
You can just leave the pockets looking like this is you prefer.
For the front cover I cut some more felt measuring 8.5 x 10.5 cm (3.5 x 4.4 Inches)
-
 Step 7
I then pinned the front and back cover to the pockets and sewed the binding stitch .
Be sure to go though all of the layers- this will make the binding strong.
I started 1/4 from the top then went up then down the spine. This makes the binding stronger also.
As I said before you could use a simple whip stitch to link all of the layers.
-
 Step 8
Once all stitched together, sew whatever you want on the front cover.
-
 Step 9
Then fill up with Tea bags and you're ready to go!


 1
Watercolor Art »
Watercolor Paints Made From Make Up
1
Watercolor Art »
Watercolor Paints Made From Make Up

Mmmm nettle tea!!
I use it all the time now!
Vee xxx