

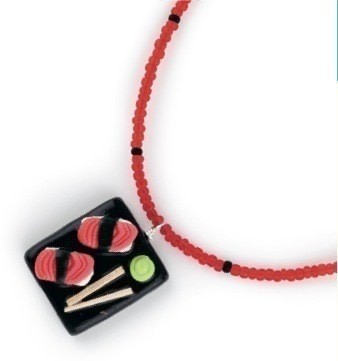
Sumptuous Sushi Platter
Extract from The Polymer Clay Cookbook: Tiny Food Jewelry to Whip Up and Wear • By Jessica Partain and Susan Partain • Published by Potter Craft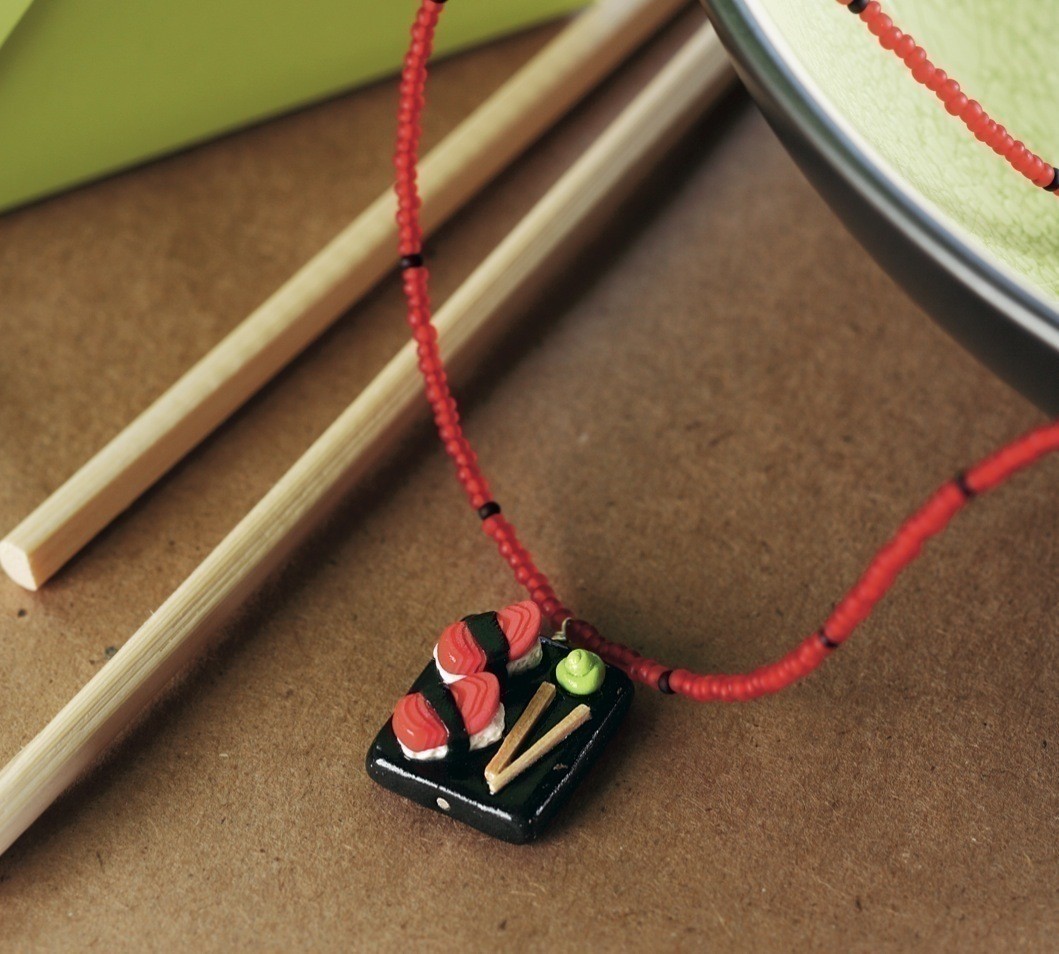

About
I’m craving fresh salmon roe, perfectly ripe avocado, sweet shrimp, and fatty tuna just think- ing about it!
JESSICA ✽ When we were kids, Susan and I spent some time living in Hawaii, where sushi meant something quite different than California rolls. Our classmates would unpack bento boxes full of Spam musubi. Although the Spam version never won me over, sushi is now one of my favorite foods. I love the gorgeous presentation, with its attention to de- tail and the mix of rich and spicy flavors in each bite. I’m craving fresh salmon roe, perfectly ripe avocado, sweet shrimp, and fatty tuna just think- ing about it!
For our sushi platter charm, the salmon is cre- ated with a simple compounded cane. You’ll also learn the difference between mixing a color with white versus translucent clay and various uses for liquid clay, which is used for bonding as well as to give the platter a shiny lacquered look.
yield: 1 platter of sushi
Tags
© 2024 Jessica Partain / Potter Craft · Reproduced with permission.
-
 Luna D. favorited Sumptuous Sushi Platter
25 Apr 05:49
Luna D. favorited Sumptuous Sushi Platter
25 Apr 05:49
-
 Brittney S. added Sumptuous Sushi Platter to Misc Other
07 Jul 05:39
Brittney S. added Sumptuous Sushi Platter to Misc Other
07 Jul 05:39
-
 Thaty F. favorited Sumptuous Sushi Platter
25 Aug 01:28
Thaty F. favorited Sumptuous Sushi Platter
25 Aug 01:28
-
 jennfer c. favorited Sumptuous Sushi Platter
30 Aug 00:32
jennfer c. favorited Sumptuous Sushi Platter
30 Aug 00:32
-
Heather H. favorited Sumptuous Sushi Platter
15 Jan 15:41
-
Susanna Q. favorited Sumptuous Sushi Platter
23 Oct 22:46
-
 amanda.shillito favorited Sumptuous Sushi Platter
18 Oct 05:52
amanda.shillito favorited Sumptuous Sushi Platter
18 Oct 05:52
-
Amanda T. added Sumptuous Sushi Platter to Jewelry
21 Sep 23:25
-
Shadow M. favorited Sumptuous Sushi Platter
10 Sep 23:58
-
 Xandrianne added Sumptuous Sushi Platter to Kawaii
30 Aug 00:59
Xandrianne added Sumptuous Sushi Platter to Kawaii
30 Aug 00:59
You Will Need
-
 Step 1
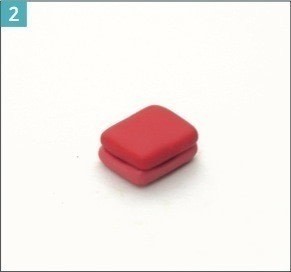
To create the salmon, thoroughly mix the orange and cadmium red clays. Divide the mixture in half. Mix one half with the ball of white clay, the other half with the ball of translucent clay. Flatten them into equal-sized rectangles.
-
 Step 2
Stack the rectangles on top of each other, then gently press together.
-
 Step 3
Cut the rectangle in half, then stack the two halves on top of each other, alternating pink and red layers.
-
 Step 4
Repeat the process of cutting the rectangle in half and compressing the whole piece two more times, until you have a total of eight layers of each color. The photo shows each step in turn.
-
 Step 5
Flatten your cane into a rectangle about 1⁄4" (6.4 mm) tall and wide. Don’t worry that the edges of your cane are uneven and imperfect—this is normal.
-
 Step 6
Use a razor blade to slice off the long imperfect edge, and one end of the cane.
-
 Step 7
Slice two 1/8" (3.2 mm) pieces of sushi from your cleaned cane.
-
 Step 8
Gently flatten the two pieces and shape them into a slightly tilted rectangle, as shown. Wash your hands and tile before moving to the next step.
-
 Step 9
Now make the rice. Divide the small ball of white clay in half. Roll each half into a smooth ball, then flatten into a pancake. Pinch the edges between your fingertips to form a small rectangle of rice, slightly smaller than the piece of salmon.
-
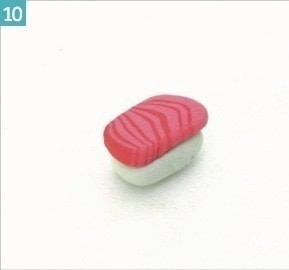
 Step 10
Put a slice of fish on top of each rice rectangle.
-
 Step 11
To make the seaweed, thoroughly mix the black and green clays. Roll the seaweed into a thin snake, then flatten into a thin strip.
-
 Step 12
Cut the strip in half, then wrap each half around one piece of sushi.
-
 Step 13
Use the small tip of a double-ball stylus to create a nubby rice texture on all sides of the white piece. Set aside your finished sushi.
-
 Step 14
To create the wasabi, thoroughly mix the white and Granny Smith clays. Roll the ball into a thick, short snake, then spiral it into a dollop of wasabi.
-
 Step 15
To make the chopsticks, use a razor blade to cut off 1⁄2" (1.3 cm) of the small end of each toothpick. Make sure the cut ends are nice and even.
-
 Step 16
To create the platter, roll the large ball of black clay into a very smooth ball, then flatten it into a pan- cake about 1/8" (3.2 mm) thick. Pinch the corners to form a rectangle about 5/8" x 3⁄4" (1.6 x 1.9 cm).
-
 Step 17
Insert a headpin through the platter as shown and pull it through until the head is flush with the bottom of the platter.
-
 Step 18
Paint a thin, even layer of liquid clay all over the front and sides of your platter.
-
 Step 19
Place the sushi, wasabi, and chopsticks on the platter and press gently to bond them to the liquid clay.
-
Step 20
Bake for 20 minutes at 275 ÌŠ F (135 ÌŠ C).
-
 Step 21
To Make a Sushi Necklace
1. Finish the headpin into a closed, wrapped loop.
2. String the charm on a necklace with red and black size 11 seed beads.


Versions


Posted by
Jasmine T.

Posted by
Krafty Kitty Kat >'.'<

Posted by
Natalia H.


CO + K User