About
Cross-stitch a stitch invaders tote bag with Urban Cross Stitch
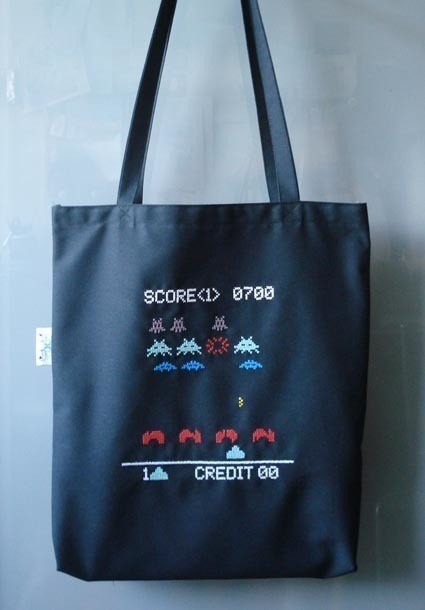
Look! Up in the sky! Is it a bird? Is it a plane…? Never mind the sky, because all eyes will be on you as you battle off invading aliens from beyond Mars; or alternatively, as you just walk down the road styling this awesome Invaders Tote Bag.....
Tags
Downloads
- 114116_2F2016-04-30-172526-Mini+Invaders+chart+symbol+key.rtf 17.6 KB [ Download ]
- 114116_2F2016-04-30-172727-Mini+Invaders+chart.jpg 2.72 MB [ Download ]
-
 Loviiletter favorited Stitch Invaders Tote
05 Oct 05:04
Loviiletter favorited Stitch Invaders Tote
05 Oct 05:04
-
 Ms Dorito added Stitch Invaders Tote to sew craft
12 Jun 19:08
Ms Dorito added Stitch Invaders Tote to sew craft
12 Jun 19:08
-
 Ellen R. favorited Stitch Invaders Tote
01 Sep 16:09
Ellen R. favorited Stitch Invaders Tote
01 Sep 16:09
-
 C T. added Stitch Invaders Tote to Bradley & Connor! x
09 Jul 20:43
C T. added Stitch Invaders Tote to Bradley & Connor! x
09 Jul 20:43
-
C T. added Stitch Invaders Tote to Accessories! x
09 Jul 20:43
-
 CannibalCasey favorited Stitch Invaders Tote
02 Jul 02:57
CannibalCasey favorited Stitch Invaders Tote
02 Jul 02:57
-
 Alexandria H. favorited Stitch Invaders Tote
06 Feb 02:03
Alexandria H. favorited Stitch Invaders Tote
06 Feb 02:03
-
Alecia B. favorited Stitch Invaders Tote
01 Jul 11:03
-
 AlterEgo Designs favorited Stitch Invaders Tote
19 Jun 20:25
AlterEgo Designs favorited Stitch Invaders Tote
19 Jun 20:25
-
 Sekar D. favorited Stitch Invaders Tote
25 May 18:36
Sekar D. favorited Stitch Invaders Tote
25 May 18:36
-
 Step 1
Method
Cut a rectangular piece of black cotton canvas 45cm x 100cm, this is the main body of your tote bag.
Hem both the short edges; decide which one will be your top and bottom edge; these will form the opening of your tote, with the long edges being sewn closed to form the side seams.
Position the soluble canvas for the Invader motif in the desired position on tote bag (about 3 inches from the top hemmed edge is good). -
 Step 2
When you are satisfied with the position use the sewing needle and sewing machine thread to tack the soluble canvas to the tote body using a running stitch.
-
 Step 3
Position the tote body/soluble canvas into an embroidery hoop.
Find the centre of the invader chart and the centre of the soluble canvas and start cross stitching the design. -
 Step 4
When the cross stitching is complete remove the tacking stitches and carefully trim away the excess soluble canvas
If you cannot get soluble canvas you can always just stitch the Mini Invader design onto black 14 count cross stitch canvas and then appliqué the entire piece onto the body of the tote bag in the desired postion. -
 Step 5
Cut two pieces of black canvas tape to form the handles of your tote. The length of the straps depends on personal preference but a good average length is approximately 1m per strap.
On the reverse side of the tote bag body, position one end of one strap approximately 11cm in from the side of the top hemmed edge and position the other end of the strap approximately 11cm in from the other side. Machine stitch the strap ends into place securely. Repeat at the bottom hemmed edge with the remaining strap.
When your straps are securely machine stitched in place, fold the tote bag body in half so that the top and bottom hemmed edges meet, (fold so that the right sides are touching.)
Machine stitch along both open side edges.
Turn your tote right side out, and it is complete. -
Step 6
Basic Cross Stitch Info
The great thing about cross-stitch is that it only requires a few basics tools, and these are so small it means that cross-stitch is totally portable and easy to do anywhere at any time.
The basic tools you will need are:
Cross-stitch fabric, (known as Aida cloth or canvas), this is specially woven fabric where the fibres are arranged to create a square grid with tiny holes separating each square. It comes in different sizes , or ‘counts’ with the higher count number resulting in smaller stitches. Eg 14 count aida cloth has 14 stitches per inch, while 22 count aida cloth has 22 stitches per inch. Most of the projects in this book use 14 count aida cloth.
Tapestry needle, size depends on the count of the cross-stitch fabric you are using. (A regular embroidery needle would be fine but a tapestry needle has a blunt tip which is more convenient for cross-stitching.)
Scissors. A pair of curved tipped embroidery scissors are really useful as these will allow you to easily snip off rogue threads with less fear of stabbing the scissors through your canvas.
Wooden or plastic embroidery hoop, if desired, to help hold your canvas taut while you stitch. While hoops are not essential they help provide a uniform finished look to your stitching and make the overall experience easier for those just beginning to venture into the world of cross-stitch. Hoops can be used over and over on different designs, so once you buy one it’s there for you to use for the rest of your life…..unless you lose or destroy it!
Embroidery floss. These are available from various different brands such as DMC, Anchor and numerous others.
Embroidery floss consists of an 8 metre length of six strands of thread twisted together, this is called a skein. It is advisable to cut your skein into 20 inch lengths before you start to stitch as these 20 inch lengths are easier to work with and tend to knot or tangle less easily than longer lengths. Use two strands of embroidery floss, so separate two strands from one of your 20 inch lengths and thread your needle with these. -
Step 7
Making a half stitch and a full cross-stitch
Cross-stitch fabric is specially created for cross stitching. The fibres are arranged to create a square grid with tiny holes separating each square.
In cross-stitching, the basic cross-stitch is created by forming an X over one of these squares.
To stitch a half cross-stitch, bring your needle from the back of the fabric through to the front in the lower left corner of the square you are stitching; this is position 1. Next bring the needle across the square to the upper right corner; this is position 2, and forms a half stitch (/). -
Step 8
Completing a full cross-stitch
Starting with your needle in position 2 and at the back of the fabric push your needle through the lower right corner; position 3, and pull the embroidery floss through. Finally, bring the needle across the square to the upper left corner; position 4, and pull the needle through. You should have a single X. This is a full cross-stitch and is the basic building block for all the designs in this book. -
Step 9
Stitching a horizontal row in one colour
Bring your needle from the back of the fabric through position 1 and push it into the fabric at position 2. (/) Repeat this until you have a number of half stitches required in that row, (/////). To complete the cross-stitches, bring the needle from the back of the fabric through position 3, of the last half stitch, and push it into the fabric at position 4 (\) until all the half stitches have been crossed, resulting in a row of full cross stitches, XXXXX.
Drop down one square underneath the first full cross stitch and stitch the next row beneath as just described.
It is important that the top half stitches on all cross-stitches cross in the same direction as this will give the finished piece a uniform finished appearance.
If you prefer not to use this technique, you can always stitch each X one by one. -
Step 10
Stitching a vertical column in one colour
Bring your needle from the back of the fabric through position 1 and push it into the fabric at position 2. At the back of the fabric drop down two squares from position 2 and over one square. This brings you to a position located 1 square directly underneath the original position 1, and push your needle through from the back of the fabric to the front. You are now in position 1 of the stitch directly below your original stitch.
Bring your needle up and across to position 2 of this new stitch and push it into the fabric. You now have two half stitches directly above and below each other. Continue in this fashion until you have a column of the required number of half stitches.
Then, bring your needle from the back out through position 3 of the bottom stitch and up, over and into position 4 of the bottom stitch. This leaves you with a column of half stitches with a full cross stitch at the bottom. Continue with this action working back up the column of half stitches until the top. -
Step 11
Starting, ending and changing thread colours
When beginning a new colour, leave a 1 inch tail holding it against the back of the fabric and working over it to secure the thread. When you finish with that colour bring your needle to the back of the fabric and weave the remaining tail through the back of your work to secure it.
Try to avoid tying knots in your floss to start and finish a colour as this will cause the finished piece to appear ‘lumpy’ when you mount it. -
Step 12
Using the pattern chart
This project features a pattern chart with symbols to follow, and a symbol key.
Each square of the pattern chart represents one complete cross-stitch (X) and contains a symbol which has a corresponding thread colour in the symbol key. Read the pattern carefully to make sure you are using the right colour for each stitch.
Some cross stitchers prefer to work all the stitches of one colour before starting others. This can however lead to mistakes when you have a large area to cover. It is therefore better to work each small area of one colour and then change the thread to work the adjacent stitches in the next colour. Building up the design in this way will help to make sure that the finished piece is accurately worked.
It is also helpful to colour in, with a highlighter pen, the symbols on the chart that you have stitched. This helps keep track of what symbols have and have not been stitched and is a useful indicator if you have to put on hold stitching your project for any length of time. It avoids any confusion when you start back into the project.
Always start working any project from the centre of the chart and fabric. This will avoid running off the fabric and being left with an unfinished project with no fabric left to stitch on…..which is unbelievably frustrating, not to mention time wasting! -
Step 13
Starting your project
First find the centre of your pattern using the arrow heads located mid-way along the top edge, and the left edge of the pattern.
Follow a straight line down from the top edge arrow head, and follow a straight line in from the left edge arrow head. Where these two lines cross, that is your centre point of your pattern.
From the centre point of your pattern, count the number of squares, stitches, to the nearest full cross stitch. This is your starting point.
Locate the centre of the fabric by folding it in half lengthwise and gently press the seam with your fingers, unfold and repeat the previous step widthwise. The point where these two folds meet is the approximate centre of your fabric.
From the fabrics centre point find the same starting point as on your pattern, by counting out the same number of squares, stitches. Stitch your first cross-stitch in this starting point position and you can work your project with the security in mind that you are not going to run off the edge of your fabric half way through. -
Step 14
DMC soluble canvas instructions
Position the soluble canvas on your fabric where you want to do your stitching. With large stitches, tack into place. Ensure the tacking line is larger than the design you will stitch inside.
Place the fabric and soluble canvas together in an embroidery hoop and cross stitch according to the pattern chart.
When the embroidery is finished carefully cut and pull out the tacking stitches.
Put your stitched fabric in a bowl with a large volume of hot soapy water (between 40 and 500 C). let it soak for 5 to 10 minutes and stir it gently from time to time. The soluble canvas will melt and disappear. Rinse with plenty of hot water.
For drying, follow the care instructions of your garment. It is now a unique piece that you have personalised.