

Secretary's Delight Bracelet & Ring Set
Extract from The Naughty Secretary Club: The Working Girl's Guide to Handmade Jewelry • By Jennifer Perkins • Published by F+W Media

About
Resin cast jewelry.
These sassy little secretaries desperately want to think outside the box, but since they are permanently suspended inside resin cubes, that is a bit of a challenge. The techniques used to make this bracelet are actually quite easy. Once you get the hang of it, you, too, will be thinking outside the resin box and floating everything from miniature toys to pictures of your grandma in the resin.
Downloads
- sec.jpg 259 KB [ Download ]
-
 Tashianna S. favorited Secretary's Delight Bracelet & Ring Set
11 Apr 12:23
Tashianna S. favorited Secretary's Delight Bracelet & Ring Set
11 Apr 12:23
-
Angel C. favorited Secretary's Delight Bracelet & Ring Set
06 Oct 17:34
-
 Jasmin favorited Secretary's Delight Bracelet & Ring Set
01 Oct 13:40
Jasmin favorited Secretary's Delight Bracelet & Ring Set
01 Oct 13:40
-
 Jennifer V. favorited Secretary's Delight Bracelet & Ring Set
21 Jun 13:26
Jennifer V. favorited Secretary's Delight Bracelet & Ring Set
21 Jun 13:26
-
 mmotse03 favorited Secretary's Delight Bracelet & Ring Set
05 May 13:56
mmotse03 favorited Secretary's Delight Bracelet & Ring Set
05 May 13:56
-
 Rosalie E. favorited Secretary's Delight Bracelet & Ring Set
06 Mar 21:28
Rosalie E. favorited Secretary's Delight Bracelet & Ring Set
06 Mar 21:28
-
 girlcousin favorited Secretary's Delight Bracelet & Ring Set
06 Mar 21:22
girlcousin favorited Secretary's Delight Bracelet & Ring Set
06 Mar 21:22
-
 angelannie1552 favorited Secretary's Delight Bracelet & Ring Set
04 Sep 20:28
angelannie1552 favorited Secretary's Delight Bracelet & Ring Set
04 Sep 20:28
-
tara P. favorited Secretary's Delight Bracelet & Ring Set
11 Aug 22:47
-
Alecia B. favorited Secretary's Delight Bracelet & Ring Set
01 Aug 16:57
You Will Need
-
 Step 1
<b>Prepare images</b>
Download the secretary image. Use a photo program to make the images 9/10" (2cm) wide by 1 3/10" (3cm) tall and 300 dpi. Print the images on heavy photo-quality paper. (Resin will soak through text-weight paper and turn it dark.) Cut out the 6 images, beveling (or rounding) the corners of each picture. -
 Step 2
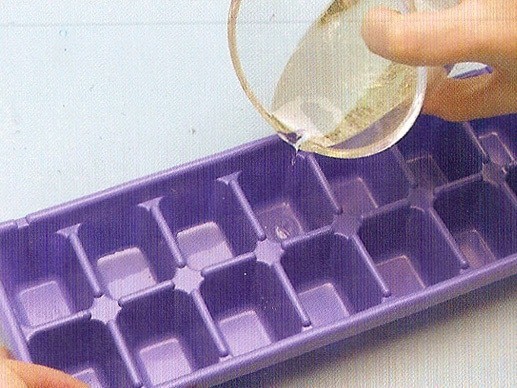
<b>Pour the resin and catalyst</b>
Follow the manufacturer's instructions for the ratio of resin to catalyst, and then pour 2 substances into a plastic cup (don't use Styrofoam - the resin will eat through it). Since resin sets up and hardens quickly, you will have to mix a new very small batch for every layer. HINT: I find that going a little heavy on the catalyst helps your resin set up and dry better. Don't go too heavy, through - it also will make your resin more brittle. -
 Step 3
<b>Mix resin and catalyst</b>
Use a craft stick to mix the resin and catalyst together. Don't worry about the bubbles - those are supposed to be there. -
 Step 4
<b>Pour Resin</b>
Making resin jewelry entails pouring many thin layers. First, you want to pour a very thin layer into the bottom of 6 compartments in your ice cube tray. Let the resin set up for about 15 minutes, or until it begins to congeal and harden. -
 Step 5
<b>Embed images in resin cubes</b>
Mix another small batch of resin. Pour another thin layer on top of the first slightly hard layer. Into this wet layer of resin, lay each image square into the ice cube tray, image side down (remember, you are making your cubes upside down). Gently push on each image with a craft stick or straw, forcing the bubbles in the resin up around the sides of the image. Make sure you pour enough resin so that it is coming around and just slightly covering the backside of each image. -
 Step 6
<b>Add Glitter</b>
Sprinkle glitter onto the surface of each resin cube. Mix a larger batch of resin and fill up 6 of the ice cube tray compartments to about 1/4" (6mm) from the top. (5 cubes will be for the bracelet, and 1 is for the ring.) You will just have to eyeball this step. How much resin you pour is also contingent on how thick your previous layers were. How fat you want your cubes to be is up to you. -
 Step 7
<b>Add ring back</b>
Add your ring blank to the back side of one of the glitter- covered resin cubes. Sprinkle on a bit more glitter coating to cover the glue pad on your adjustable ring. Add your final layer of resin to thicken the cube as explained in step 6. -
 Step 8
<b>Pop out resin cubes and ring</b>
Allow the resin to harden and set up fully overnight. Then simply pop all of the resin cubes out of the tray. Your ring is basically finished, and the other cubes are ready to be drilled and used to create a bracelet. -
 Step 9
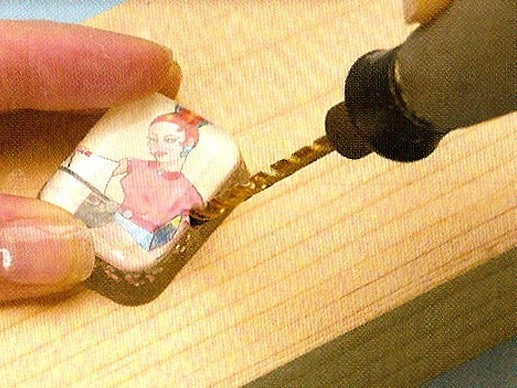
<b>Sand backs of cubes</b>
Use the high-speed drill with the sanding attachment to smooth the backs of all the resin cubes and to smooth the back of the ring. -
 Step 10
<b>Drill holes in cubes</b>
Use the high-speed drill with the larger bit to drill a hole diagonally through the midpoint on each long side of each cube, from front to back. After all your pieces are drilled and sanded, take the cubes outside and spray them with a shiny topcoat. If you used a brand-spanking-new ice cube tray, your cubes should be shiny enough already, but the backsides still will need to be topcoated because they may be tacky from the resin. Allow the topcoat to dry thoroughly. -
 Step 11
<b>Construct Bracelet</b>
Open a jump ring and slide it through one of the holes in one of the cubes. Slide the next cube onto the open jump ring and then close it. Continue linking the cubes in this manner until you have fashioned an entire bracelet. Add a chain of 2 jump rings to the final jump ring on one side of the bracelet. Slide a lobster clasp onto a jump ring and link it to the final jump ring on the other side of the bracelet.<b>Hot tip:</b>
Drilling a hole through resin at an angle ensures that the hole will be sturdy and still narrow enough so a jump ring can link two cubes together. If you're a beginner, you might want to fill the whole ice cube tray with resin so that if you mess up, you have a back-up handy.


Very cute (:
Happy Crafting,
Alex