


About
Good enough to eat (almost!)
These doughnuts may look good enough to eat - BUT resist the temptation unless you want broken teeth! (they probably wouldn't taste to good either!
These cuties have lots of uses - whether they are for pendants, earrings, hair-accessories, fridge magnets or miniature food for barbie dolls - you'll have lots of fun making them!
Tags
Downloads
- 2021-01-30-100146-doughnut+9.jpg 92.1 KB [ Download ]
-
 Caden Kaslik favorited Polymer Clay Doughnuts!
07 Oct 00:35
Caden Kaslik favorited Polymer Clay Doughnuts!
07 Oct 00:35
-
 Key West Witch favorited Polymer Clay Doughnuts!
27 Jun 08:00
Key West Witch favorited Polymer Clay Doughnuts!
27 Jun 08:00
-
 Luna D. favorited Polymer Clay Doughnuts!
25 Apr 05:28
Luna D. favorited Polymer Clay Doughnuts!
25 Apr 05:28
-
Darcy replied to a comment on Polymer Clay Doughnuts!
22 Apr 16:34
-
 Crafterella featured Polymer Clay Doughnuts!
07 Apr 23:00
Crafterella featured Polymer Clay Doughnuts!
07 Apr 23:00
-
 The Little Craft House replied to a comment on her project Polymer Clay Doughnuts!
06 Apr 02:40
The Little Craft House replied to a comment on her project Polymer Clay Doughnuts!
06 Apr 02:40
-
Darcy commented on Polymer Clay Doughnuts!
05 Apr 14:31
-
Darcy favorited Polymer Clay Doughnuts!
05 Apr 14:00
-
The Little Craft House published her project Polymer Clay Doughnuts!
27 Mar 09:00
-
 Step 1
Start by conditioning your clay. (I've used Premo Ecru)
and roll your clay into a ball. -
 Step 2
Press down gently on your ball to slightly flatten the top and bottom
-
 Step 3
To make the icing- roll a piece of coloured clay into a small ball. Squish the ball between your fingers to flatten it. Gently pull at the sides to make your clay a thin, slightly distorted shape.
-
 Step 4
place this piece on the top of your doughnut. Smooth the edges down so it is stuck to the doughnut. The distorted edges will give a dripping look to the icing!
-
 Step 5
With a pokey tool, push a hole into the center of your doughnut.
-
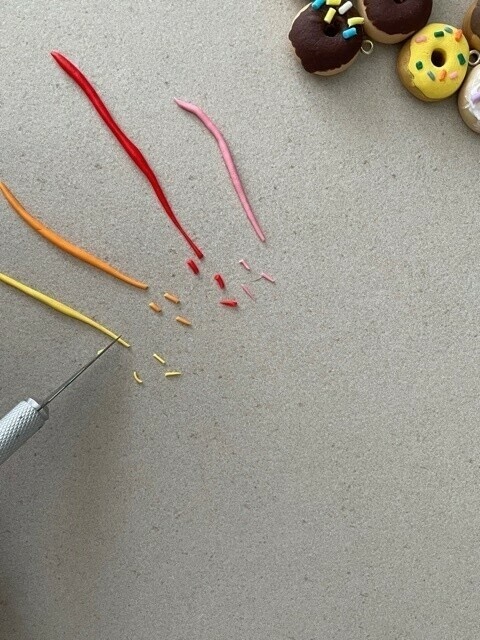
 Step 6
To make the sprinkles for your doughnut, roll some very thin snakes of bright coloured clay. Use your knife to cut small pieces to form the sprinkles.
(Hint - you can pre-bake these so you have a bunch for whenever you need them) -
 Step 7
For the drizzle icing and to hold your clay sprinkles on - use white liquid clay. (I've used Sculpey brand, however it is also available in Fimo brand)
-
 Step 8
Cure (bake) in the oven at the clay manufacturers recommended instructions. If you find your clay is still to soft - and not baked properly- you can bake longer but not hotter.
Thanks for joining me for this project! If you enjoyed this - please follow along with my Instagram or YouTube channel @thelittlecrafthouseaus for more inspo and projects!


Hope that helps!