About
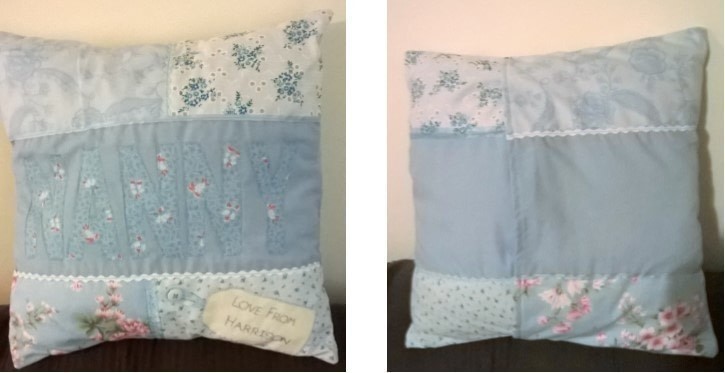
Contrasting fabric personalised cushion cover
Personalised cushion cover for 30cm cushion inner. The cover can have any name across the middle and a hand embroidered 'Love From' tag in the bottom corner.
The cover is made in an envelope style so can be easily removed and washed.
I have made this cushion cover for my nephew to give to his Nanny for Christmas ☺
Tags
-
 Maryann C. favorited Personalised Cushion Cover
13 Apr 07:13
Maryann C. favorited Personalised Cushion Cover
13 Apr 07:13
-
 Wanda B. favorited Personalised Cushion Cover
19 Jan 12:47
Wanda B. favorited Personalised Cushion Cover
19 Jan 12:47
-
 Niamh M. added Personalised Cushion Cover to bits & bobs
09 Dec 20:23
Niamh M. added Personalised Cushion Cover to bits & bobs
09 Dec 20:23
-
 Caz entered her project Personalised Cushion Cover to Secret Santa
08 Dec 19:58
Caz entered her project Personalised Cushion Cover to Secret Santa
08 Dec 19:58
-
Caz published her project Personalised Cushion Cover
06 Dec 21:00
-
 Step 1
Material needed-
30cm x 30cm cushion inner
Main cover fabric
4 x Contrasting fabrics
Letter fabric
Calico
Contrasting ribbons & ricrac
Embroidery Thread
Sewing Machine
Sewing Kit
BondawebFrom your main fabric cut out rectangles measuring 32cm x 32cm and two measuring 20cm x 32cm. This already includes a 1cm seam allowance.
-
 Step 2
From contrasting fabric 1 cut out 2 pieces measuring 11cm x 20cm. This will be pieces C1F and C1B.
From contrasting fabric 2 cut out 1 piece measuring 11cm x 14cm (this will be piece C2F) and 1 piece measuring 11cm x 20cm (this will be piece C2B.)
From contrasting fabric 3 cut out 1 piece measuring 11cm x 14cm (this will be piece C3F) and 1 piece measuring 11cm x 20cm (this will be piece C3B.)
From contrasting fabric 4 cut out 2 pieces measuring 11cm x 20cm. This will be pieces C4F and C4B. -
 Step 3
Front Panel: Place largest main rectangle right side up on a flat surface and pin C1F to the top left corner. Pin C2F in the top right corner overlapping the edge of C1F. Pin C4F in the bottom right corner and finally pin C3F to the bottom left corner. Sew pieces in piece using a zigzag stitch.
-
 Step 4
Back Panel 1: With right side facing up, pin C1B across the top and C3B along the bottom. Sew in place using a zigzag stitch.
-
 Step 5
Back Panel 2: With right side facing up, pin C2B across the top and C4B along the bottom. Sew in place using a zigzag stitch.
-
Step 6
Sew various matching coloured ribbons and ricrac along the zigzag stitching to decorate.
Lettering: Iron Bondaweb onto your chosen letter fabric. Cut out letters and iron in place across the centre of the front panel.
Tag: Cut out tag shape from calico fabric. Hand embroider a ’Love From’ message. Use Bondaweb or glue to attached to cushion cover remembering to leave enough room from the edge to sew the cushion cover together.
-
 Step 7
Hemming Back Panels: Hem left edge of Back Panel 1 and the right edge of Back Panel 2.
-
 Step 8
Sewing together: With front cushion cover piece right side up, pin on top back panel pieces making sure the hemmed edges are in the middle. Sew completely around the edge. Turn cushion cover right way out and insert cushion inner.