

About
Something I've made for a costume, but it could be a great ornament for really any holiday decorations!
A couple of notes I want to make ahead of time- I used two 1.5 foot (approx. length) feather boas on a 3 inch styrofoam ball. You'll probably only need one or half of one for smaller styrofoam balls, but you will definitely need more boas if you're making larger ones!
I also spent $14 on what I bought, but if you can buy individual styrofoam balls, it will be even cheaper!
I also took these pictures as an afterthought, I had already made the pompom seen above, and decided to make a tutorial after I'd completed it.
If you want this pompom to last for a very long time or be very sturdy, you may want to add a dab of styrofoam-safe glue to the tip of each pin before you insert it, so that it holds a little stronger.
Tags
-
 Melissa Beth favorited Moogle Pom Pom
26 Nov 02:47
Melissa Beth favorited Moogle Pom Pom
26 Nov 02:47
-
 PunkyFunk added Moogle Pom Pom to DIY the Room
22 Jun 19:52
PunkyFunk added Moogle Pom Pom to DIY the Room
22 Jun 19:52
-
 Keri T. added Moogle Pom Pom to bit n pieces
06 Feb 23:12
Keri T. added Moogle Pom Pom to bit n pieces
06 Feb 23:12
-
 zorenne z. added Moogle Pom Pom to pompom
01 Sep 02:47
zorenne z. added Moogle Pom Pom to pompom
01 Sep 02:47
-
 Linkin Logs added Moogle Pom Pom to Cosplay
14 Jan 07:54
Linkin Logs added Moogle Pom Pom to Cosplay
14 Jan 07:54
-
Shia H. added Moogle Pom Pom to Final Fantasy
29 Jul 14:03
-
 kristy c. added Moogle Pom Pom to cool ideas
22 Feb 02:45
kristy c. added Moogle Pom Pom to cool ideas
22 Feb 02:45
-
 Sam A. added Moogle Pom Pom to Accessories
02 Jan 22:47
Sam A. added Moogle Pom Pom to Accessories
02 Jan 22:47
-
 LilKitten2000 favorited Moogle Pom Pom
13 Dec 21:16
LilKitten2000 favorited Moogle Pom Pom
13 Dec 21:16
-
LilKitten2000 commented on Moogle Pom Pom
13 Dec 21:16
You Will Need
-
 Step 1
Just an image of the materials! I didn't buy the large feather boa that's meant to be worn, just the small ones.
-
 Step 2
A reference for the length of the boa, and the thickness- they're rather thin, and not so very long.
-
 Step 3
Okay, first things first, all feather boas have a bit running through the middle that keeps all the feathers together- that's what you're going to be pinning down to the styrofoam ball throughout this tutorial.
Stick your pin through the tip of your boa.
-
 Step 4
Choose any spot in your styrofoam ball, and pin that boa in there (I have the pin sticking up here just to show you where it is!).
-
 Step 5
Just showing the attachment point, I tried to get it as close to the tip of the boa as I could, while still making sure it would be secure.
-
 Step 6
Start wrapping! Wrap the boa from your starting point, directly around the circumference from there, back up to your starting point.
-
 Step 7
Pin the boa again, very close to your starting point (but try not to pin through two points on the boa at once, it will come out lumpier looking, and obviously you can't pin through another pin!).
You may want to pin more points on each wrap of the boa, as it will help to hold the round shape better and keep the boa in place better.
-
 Step 8
Now turn the loose end of your feather boa a bit...
-
 Step 9
Wrap again, pinning as you go!
-
 Step 10
Keep on wrapping, pinning as you go, and once you get to the end of your boa, pin the end down. If you have a 3-inch styrofoam ball like mine, you'll obviously have some bald spots.
You may also have a tail from your first boa- if so, just snip it off.
Pin on your next boa, and keep on wrapping! Cover any spots where white is still showing.
-
 Step 11
Now your ball should look nicely fluffy- if you're planning to use this for a costume, blow on it all over to make sure there aren't any bald spots that might be seen if the wind picks up. If not, it should be fine sitting wherever you so choose! (Just make sure you secure things, as these are very light weight and may blow around or be easily knocked over).
-
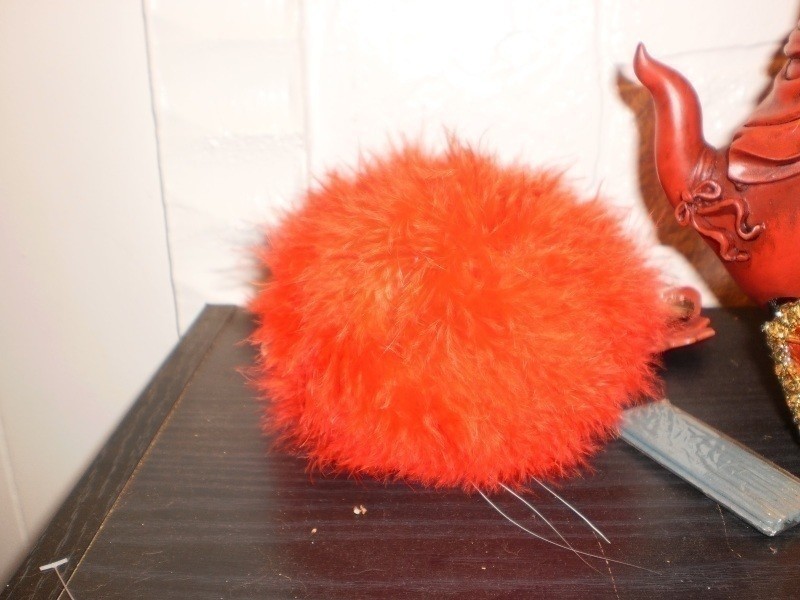
Step 12
Your pompom should look like the very first image now! Obviously, you don't have to use a red boa- pastel colors on a styrofoam egg (or just a ball, too!) would be cute for Easter, orange and black boas would be great for Halloween, and red and green would be awesome for Christmas!
I just used red because it's the color of a standard Moogle's pompom, and that's what I'm being for Halloween. Hopefully, I'll have a creation up soon of my entire headband set up!


Comments

