


About
Frame up your favorite pictures
I've tried to replicate a piece I saw that was an image placed between two pieces of glass and soldered around the edges. This is what I came up with. I hope you like it.
Note: There are several different variations you can do to this project, use natural items instead, do just one piece and wear it as a pendant.. the possibilities are endless!
-
 zoegirl221 favorited Mini Framed Picture
28 Sep 02:18
zoegirl221 favorited Mini Framed Picture
28 Sep 02:18
-
 Tamsin M. favorited Mini Framed Picture
23 Mar 05:27
Tamsin M. favorited Mini Framed Picture
23 Mar 05:27
-
 angelvaliant favorited Mini Framed Picture
08 Jan 03:18
angelvaliant favorited Mini Framed Picture
08 Jan 03:18
-
 D. Samone favorited Mini Framed Picture
19 Aug 13:00
D. Samone favorited Mini Framed Picture
19 Aug 13:00
-
Len favorited Mini Framed Picture
17 Jul 23:42
-
 Step 1
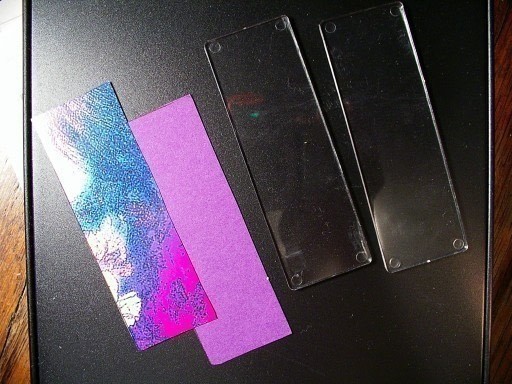
First, find the graphic you want to use, cut the image to fit the appropriate glass (or plastic in my case) pieces you have. Since my image was just printed off the computer I cut out some purple card stock to be the back.
-
 Step 2
After placing the image(s) between the two pieces secure the edges with coper tape.
If you're having a hard time finding copper tape check your local nursery because its other use is to ward off snails and keep them from eating your plants.
-
 Step 3
Make sure you fold over the edges neatly and then burnish it so the tape is flush with your clear surface. Then using a sharp cutting tool cut away excess tape. It's a good idea to measure out and trace where you want to cut away, just so it's all even in the end.
-
 Step 4
Once you have your pieces all arranged and ready to go you will need to apply a decent amount of flux anywhere there is copper tape.
Then the tricky part: Soldering. I use a relatively cheap soldering iron found at the hardware store. You will want one that reaches the highest temperature though.
-
 Step 5
The technique itself takes some time to get use to, but here are some pointers.
Touch the solder to the iron tip, wait for it to get shiny and liquid on the iron, the slowly tip the iron and glide it against the surface of the copper tape.
If you mess up it's okay, you can press the iron on top of the mistake to smooth it out, or just apply more solder to fill in any missing gaps.
I do each side at a time, and use a third hand (clamp) to help keep the piece still.
-
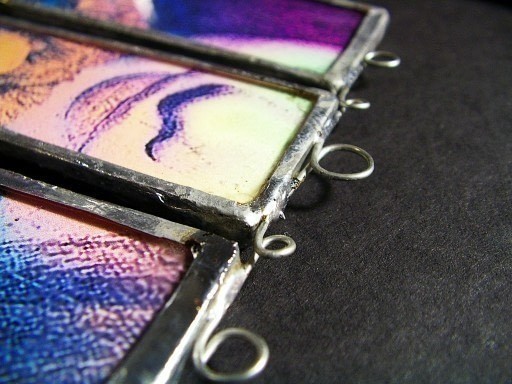
 Step 6
The loops were made from just one piece of wire, looped with the aid of needle nose pliers, I used a small amount of solder between each loop to attach it to my piece.
After you are done you will need to clean all the flux away. Then I recommend using sand paper followed by a polishing tool (or cloth) for final touches.


its fun
i necer thought of putting one pic in 3 frames. very nice