


About
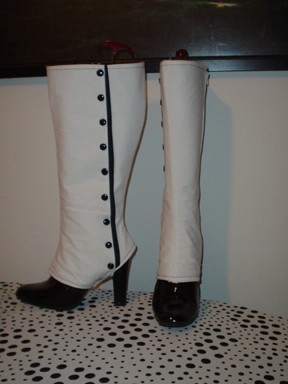
Zip On Victorian Spats for Boots
Supplies:
White spool of thread
White cotton (I’m gonna guess I had about 1.5yds)
Iron on interfacing (Very important for stiffness)
Scrap cotton fabric for mock up (I used old Halloween fabric)
2 separating white zippers in 18” (can be cut down for length)
Black cotton (used 3 strips of fabric approx 2” wide x 18” long)
18 1/2” wide black flat round buttons
1.5 “ wide elastic (approx 6 inches long)
Total sewing time: Approx 3 hours.
-
 Key West Witch favorited Knee High Victorian Spats/ Boot Covers
12 Sep 09:22
Key West Witch favorited Knee High Victorian Spats/ Boot Covers
12 Sep 09:22
-
 Megzy H. favorited Knee High Victorian Spats/ Boot Covers
08 Apr 00:08
Megzy H. favorited Knee High Victorian Spats/ Boot Covers
08 Apr 00:08
-
 ShortHairedGirl favorited Knee High Victorian Spats/ Boot Covers
01 Jan 00:34
ShortHairedGirl favorited Knee High Victorian Spats/ Boot Covers
01 Jan 00:34
-
 Marci F. favorited Knee High Victorian Spats/ Boot Covers
25 Oct 04:51
Marci F. favorited Knee High Victorian Spats/ Boot Covers
25 Oct 04:51
-
 Rashel S. favorited Knee High Victorian Spats/ Boot Covers
24 Jun 03:28
Rashel S. favorited Knee High Victorian Spats/ Boot Covers
24 Jun 03:28
-
 cea e. added Knee High Victorian Spats/ Boot Covers to Cosplay
06 Jan 14:39
cea e. added Knee High Victorian Spats/ Boot Covers to Cosplay
06 Jan 14:39
-
 Courtney B. favorited Knee High Victorian Spats/ Boot Covers
06 Nov 03:52
Courtney B. favorited Knee High Victorian Spats/ Boot Covers
06 Nov 03:52
-
ellie j. added Knee High Victorian Spats/ Boot Covers to kate
27 Oct 20:02
-
 Emma H. favorited Knee High Victorian Spats/ Boot Covers
26 Oct 19:43
Emma H. favorited Knee High Victorian Spats/ Boot Covers
26 Oct 19:43
-
 neijie added Knee High Victorian Spats/ Boot Covers to Mrs. Lovett
06 Oct 20:31
neijie added Knee High Victorian Spats/ Boot Covers to Mrs. Lovett
06 Oct 20:31
-
Step 1
First I started with left over holiday wrapping paper and a knee high boot. I put on my boot and sat on the floor, tracing the outline of my leg. Then I measured the circumference of my ankle, calf, and arch, and then divided it by half. For example, my ankle was 11 inches circumference with the boot on so naturally a pattern half would be 5.5” plus and extra inch for seam allowance. On my paper traced outline, I drew on the additional inches making the ankle approx 6.5” wide.
Once I had a spat half draw out with all the added seam allowances, I determined where I wanted to added my inseam zipper and my outseam faux button closure. I had both going perfectly straight down the side of my leg. Then I cut it out. Basically this outline of my boot is going to be the ENTIRE pattern. SWEET! -
Step 2
Next I took my scrap cotton, and cut out a mock up of the pattern. THIS IS EXTREMELY IMPORTANT. This is how you are going to be able to determine a perfect fit. I loosely sewed together to two front pieces, the outside piece with the black faux fold strip in it and the inseam with the zipper in it. Now the mock up doesn’t have to be a perfectly sewn piece. Basically you are doing this to get a perfect fit AND the use it as your final pattern piece.
Using a sharpie I started to mark on the mock up where I needed to pinch in the pattern, or reshape the arch. Once you have all that figured out, you got yourself a FINAL PATTERN PIECE! -
Step 3
Next you are gonna take apart the mock up. BUT FIRST number each 1,2,3,4 so you will know which piece attaches to which. Next I cut out the pieces from my white cotton. You are going to cut 4 pieces each; 2 per section per leg. Then I cut 2 each on the iron on interfacing. Each of the 4 sections of the spat will be composed of cotton, interfacing, cotton.
For the sake of clarity, start with the right foot. -
Step 4
I started off assembly with the 2 front pieces of the right foot. Each of the sections I laid out as interfacing, cotton, cotton. Then hemmed the top and the bottom on the wrong side, then flipped it making it cotton, interfacing, cotton. Next I sewed these two pieces together, cut notches in the seam allowance at the ankle to allow the seam to curve and pressed the seams open. You now will have a finished front piece.
Now that I have pieces 1 and 2 assembled, I attached piece 3 (the outer faux closure piece) Repeating the same steps of hemming the top and bottom first I then flipped it and sewed it to the outer front piece. But first I took the black 2” x 18” strip, folded it in half, pressed it , and sandwiched it between the front and side piece. Stitch it all together. Once done you now have your finished and attached side piece with the faux black stripe closure on the side. LOOKING SHARP! -
Step 5
Next I attached the inner side piece, making sure the hem the top and the bottom just like before, then flipped it and attached it to the outer side piece.
Also don’t forget to press all your seams open!
Lastly I attached the inseam zipper. On my final piece my zipper length was 16”, but I used an 18” zipper and cut it down. It is very important to use a separating zipper so you can easily put on and remove your spat. You will line up the separating end at the bottom of your spat, then stitch you inseam front piece and your inseam side piece to the zipper. If your zipper is too long, simply cut it to the length you want and machine stitch back and forth across the top to seal off the zipper teeth so your zipper doesn’t fly off. -
Step 6
Next I added the elastic to the arch piece and finished the body of the spat. Now it’s time to embellish it. I placed the black half inch buttons approx 1.75” apart from each other. Hand stitched them on and TAH DAH! It’s finished.
I encourage creativity. This is merely how I wanted mine to look. But you can change it up any way you like. Do them in olive, put the zipper on the side, add buckles, add grommets, change the length! It’s all up to you.

PJ
But the instructions are a bit confusing. Or I'm bad at following instructions. Well, I know I am. xD
I'm not exactly sure how many basic pieces there are in total, minus the facing and blah. Like, a front piece and a back piece?
Thanx