About
Make Your Own Two Step Stamps!
This tutorial teaches you how to make two, or even three, step stamps using stencils or by drawing free-hand.
You can also visit an additional tutorial on my blog that covers more basics of creating your own two-step stamps.
http://madebynicole.blogspot.com/2011/08/home-made-two-step-stamps-for-art.html
-
 Tashianna S. favorited Homemade Two Step Stamps Using A Stencil Or A Drawing
11 Apr 13:07
Tashianna S. favorited Homemade Two Step Stamps Using A Stencil Or A Drawing
11 Apr 13:07
-
Amanda P. favorited Homemade Two Step Stamps Using A Stencil Or A Drawing
23 Jun 07:24
-
 Sarah Sylvia S. favorited Homemade Two Step Stamps Using A Stencil Or A Drawing
19 Jul 01:37
Sarah Sylvia S. favorited Homemade Two Step Stamps Using A Stencil Or A Drawing
19 Jul 01:37
-
 Lorrie B. added Homemade Two Step Stamps Using A Stencil Or A Drawing to crafts
23 May 19:08
Lorrie B. added Homemade Two Step Stamps Using A Stencil Or A Drawing to crafts
23 May 19:08
-
 alexandra.wood.148 favorited Homemade Two Step Stamps Using A Stencil Or A Drawing
16 May 00:49
alexandra.wood.148 favorited Homemade Two Step Stamps Using A Stencil Or A Drawing
16 May 00:49
-
 nikimaki published her project Homemade Two Step Stamps Using A Stencil Or A Drawing
15 May 06:00
nikimaki published her project Homemade Two Step Stamps Using A Stencil Or A Drawing
15 May 06:00
You Will Need
-
 Step 1
What you’ll need to make DIY Two-Step Stamps is plexiglass, silicone caulking, basic craft tools and a stencil (optional)
-
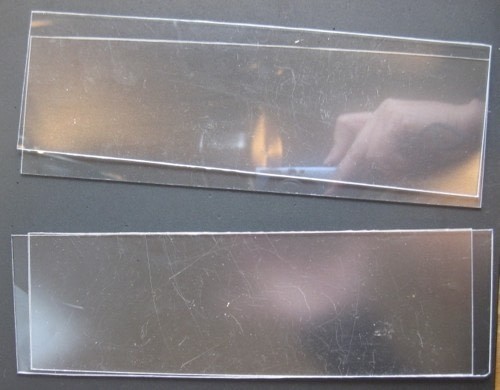
 Step 2
Take your plexiglass, decide on the size of base you want to cut and then score it several times with an craft blade. Next, hold the scored-line against the edge of your table and WHACK IT really hard. For my second batch I bought thinner plexiglass then suggested and it snapped with ease while still being rigid enough to stamp with.
You'll need two plexiglass bases for each layered stamp set; one for the foam stamp, one for the silicone.
-
 Step 3
To Make a Stamp Set Using a Stencil:
Choose a stencil with an image that fits your base. I got this set at the Dollar Store as it has great stamp-style images
-
 Step 4
Trace the stencil onto your sticky back foam and cut out. Trim as close to the image as you like, I prefer to leave a little space around the edges.
-
 Step 5
Attach foam to base. If using sticky-backed foam, peel the paper backing off and stick it on the plexiglass. If you’re using the thicker foam, glue it to the plexiglass with Aleene’s Tacky Glue and let it dry overnight.
-
 Step 6
For the silicone step, trace your stenciled image onto scrap paper and place the matching-size base over top. Trace the pattern in silicone. Let dry over night. The type of silicone I use says, “shower ready in three hours” but I let it dry longer.
Tip: If you’ve tested your foam stamp on paper, don't lay your plexiglass over your stamped image for the silicone step as it'll come out backwards because your outlining the mirror image. I did... not good.
-
 Step 7
Now have fun stamping. Brush paint on the foam stamps and then once it's dry use paint or ink on the outline stamp. I love using Staz-On ink with the silicone stamps.
-
 Step 8
To Make a Stamp Set Using Your Own Hand Drawn Image:
The method for hand-drawn layered stamps is basically the same but instead of copying the stencil you draw your own image and transfer it to the paper side of your sticky-backed foam.
-
 Step 9
And here's the drawn banner!
-
 Step 10
Tips and Trouble Shooting:
* Ink goes on to the silicone better if you rub fine sand paper over it very gently.
* Wash these carefully - they aren’t as durable as manufactured stamps.
* I’ve had a few silicone pieces come loose when rinsing. It seems to occur where my line of silicone was too narrow. But, when I’ve let them air dry they reattached.
* Repairs or additions to your image can be made at any time, just add more silicone.
* To make three-step stamps create your foam background layer and silicone outline. Then make a third layer of designs to fill the outline. For example, with the banner I could make a layer to add stripes or polka dots to each pennant.
* Choose versatile shapes and make multiple silicone toppers. A rectangle could have a matching high rise layer but also serve as a text block (remember to mirror your writing so it’ll be oriented correctly when stamped), bricks, a border design, presents etc.
-
 Step 11
An art journal project using these stamps
-
 Step 12
Our cash envelope system... we're Dave Ramsey people :-)