


About
Glitzy Gift Bags on a Circular Knitting Loom
Designed for Circular Loom Knitting
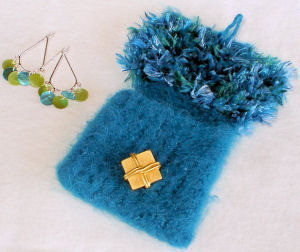
Two days before my best friend’s birthday, I suddenly had that sinking feeling: the store-bought necklace & earrings I’d gotten her just weren’t “special enough”.
Then inspiration struck ... and in less than 2 hours I had whipped out a “Glitzy Flapped Gift Bag” on my round blue Knifty Knitter loom, felted it, and stitched on a decorative button.
Voila! A very special package for the earrings.
I’m happy to share these ideas for making small presents more special.
You’ll find the gift bags are quick and easy to make, use up small stash bits trimmed with inexpensive notions, and best of all, require very little finishing work.
The envelope-style “Glitzy Flapped” bag is knit in the round, the pocket portion bound off halfway – only the bottom needs to be stitched shut. What could be easier?
Pattern Notes
1. For Main Color, choose a yarn that is at least 50% wool or other animal fiber for felting. For Contrasting Color, choose any lightweight novelty yarn you like: eyelash, fun fur, feather boa, even ribbon!
2. Remember that all yarns felt differently. If you don’t like surprises, knit a swatch of the yarns you intend to use. Take measurements before and after felting, and adjust my pattern according to the finished size you want. (Your felted swatches can serve as coasters, or Catnip Mice!)
-
 Maggie B. entered her project Glitzy Gift Bags to Doxie Flip Contest
26 May 03:45
Maggie B. entered her project Glitzy Gift Bags to Doxie Flip Contest
26 May 03:45
-
Maggie B. entered her project Glitzy Gift Bags to Wander & Hunt
11 Nov 15:09
-
Maggie B. entered her project Glitzy Gift Bags to Paradise Fibers Knitting Contest
09 Jul 22:58
You Will Need
-
 Step 1
Knitting the Bag
Leaving a 12” tail for finishing, CO all 24 pegs in MC using the basic cast-on method as shown in the Knifty Knitter Loom instructions, or any other cast-on you prefer.
Wrap and knit until fabric is approximately 4” long, or as deep as you want your bag to be, allowing extra measure for shrinkage in felting.
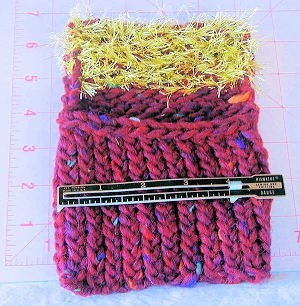
Starting at the beg of the next round, BO 12 pegs using basic bind-off method. After this partial bind off, your loom should look like the photo at right.
The pocket portion of the bag is now complete, and you’re ready to start the envelope flap.
Continuing in MC, wrap and knit the next 4 rows back and forth, flat panel style. To make the turns, you will alternately wrap and knit the pegs in clockwise, then counterclockwise, fashion.
These “extra” rows will allow the envelope flap to easily fold down over the thickness of the bag’s pocket.
At the beginning of the next round, join the CC novelty yarn by twisting it around the MC yarn, leaving a short 3” tail. Continue to wrap and knit back and forth using the combined yarns as one. Remember that the CC novelty yarn does not have the same stretchiness as your wool MC: to make knitting the combined yarns easier, wrap and knit ONE PEG AT A TIME.
When the knitted fabric of the combined yarns measures approximately 2”, drop the CC novelty yarn and use the MC yarn alone to BO. Clip both yarns leaving a 3” ending tail.
-
 Step 2
Finishing
Thread the 12” beginning tail of MC onto the tapestry needle, and use it to whipstitch the bottom of the bag closed.
You don’t have to do the seaming on the inside of the bag: edge stitching outside the bag will disappear in the felting process.
You can weave in the other yarn tails, if you like, or just clip them after felting.
Brush the CC eyelash fibers with your hand to ruffle them up from the knitted fabric. If too much of your “bling” has ended up on the inside of the bag’s flap, use the point of the knitting tool to gently pull some back out to the front.
Your finished bag will resemble the sample shown in Photo 2, right, now measuring approximately 5” wide and 7” tall.
-
Step 3
Felting the Bag
You can felt your project by hand, or in your washing machine. I prefer the work-saving washing machine!
Place your knitted bag into a zippered pillow case or lingerie bag to prevent the little bag from escaping down the drain, and to capture the “fuzz” that it will shed during felting.
Set your washer to its lowest water level, with the most vigorous agitation, on a HOT wash COLD rinse cycle.
Start the water and add 2 tablespoons of wool wash, dishwashing liquid or shampoo. Drop the bag containing your project into the hot sudsy water along with a pair of old blue jeans or similar non-linty item for added friction. (“Non-linty” means no sweatshirts or towels!) Close the lid and let the washing machine do its magic.
I like to check my felting projects every 5 minutes or so during the wash agitation cycle: stop the machine, pull out the bag and check your project to see how it’s progressing. Use tongs if it’s too hot to handle.
If the machine reaches the end of the wash portion of the cycle and your project is not yet as felted as you like, restart the wash cycle. (This sample project needed two 14-minute wash cycles to lose the stitch definition.)
When your project is as felted as you want it to be, you can pull it out to hand-rinse in cold water, or allow the machine to complete the rinse and spin cycles.
Remove the now-felted bag from the machine, squeeze out excess water, and shape it with your fingers to square. You can pull and tug pretty hard to shape the bag, as the felted fabric is quite sturdy. Allow to air dry completely before finishing.
-
Step 4
Adding Buttons or Charms
After felting, you have a sturdy fabric bag! The felted wool yarn grips the novelty yarn in place with no risk of fraying, so you can clip any loose yarn ends. If your finished bag is fuzzier than you like, you can give it a “haircut” with a pair of scissors.
Cut a short strand of the MC yarn, thread the tapestry needle, and use it to attach a decorative button or charm to the front of the bag for a closure. I used a gold jingle bell for the red bag, and a decorative gold button for the blue bag.
Cut another short strand of the MC yarn, and using the tapestry needle attach a loop to the edge of the flap, measuring to make sure it will fit snugly over the button to hold the bag closed.
Aaaand ... you're done!

 1
Watercolor Art »
Watercolor Paints Made From Make Up
1
Watercolor Art »
Watercolor Paints Made From Make Up


You should submit this to instructables Summer Yarn Contest to win an awesome prize from Lion Brand Yarn!
http://www.instructables.com/contest/summeryarns/