About
Make your own Galaxy/Space shirt!
Have you ever wanted your own space/galaxy shirt?
You know... you could make your own with just some fabric paints!
-
 Claire K. favorited Galaxy Shirt Tutorial
12 Nov 21:37
Claire K. favorited Galaxy Shirt Tutorial
12 Nov 21:37
-
 Melissa Beth favorited Galaxy Shirt Tutorial
07 Jan 19:50
Melissa Beth favorited Galaxy Shirt Tutorial
07 Jan 19:50
-
 cornelia.featherstone favorited Galaxy Shirt Tutorial
08 Jun 14:37
cornelia.featherstone favorited Galaxy Shirt Tutorial
08 Jun 14:37
-
 Leah. favorited Galaxy Shirt Tutorial
11 May 19:59
Leah. favorited Galaxy Shirt Tutorial
11 May 19:59
-
 Stormy E. favorited Galaxy Shirt Tutorial
21 Apr 16:02
Stormy E. favorited Galaxy Shirt Tutorial
21 Apr 16:02
-
 Miss Captain Cosplay favorited Galaxy Shirt Tutorial
20 Apr 00:28
Miss Captain Cosplay favorited Galaxy Shirt Tutorial
20 Apr 00:28
-
 Jayne W. added Galaxy Shirt Tutorial to Hermione Granger
28 Mar 17:13
Jayne W. added Galaxy Shirt Tutorial to Hermione Granger
28 Mar 17:13
-
 Evilpanda666 favorited Galaxy Shirt Tutorial
08 Jan 18:46
Evilpanda666 favorited Galaxy Shirt Tutorial
08 Jan 18:46
-
 LollypopLoz favorited Galaxy Shirt Tutorial
30 Dec 12:37
LollypopLoz favorited Galaxy Shirt Tutorial
30 Dec 12:37
-
 Kera W. favorited Galaxy Shirt Tutorial
04 Nov 21:08
Kera W. favorited Galaxy Shirt Tutorial
04 Nov 21:08
You Will Need
-
 Step 1
TIP: If you're doing this indoors, please lay down some old newspaper and make sure to wear old clothes, because this does get a bit messy.
First things first. Get your spray bottle and put in a very small amount of bleach in there with the same amount of water. You won't need much.
-
 Step 2
Now get your fabric paint. I have a lot of acrylic paints so I ended up getting acrylic fabric medium, which basically turns any normal acrylic paint into fabric paint. Magic!
I would say the best colours to use would be white, blue, purple and yellow. But you can use any colours you want!
-
 Step 3
Once you have your bleach and paints all ready to do...spray some bleach on your t-shirt. Just make some blotchy circles, don't cover the whole shirt with bleach though. You want a lot of black space too or it'll look too crowded once you put the paint on. Give your bleach some time to dry. I waited about 5 - 10 minutes.
TIP: If you are doing BOTH sides of your shirt, then I highly recommend you start with the back of your shirt first. It's a good way to practice. Both sides of your shirt won't look the same no matter how hard you try. One side will always end up looking better. And usually it's the second time around that looks best.
-
 Step 4
I'm starting with the back of my shirt.
Now start splashing, dripping and smudging your fabric paint. You might want to use a sponge or something similar (paper towel?) but I used my hands. I even painted my hands a few times and just rubbed them onto my shirt.Start with the lighter colours and work your way to the darker ones. I started out using the white paint. I gave the paint some time to dry (about 10 minutes) before moving on to the next colour.
After the white layer I then did a yellow pass, followed by blue and purple. Build the coloured areas! Make sure they are close together and overlapped. (It gives it a nice effect.)
Then I finished it all off with a layer of white 'stars' using your paint brush.
TIP: You can also use an old toothbrush for the white 'stars'. Dip the toothbrush into your paint and use your finger to 'flick' the paint onto your shirt.
-
 Step 5
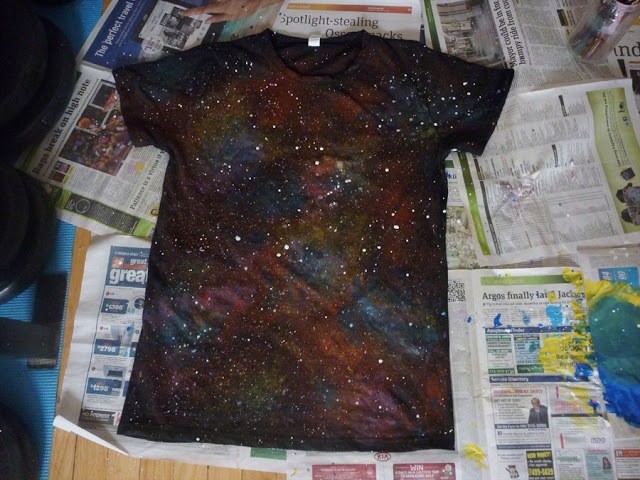
This is the front of my shirt.
Make sure you give enough time for your shirt to dry before starting the other side! -
 Step 6
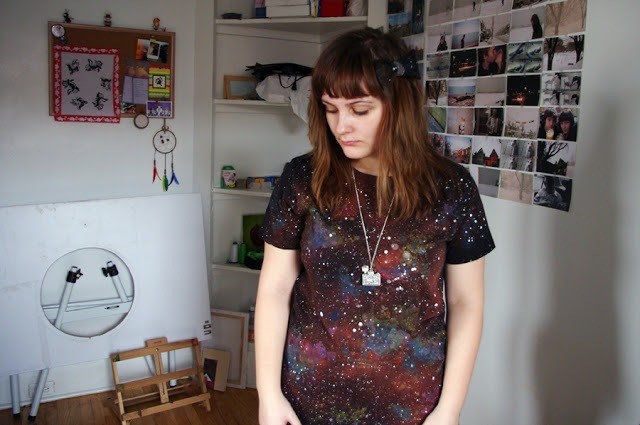
Hang your shirt and admire it.
Let it fully dry over night. -
 Step 7
Once your shirt is dry you can wear it. Or put it in the wash first, to 'soften' the paint a bit.
P.S. I've made my own galaxy shirt about 3 years ago and I still have it. The paint has only faded a little bit. But it still looks like a galaxy. :]