
Folk Art Bowls
Extract from Simple Printmaking • By Elizabeth Harbour • Published by Stackpole Books

About
Simple Printmaking
This is a satisfying and effective way of creating
simple, stylish and individual designs on china.
Porcelain paints are very durable, but do keep
the painted designs to areas that won’t come
into contact with cutlery – such as the outsides
of bowls and the edges of plates.
The technique takes a little practice, but you
can wipe or wash off your design if it is wonky
or wrongly spaced, or if there are any smudges
or mistakes, as the paint is removable until it is
baked. (Have some damp kitchen paper to hand
for this purpose, and make sure that you clean
up any marks that may have occurred during
the printing process before you bake your china.)
It is important to flatten the stencil down well
when printing – and even to cut some extra
stencils to use if you are decorating a lot of
china, in case your stencil loses its stickiness.
-
 Bek S. favorited Folk Art Bowls
03 Aug 01:54
Bek S. favorited Folk Art Bowls
03 Aug 01:54
-
 Biblionic added Folk Art Bowls to Elizabeth Bennet's Sitting Parlor
03 Aug 02:40
Biblionic added Folk Art Bowls to Elizabeth Bennet's Sitting Parlor
03 Aug 02:40
-
Biblionic favorited Folk Art Bowls
03 Aug 02:40
-
Rebecca M. favorited Folk Art Bowls
19 Jun 23:39
-
 Libby W. added Folk Art Bowls to Homewares
22 Apr 19:42
Libby W. added Folk Art Bowls to Homewares
22 Apr 19:42
-
 mmotse03 favorited Folk Art Bowls
29 Mar 06:18
mmotse03 favorited Folk Art Bowls
29 Mar 06:18
-
 Buttons favorited Folk Art Bowls
16 Jun 19:28
Buttons favorited Folk Art Bowls
16 Jun 19:28
-
 Emma H. favorited Folk Art Bowls
27 May 13:13
Emma H. favorited Folk Art Bowls
27 May 13:13
-
 buttercup303 added Folk Art Bowls to to do
18 Feb 08:25
buttercup303 added Folk Art Bowls to to do
18 Feb 08:25
-
 Alex B. favorited Folk Art Bowls
15 Jan 01:40
Alex B. favorited Folk Art Bowls
15 Jan 01:40
You Will Need
-
Step 1
1Prepare the stencils and china
Trace and transfer your chosen template
on the inside front cover onto the paper backing of the
low-tack mask or stencil film, and carefully cut it out using
a scalpel or craft knife on a cutting mat. Remove any sticky
labels from the china and wash and dry it thoroughly. -
 Step 2
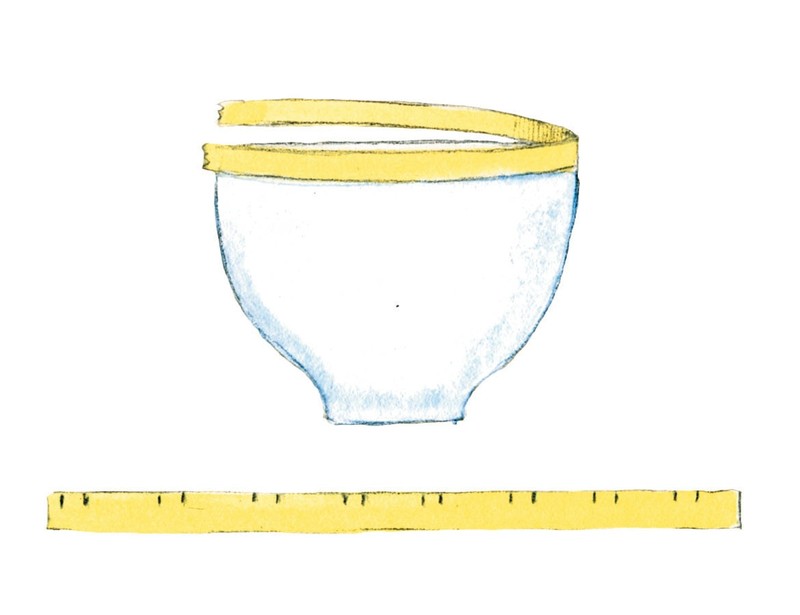
Work out the positions of each stencil
Measure the circumference of each bowl by placing a
length of masking tape around the outer rim, then gently
remove the tape and stick it onto a plastic surface. Use the
shape you have cut out of your stencil to work a design so
that there is more or less 1cm (½in) between each shape,
and mark their positions on the masking tape. -
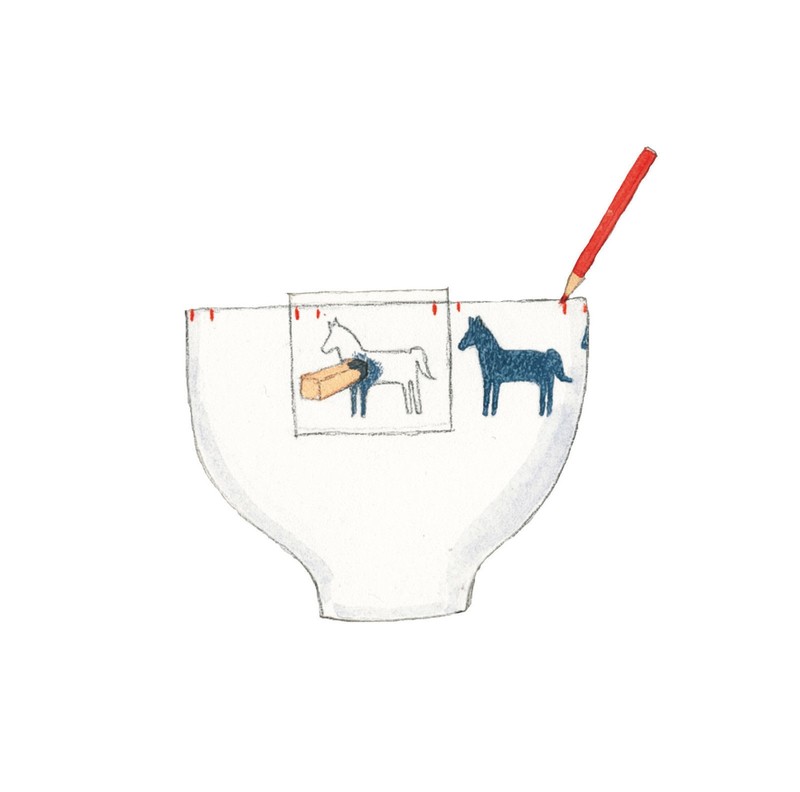
 Step 3
Mark the stencil positions on the china
bowl and begin printing
Reposition the masking tape just below the bowl’s outer
rim and use a watercolour pencil to mark out the stencil positions on the bowl’s side, positioning the stencil each
time so that its top edge is 6mm (¼in) down from the
rim of the bowl. Using a small make-up sponge, gently
sponge scarlet red or abyss black paint onto the stencil.
Be careful not to print over its edges. If you have
any accidents or misprints wipe them off the bowl with
dampened kitchen paper. -
 Step 4
Finish printing and add details
Carefully remove the stencil and reposition it repeatedly
around the side of the bowl, being careful not to smudge
the printed shape. If you are printing the horse, once all
of the shapes are printed, scratch out the eye detail with
the pointed end of a kebab skewer or cocktail stick.
If it is difficult to scratch out the paint, dampen the tip of the stick. Allow to dry for 24 hours and then, following the
Porcelaine paint instructions, bake your bowls in an oven
for 35 minutes at 150°C/300°F/gas mark 2.

Comments

 1
Watercolor Art »
Watercolor Paints Made From Make Up
1
Watercolor Art »
Watercolor Paints Made From Make Up
