


About
A tutorial on making fabric covered buttons!
This tutorial can be used to make any kind of fabric buttons, I just decided to turn mine into a Pokéball. :)
Tags
-
 Hgosn1 favorited Fabric Covered Pokébutton
15 Jan 11:40
Hgosn1 favorited Fabric Covered Pokébutton
15 Jan 11:40
-
 Lauren H. favorited Fabric Covered Pokébutton
21 Jun 23:58
Lauren H. favorited Fabric Covered Pokébutton
21 Jun 23:58
-
 Kays K. favorited Fabric Covered Pokébutton
26 Dec 04:42
Kays K. favorited Fabric Covered Pokébutton
26 Dec 04:42
-
 bemeself favorited Fabric Covered Pokébutton
14 Dec 20:19
bemeself favorited Fabric Covered Pokébutton
14 Dec 20:19
-
 gloria z. favorited Fabric Covered Pokébutton
05 Nov 03:06
gloria z. favorited Fabric Covered Pokébutton
05 Nov 03:06
-
Amy D. favorited Fabric Covered Pokébutton
05 Nov 00:52
-
 notthatmj added Fabric Covered Pokébutton to Sewing projects
04 Nov 15:57
notthatmj added Fabric Covered Pokébutton to Sewing projects
04 Nov 15:57
-
 Rose K. favorited Fabric Covered Pokébutton
19 Aug 23:56
Rose K. favorited Fabric Covered Pokébutton
19 Aug 23:56
-
HarukaMS added Fabric Covered Pokébutton to Cosplay&etc
08 Jul 06:18
-
 Roughwaters44 favorited Fabric Covered Pokébutton
08 Jul 03:19
Roughwaters44 favorited Fabric Covered Pokébutton
08 Jul 03:19
You Will Need
-
 Step 1
Measure the back of your button from the edge to the shank. Draw around your button using a tailors pen on your scrap fabric, then add the distance from the edge to the shank around the circle.
-
 Step 2
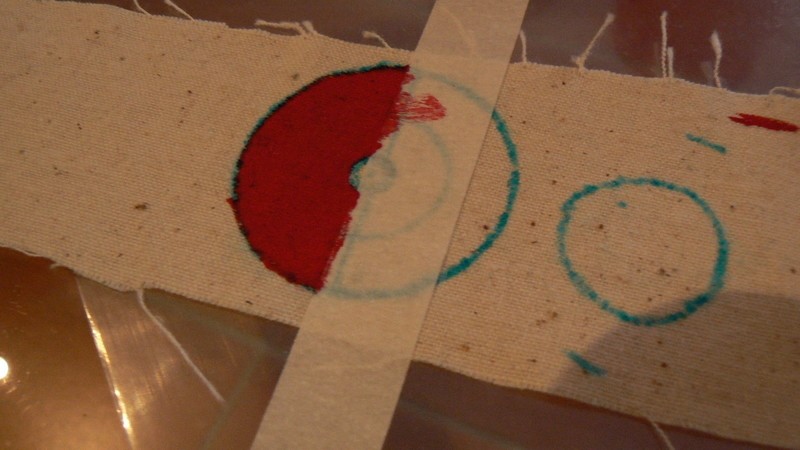
I drew the basic lines of the pokéball onto the smaller circle, using a circle stencil for the small, middle circle and measuring with a ruler to find the centre line (make this line about 1mm). Once your lines are drawn on, stick a piece of masking tape across the middle, touching the line you drew across the middle.
-
 Step 3
Paint one side of the circle red, overlapping the masking tape if necessary.
-
 Step 4
My fabric paint required me to iron the back of the fabric to set the paint when dry, so I did this now.
-
 Step 5
Repeat step 3 on the other side of the circle, this time using white paint.
-
 Step 6
Repeat step 4 once the white paint is dry, and then add two pieces of masking tape on either side of the centre line.
-
 Step 7
Fill in the centre line between the two pieces of masking tape using black paint, leaving the small, middle circle blank.
-
 Step 8
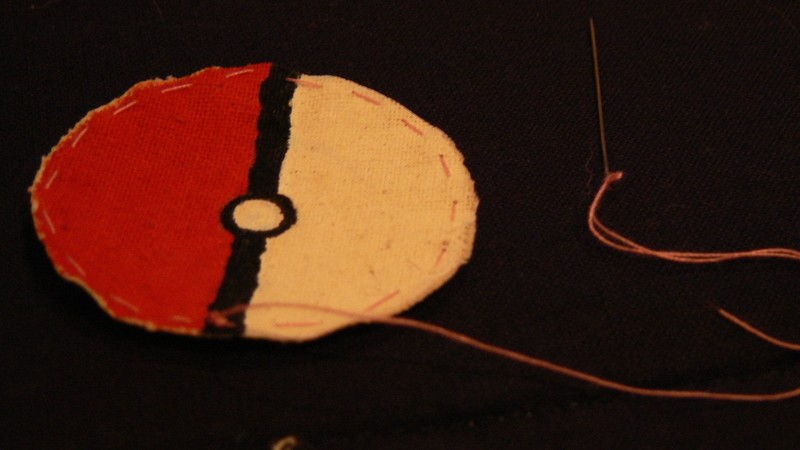
After removing the masking tape, once the black paint is dry, paint the middles circle in using white paint and black for the outline.
-
 Step 9
Cut out the painted circle and sew tacking stitches around the outside.
-
 Step 10
Pull the tacking stitches tight to gather the circle around the button and pull it as tight as possible.
-
 Step 11
Sew the fabric tight around the gathered area to secure the fabric around the button.
-
 Step 12
Attach your button to your garment and wear with pride!


CO + K User
SO CUTE!
CO + K User