About
stitch up a TARDIS and some adorable adipose to hang on your wall!
Embroidery is like drawing, with THREAD! So I 'drew' an image inspired by Doctor Who, (because I'm a huge fan), and I wrote up a mini little tutorial on how to make one of your own. Please note, this is NOT a "how to embroider" tutorial.. that's a whole different ballgame. If you don't know how to embroider, I highly recommend Jenni Hart of Sublime Stitching's books and website.
This is my first ever how-to, so please bear with me and my blurry pics ;)
I'd love to know your thoughts, and if you decide to make one of your own, please show me. Thanks for taking a look!
-Gaby
NOTE: This tutorial also appears on my blog, (link in promo box above!)
Tags
-
 Deb E. favorited Doctor Who Tardis Embroidery Diy
18 Jan 04:32
Deb E. favorited Doctor Who Tardis Embroidery Diy
18 Jan 04:32
-
 Haley G. favorited Doctor Who Tardis Embroidery Diy
11 Jun 15:09
Haley G. favorited Doctor Who Tardis Embroidery Diy
11 Jun 15:09
-
 Xfluffy_unitatoX favorited Doctor Who Tardis Embroidery Diy
16 Mar 17:30
Xfluffy_unitatoX favorited Doctor Who Tardis Embroidery Diy
16 Mar 17:30
-
 Conner W. added Doctor Who Tardis Embroidery Diy to anime/manga
13 Feb 01:18
Conner W. added Doctor Who Tardis Embroidery Diy to anime/manga
13 Feb 01:18
-
 Tiffanezep K. favorited Doctor Who Tardis Embroidery Diy
29 Mar 21:55
Tiffanezep K. favorited Doctor Who Tardis Embroidery Diy
29 Mar 21:55
-
Anne Mary F. favorited Doctor Who Tardis Embroidery Diy
30 Nov 05:20
-
 OverlordSayo favorited Doctor Who Tardis Embroidery Diy
24 Aug 23:15
OverlordSayo favorited Doctor Who Tardis Embroidery Diy
24 Aug 23:15
-
 Roughwaters44 favorited Doctor Who Tardis Embroidery Diy
06 Jul 08:39
Roughwaters44 favorited Doctor Who Tardis Embroidery Diy
06 Jul 08:39
-
 adri.goodson favorited Doctor Who Tardis Embroidery Diy
08 Dec 23:49
adri.goodson favorited Doctor Who Tardis Embroidery Diy
08 Dec 23:49
-
 MewStrawberry favorited Doctor Who Tardis Embroidery Diy
13 Aug 23:51
MewStrawberry favorited Doctor Who Tardis Embroidery Diy
13 Aug 23:51
-
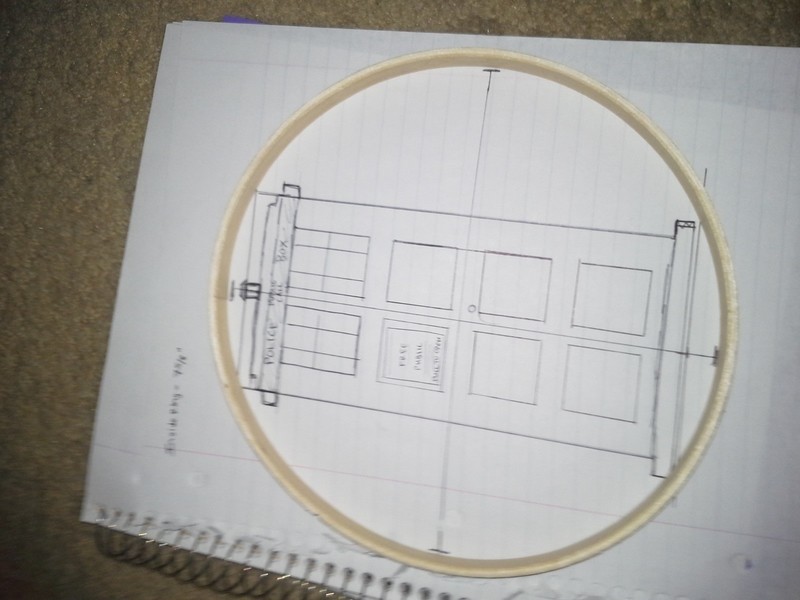
Step 1
Measure INSIDE of your hoop to determine how big of a TARDIS you will need to draw. Mine was about 7 5/8".
-
Step 2
Draw a vertical line on a piece of paper measuring this same length. (Note: this means your TARDIS will need to be smaller than this).
-
 Step 3
Draw out the rest of your TARDIS as best you can, using your ruler to get straight lines and making sure you drawing at least 1/4" below and above the height of your hoop. (see STEP ONE). Add in the details, the square panels, the windows, the notice... It helps to use a reference photo. Also, the squares below the windows are 1 square inch for me, if that helps.
-
Step 4
Cut out finished TARDIS. (Only the outline for now).
-
Step 5
Trace onto scrap fabric.
-
 Step 6
Start to embroider the outline in blue. (I used the split stitch technique for this part).
-
 Step 7
After you do the outline, you can start in on the inner details, using any techniques you like. I continued with the split stitching, and incorporated whip stitching with different colors on the bars of the window, and the text on the sign..) For help, you can go back to your original paper drawing, and carefully cut out the square shapes with an xacto knife to use as stencils for your fabric.
-
 Step 8
After the TARDIS is completed, you can add on to the 'scenery' in any way you like. I used french knots in several different colors, and silver sequins that look like stars. And of course, I added in some adorable adipose (human fat babies!) floating around, using white and a silvery gray combo.
-
Step 9
Finally, you can either choose to leave it as is, or if you want a more solidly colored TARDIS, you can paint it in any way you like. I used a PRISMA marker :)
Hang it up on your wall! Or gift it to a Doctor Who loving friend.