About
Zippered Project Bag
On the tail end of deep dive cleaning my sewing room, I suddenly felt that I needed quilted project bags for my WIPs. And if I needed them, I’m thinking that many of y’all out there might need them too. And even though I used a quilted panel in my tutorial, you can totally make these non-quilted, which would make them even easier than they already are.
-
 RareJewel favorited Zippered Project Bag
23 Mar 21:40
RareJewel favorited Zippered Project Bag
23 Mar 21:40
-
 Delicate Stitches favorited Zippered Project Bag
20 Jan 12:59
Delicate Stitches favorited Zippered Project Bag
20 Jan 12:59
-
 Crafterella featured Zippered Project Bag
17 Jan 23:00
Crafterella featured Zippered Project Bag
17 Jan 23:00
-
 Deb E. favorited Zippered Project Bag
17 Jan 01:26
Deb E. favorited Zippered Project Bag
17 Jan 01:26
-
C.J. M. added Zippered Project Bag to Sew
16 Jan 15:46
-
C.J. M. favorited Zippered Project Bag
16 Jan 15:41
-
 Mister Domestic published their project Zippered Project Bag
14 Jan 09:00
Mister Domestic published their project Zippered Project Bag
14 Jan 09:00
You Will Need
-
 Step 1
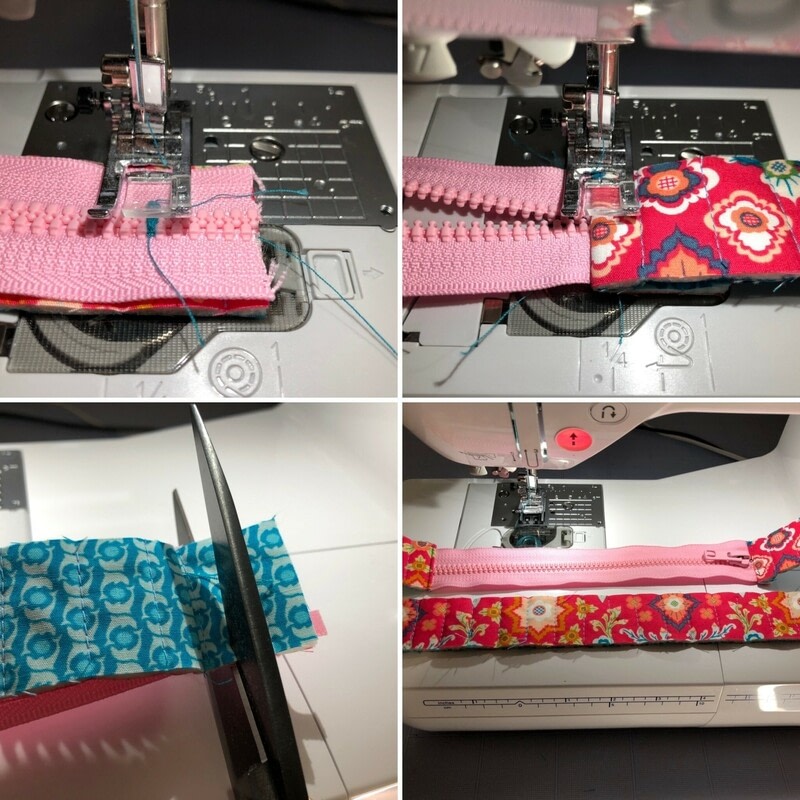
If you have an 8” zipper then you can skip this section. I’m very much a proponent of using what you have and any type of zipper would work for this project. I had a separating sports zipper that worked with the fabrics so I used that. It was a little longer than I needed, so I needed to secure the zipper at the length I needed before trimming to size.
From the quilted panel, cut two 10” strips: one 1.5” and one the width of the zipper.
Set your machine to a zigzag stitch with a length of 0 and width of 7mm (or the widest setting)
Measure the section of the zipper teeth to 8” and mark it. Center the zipper under the needle and stitch 10 times across the zipper and snip.
Trim the excess of the zipper, leaving 1” beyond the stitch on the zipper. -
 Step 2
Cut the zipper-width strip in half. Take one half and, right sides together, slowly sew the zipper and strip together just inside the stitch line. As long as you sew slowly, the needle should fit between the zipper teeth as you stitch over it. If this is new for you, use the hand crank and slightly shift the zipper if you meet resistance.
Fold the tab portion onto the seam allowance and top stitch 1/8” from the seam.
Trim excess, leaving between 1/8” and 1/4”.
Compare the length of the zipper strip to the other strip and trim any excess until they are the same length. -
 Step 3
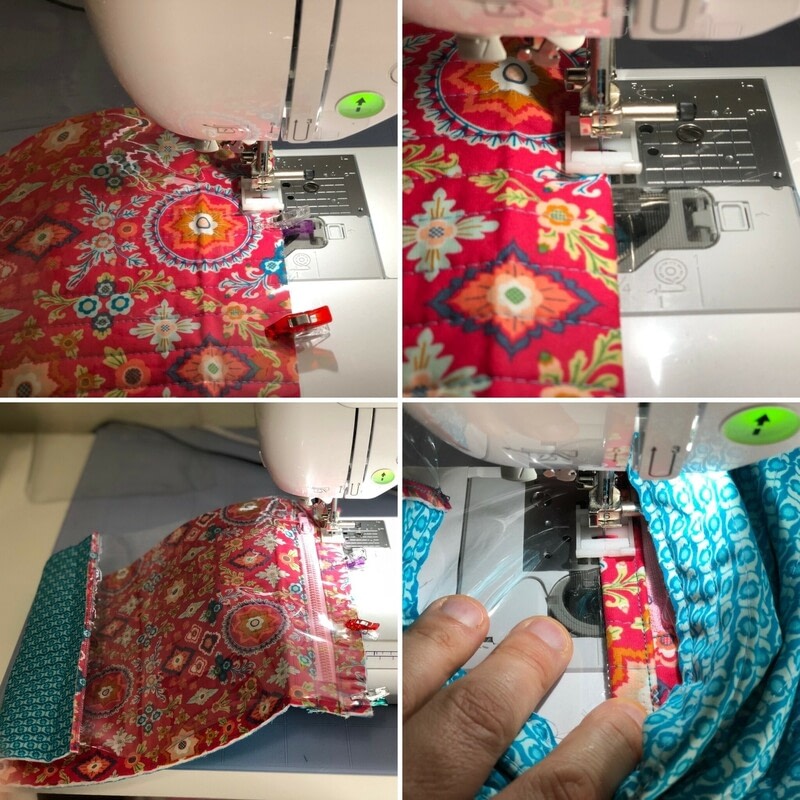
Right sides together, sew the zipper strip and regular strip together using a 1/4” seam allowance. Using a zipper foot is recommended.
Fold the regular strip onto the seam allowance and top stitch 1/8” from the seam.
Trim excess, leaving between 1/8” and 1/4”.
Follow the same process to sew the zipper tab to the remaining quilted panel. -
 Step 4
When working with vinyl or leather, I use a roller or a teflon foot that will keep it from sticking to the presser foot. If the vinyl sticks underneath or you don’t have this foot, placing paper underneath as you sew will allow it to slide through with ease and could be torn away after the sewing is complete.
Line the vinyl up with one of the 10” sides of the panel with the vinyl on top. Clip in place and sew using a 1/4” seam allowance.
Fold the fabric portion onto the seam allowance and top stitch 1/8” from the seam. Trim excess, leaving between 1/8”.
Follow the same process with the other two raw ends. You will need to push the fabric out of the way as you topstitch. -
 Step 5
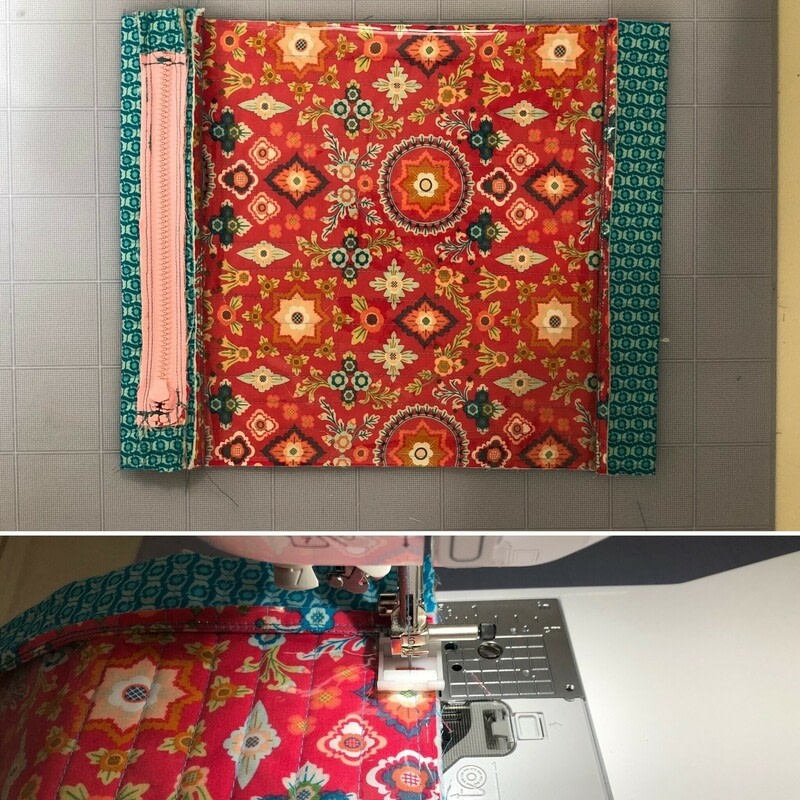
Flatten the body and press folds into the top and bottom. The bottom should be approximately 1” and the top will be whatever the natural excess.
Using a 1/4” seam allowance, sew up both sides.
Using a zigzag stitch with 6 mm width and 1.4” length, sew both sides, encasing the raw edges.
Turn right-side out and enjoy your new project bag. -
 Step 6
So here’s to an easy way to organize your Works in Progress. And, they’re so quick to make, that you can pay it forward by making some for your friends and family as well.