Vintage Inspired Blouse
Extract from The Great British Sewing Bee: Fashion with Fabric • By Claire-Louise Hardie • Published by Quadrille


About
The Great British Sewing Bee: Fashion with Fabric
Inspired by the elegant and feminine blouses of the 1950s, this classic pussy-bow blouse has been made up in luxurious chiffon, which feels light against the skin and drapes beautifully. The full sleeves are gathered at the wrist onto a buttoned cuff, and the front of the blouse gathers softly onto a yoke. Worn with a pair of smart tailored trousers, this makes an elegant boardroom outfit that works just as well worn on a night out.
DIFFICULTY LEVEL
Intermediate
FABRIC SUGGESTIONS
Lace, chiffon, handkerchief linen, double georgette, crêpe de chine, charmeuse, challis. Really fine sheer fabric is not suitable.
DESIGN NOTES
The seam allowance used throughout is 1.5 cm (5/8 in.) unless otherwise stated; for most seams, we’ve used a French seam. This blouse has been designed as a loose fit; if you’d prefer it to be more fitted, either make it in a smaller size or take it in a little at the side seams.
-
 Luna D. favorited Vintage Inspired Blouse
24 Apr 16:27
Luna D. favorited Vintage Inspired Blouse
24 Apr 16:27
-
Kellyton K. favorited Vintage Inspired Blouse
18 Mar 15:44
-
Traci S. added Vintage Inspired Blouse to Autumn Chill
11 Oct 18:48
-
India K. favorited Vintage Inspired Blouse
03 Jan 18:57
-
 BornAgainVintage added Vintage Inspired Blouse to Rachel Zoe
24 Oct 21:15
BornAgainVintage added Vintage Inspired Blouse to Rachel Zoe
24 Oct 21:15
-
Alecia B. favorited Vintage Inspired Blouse
06 Oct 09:27
-
 Clairvoyant favorited Vintage Inspired Blouse
10 Jun 09:08
Clairvoyant favorited Vintage Inspired Blouse
10 Jun 09:08
-
Lauretta C. added Vintage Inspired Blouse to sewing
22 Apr 16:34
-
Lauretta C. favorited Vintage Inspired Blouse
22 Apr 16:34
-
 Maya G. added Vintage Inspired Blouse to Tops Inspiration
23 Feb 14:11
Maya G. added Vintage Inspired Blouse to Tops Inspiration
23 Feb 14:11
You Will Need
-
 Step 1
LAYOUT PLAN
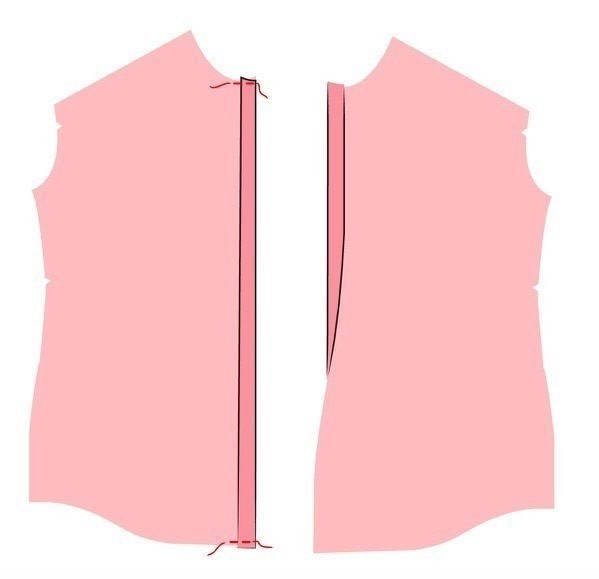
Trace off the pattern pieces – back, front, sleeve, cuff, continuous sleeve placket, yoke and necktie. Cut out and transfer any pattern markings to the fabric. -
 Step 2
MAKE THE FRONT BUTTON STAND
Along the front edge of the front, fold under and press 2 cm (¾ in.) to the wrong side. Hand tack across the top and bottom. -
 Step 3
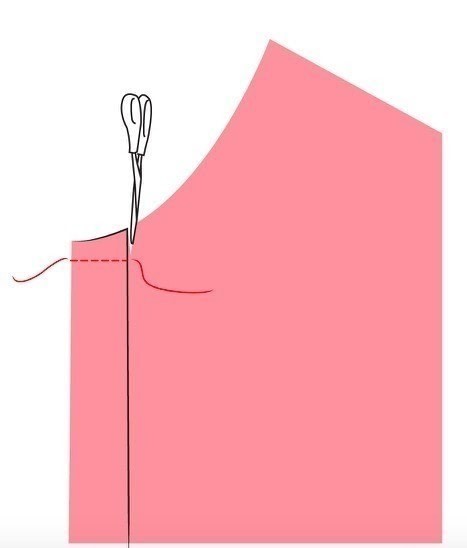
Fold under and press another 2 cm (¾ in.) to the wrong side, so that all the raw edges are encased. This forms the button stand. Turn the second fold back to the right side. Machine stitch across the top of the fold from the centre front to the outside edge. Make a small snip from the neck edge to the stitches, as indicated.
-
 Step 4
Turn the button stand through to the wrong side and re-press the front edge. You should have a finished ‘step’ at the top of the button stand and the raw edge should be completely encased. Edge stitch 3 mm (1/8 in.) from the inner folded edge, securing the button stand in place. Repeat steps 1–3 on the opposite front piece.
-
 Step 5
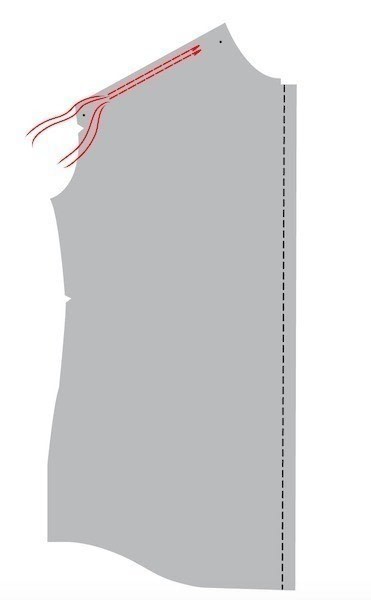
GATHER THE FRONT SHOULDERS Gather the front shoulders (see Core Skill).
CORE SKILL Gathering
Gathering threads are used to make a longer piece of fabric fit onto a shorter piece. Gathering creates shape in garments, and puts soft pleats or folds along the edge that has been gathered up.Set your sewing machine to a long stitch length – usually about 4 mm (3/16 in.). (Your manual should tell you the optimal length on your model.) Working on the right side between the circles, sew a row of stitches inside the seam allowance, a fraction away from the seam line – about 1.2 cm (½ in.) from the edge. Start with a backstitch, but DON’T finish the row of stitches with one. Sew a second parallel row of stitches still inside the seam allowance, a little way from your first row, using the presser foot width as a guide.
-
 Step 6
Working on the wrong side pull on the bobbin threads, sliding the fabric along until it is the correct length. To work out the length, measure your gathered seam against the front edge of the yoke. Once the correct length, draw the threads through to the wrong side and knot them or wrap them around a pin in a figure-of-eight.
-
 Step 7
ATTACH THE BACK TO THE YOKES AND YOKE FACINGS
With right sides together, pin the longer edges of two of the yokes to the back of the blouse, matching up the notches and circles. -
 Step 8
Lay the second yoke pieces, which act as facings, over the pinned seams, with the right side of these yoke pieces against the wrong side of the back shoulder seam, effectively sandwiching the back between two yoke layers. Pin in place.
-
 Step 9
Stitch the back shoulder seams, stitching through all three layers. Press the yoke pieces away from the back, so that the seam allowances are sandwiched in between the two yoke pieces. Press under a 1.5-cm (5/8-in.) fold on the front edge of the yoke facing piece.
-
 Step 10
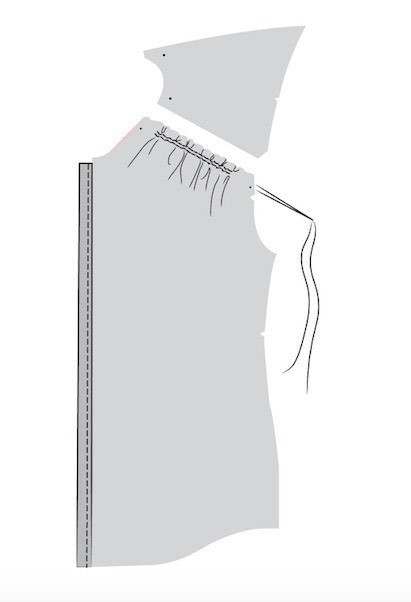
ATTACH THE FRONT PIECES TO THE SHOULDER YOKE
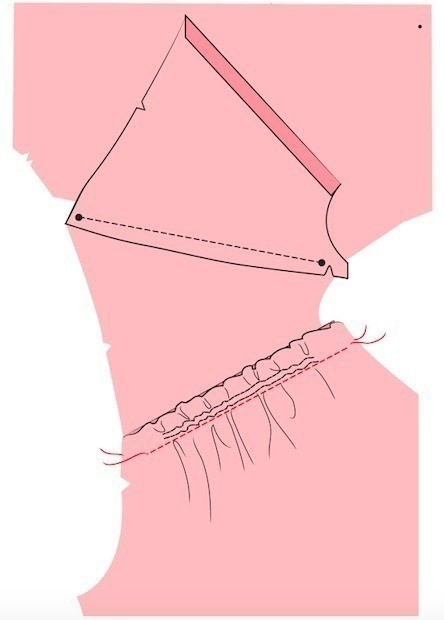
With right sides together and matching up the circles, pin the gathered front seam to the front edge of the yoke piece. Machine the front yoke seam; your stitches should be just to the left of the rows of gathering. Repeat on the opposite side of the front.Pin the previously pressed edge of the yoke facing over the gathered front shoulder, lining up the folded edge with the seamline. Slipstitch it in place. Hand tack around the armhole edge of the yokes. (These two layers will now be treated as a single piece.)
-
 Step 11
Fold the blouse in half at the shoulders, so that the right side is facing outwards. Join the side seams with a French seam. Press the seams towards the back of the blouse.
CORE SKILL French Seam
French seams are 'enclosed' seams that are stitched twice, so there are no visible raw edges either on the inside or outside of the garment. They are the perfect choice when using fabrics that allow the seams to be visible. French seams are also ideal for garments that will be laundered a lot, such as lingerie and children’s clothes, as they are a very robust type of seam.Pin the pieces wrong sides together. Sew the seam, taking a 1-cm (3/8 in.) seam allowance; this is only part of the total seam allowance, as French seams are sewn twice. Trim the seam allowance down to 3 mm (1/8 in.). Press the seam open, then press it to one side.
Re-fold the fabric so that the right sides are now together, with the previous seam line on the folded edge, then press the seam flat. Pin 5 mm (¼ in.) from the outside edge and then sew. Press the seam over to one side.
-
 Step 12
Sew two rows of gathering stitches (see Core Skill) around the head of each sleeve, between the marked circles.
-
 Step 13
MAKE A CONTINUOUS BOUND PLACKET OPENING
Re-inforce the marked slash line at the lower edge of both the sleeves by stitching closely around it in a V shape. Slash the opening, making sure to slash to a hair’s breadth at the point. -
 Step 14
Fold under and press 6 mm (¼ in.) along one long edge of the sleeve placket, then press the second placket in the same way.
-
 Step 15
Open up the bottom of the sleeve opening, so that it lies in a straight line. With the right sides together, pin and tack the un-pressed edge of the placket to the sleeve along the length of the slashed edge. Machine stitch along the unfolded edge of the placket (see tip below).
-
 Step 16
Press the seam allowance in towards the placket. Fold the pressed edge of the placket over to the wrong side of the sleeve and pin the pressed edge over the seam allowance. Slipstitch the placket in place.
Working from the inside of the sleeve, fold the sleeve in half, aligning the short ends of the placket, and sew a short diagonal row of stitching across the top edge of the placket from the fold closest to the sleeve across to the other side of the placket. This reinforces the opening.
Join the underarm seam of the sleeves with a French seam (see Core Skill).
-
 Step 17
MAKE UP THE SLEEVE CUFFS
Apply interfacing to the wrong side of the two cuff pieces, hand tacking it inside the seam allowances. Fold under and press 1.5 cm (5/8 in.) along one long edge of the sleeve cuff. Gather up the lower edge of the sleeve to fit the cuff (see Core Skill). With right sides together, aligning the raw edges, pin and stitch the cuff to the bottom of the sleeve, leaving 1.5 cm (5/8 in.) overhanging at either end. Press the seam allowance towards the cuff. -
 Step 18
Fold the cuff in half, with right sides together and the long, folded edge aligned with the seam line. Machine stitch across the short ends from the previous seam line to the lower folded edge.
-
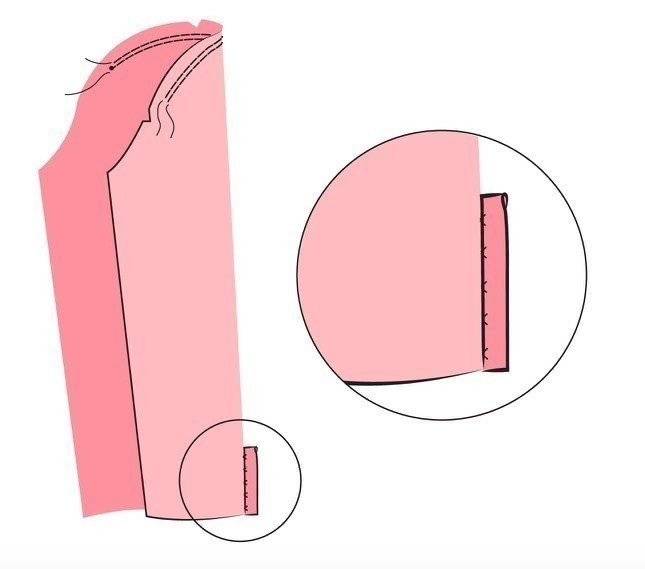
Step 19
Turn the cuff through to the wrong side, work out the corners and press them well. Slipstitch the cuff on the inside of the sleeve along the previous seamline.
-
 Step 20
SET IN THE SLEEVES
Turn the sleeves right side out and slip them through the armholes so that the right sides are together. Match up the underarm seams with the side seams, the shoulder seam with the circle on the yoke, and the double and single notches. Pin around the armhole from one end of the gathering around to the underarm seam and up to the opposite end of the gathering. Pull the gathering threads until the sleeve head fits into the top of the armhole, then pin and machine it in place. Trim the armhole seam allowance to 1 cm (3/8 in.) and neaten. -
 Step 21
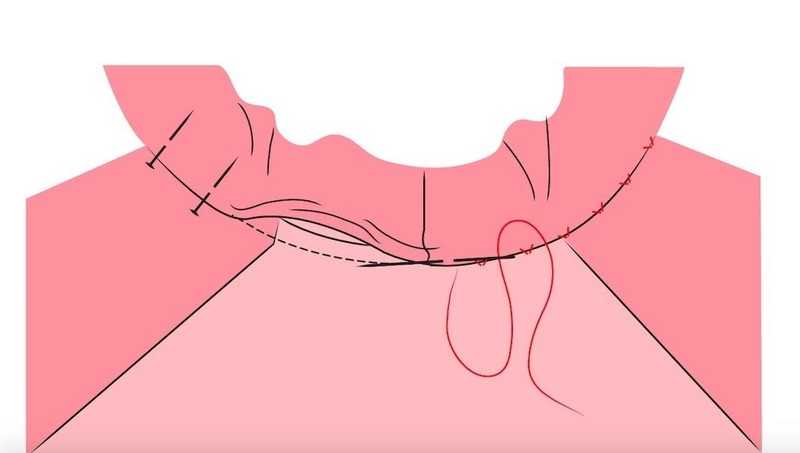
MAKE UP THE NECKTIE
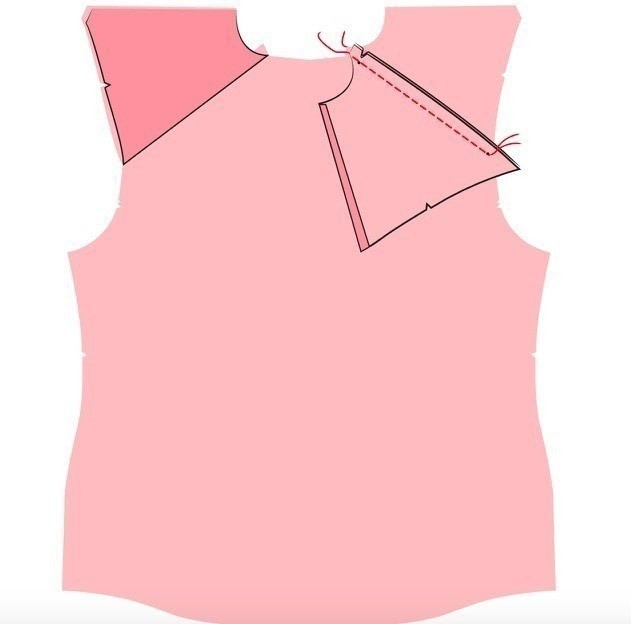
With right sides together, pin then stitch the two necktie pieces together at the centre back seam. Neaten the seam and press open. With right sides together, fold the necktie in half along its length. Stitch around the necktie, leaving an opening in the middle between the two circles. Turn right side out and press well. With right sides together, pin one side of the un-stitched section of the necktie to the neckline. Stitch in place, then press the neckline seam allowances inside the necktie. -
 Step 22
Matching up the centre back seams, fold the necktie over to the inside of the neckline, so the finished edge sits just over the previous seamline. Pin and slipstitch it to the seamline around the neck.
-
Step 23
HEM THE BLOUSE
Making a total hem allowance of 1 cm (3/8 in.), turn under a narrow double hem around the bottom of the blouse and edge stitch in place. The neckline should now be neatly covered by the folded necktie. -
 Step 24
ADD BUTTONS AND BUTTONHOLES
Mark the position of your buttonholes spacing them evenly. Sew buttonholes on the right front, then sew on the buttons onto the left front. Make the buttonhole on one side of the cuffs, and sew on a corresponding button.