


About
brighten up any wall with PLANTS!!!
I put this planter together for a container gardening class i took- turns out i was the only one who made my own container! i designed it to bring a splash of green to our cramped north facing entryway. it turned out better than i could have expected, so i thought i'd share. it was made with stuff i found on the street or had lying around (except the plants, which i chose specific for this project).
you can use any kind of spice rack or vertical container, just keep in mind that bare wood will flex/ warp/ decay if exposed to lots of water/ weather, and plastic will get VERY brittle if exposed to sun. you can also make your own 'boxes' for your plants (as i did), or find pots/ trays that fit your rack.
-
 Key West Witch favorited Vertical Garden, Diy Style!
26 Jun 21:38
Key West Witch favorited Vertical Garden, Diy Style!
26 Jun 21:38
-
 Susana F. added Vertical Garden, Diy Style! to must doit
30 Mar 16:38
Susana F. added Vertical Garden, Diy Style! to must doit
30 Mar 16:38
-
Susana F. favorited Vertical Garden, Diy Style!
30 Mar 16:37
-
 Amber L. favorited Vertical Garden, Diy Style!
02 Apr 02:58
Amber L. favorited Vertical Garden, Diy Style!
02 Apr 02:58
-
 imfletchersmom@gmail.com favorited Vertical Garden, Diy Style!
01 Jun 08:37
imfletchersmom@gmail.com favorited Vertical Garden, Diy Style!
01 Jun 08:37
-
 neimie favorited Vertical Garden, Diy Style!
10 Feb 04:39
neimie favorited Vertical Garden, Diy Style!
10 Feb 04:39
-
 Harmonee.seal added Vertical Garden, Diy Style! to Gardening Fun
01 Jun 16:47
Harmonee.seal added Vertical Garden, Diy Style! to Gardening Fun
01 Jun 16:47
-
 Lorraine H. added Vertical Garden, Diy Style! to pot and planters
01 Nov 20:26
Lorraine H. added Vertical Garden, Diy Style! to pot and planters
01 Nov 20:26
-
Lorraine H. favorited Vertical Garden, Diy Style!
01 Nov 20:26
-
 Raven_B. favorited Vertical Garden, Diy Style!
03 Oct 06:00
Raven_B. favorited Vertical Garden, Diy Style!
03 Oct 06:00
You Will Need
-
 Step 1
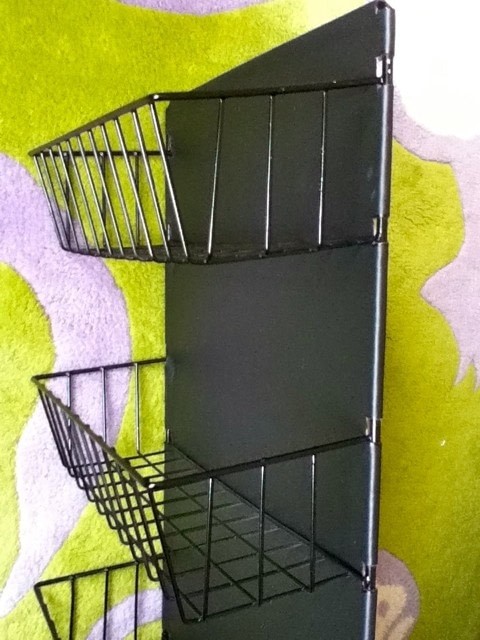
Find a metal rack that fits the wall space you've got. it is going to get wet, so make sure the metal is coated, or stainless- otherwise it will rust, and might stain your wall.
to keep the plants from dripping/ leaking all over the wall, i used a piece of pleather cut to fit the back.
-
 Step 2
i spray painted the rack to match my water proof fabric.
the notches in the fabric are cute so i can wrap them around and glue tight.
-
 Step 3
after gluing the pleather in place- makes a nice taught backing to protect the wall.
-
 Step 4
Next, make the little containers to fit. i used black cordura so it would hold up to the water/ sun/ soil. so far (2yrs), it's still plenty sturdy, but now covered in mineral stains (those white deposits that often collect on the outside of terra cota pots). choose a color that will accent your plants.
i sewed mine, but you could also buy pots to fit, or used some basic origami boxes.
-
 Step 5
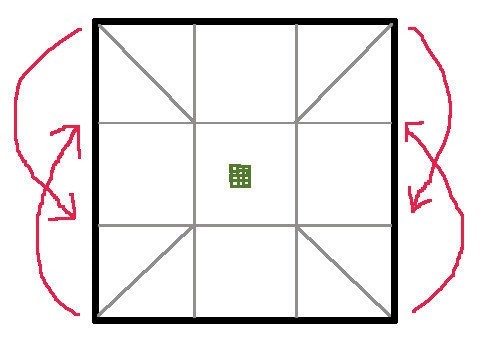
this is the 'pattern' i used for my small boxes (i also did some longer ones, but i'd rec against it- they are hard to manage when filled with dirt & plants).
fold along the gray lines, then sew or glue the sides in place. sewing seemed the most sturdy, and so far has held up well (i used cheap poly thread). finished product is like a 'chinese food' take out box.
i sewed a piece of screen into the center, to provide drainage for the finished container (see next pic).
-
 Step 6
here you can see the drain- drainage is VERY important for most plants, so if you use water resistant fabric, make sure there's some kind of drainage.
-
 Step 7
time to plant! i picked lots of shade tolerant ferns and little edge plants, since i knew my garden was to be mounted in a north facing entryway.
i should have left more space between plants, but i was doing this for a class, and wanted it to look good right away. generally speaking, leave room for them to grow/ fill in.
-
 Step 8
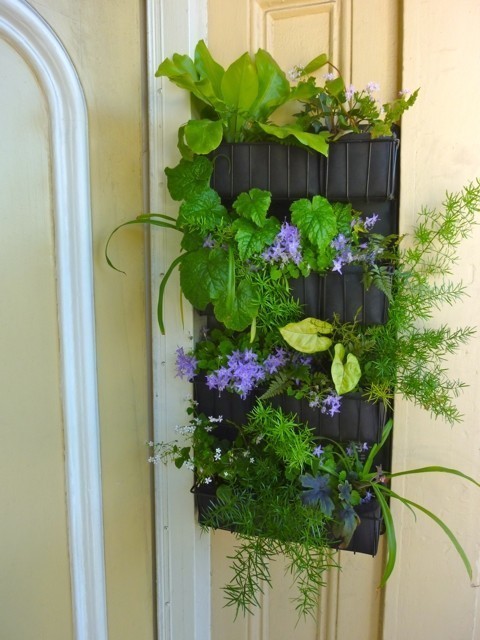
here's my garden mounted in my entryway! i put drainage holes in all the upper 'boxes' so water would drain down thru the plants. i then lined the bottom box with fleece to wick the moisture up to the air (see the box in the background of pic at step 4), but not drain all over my front step.
it worked really well, possibly too well- the plants got a little overgrown and i had to pull a few out!
remember when you mount this- wet dirt is really heavy, plan accordingly!


http://ccchinachic.com/products/summer-holidays-sale/c-215/