About
Rough up a plain old tee :)
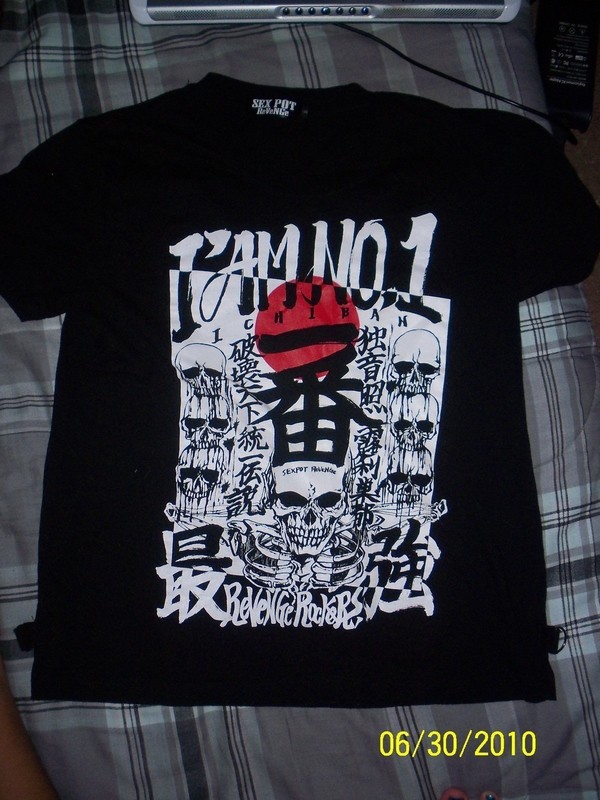
This shirt always had a weird cut and design; probably purposely, but I also never really liked the fit. When I bought it at Anime Expo last year, I originally wanted a small... when I tried to buy a small, the women at the Sexpot Revenge booth started telling me how Japanese sizes are smaller, and I should probably do a medium. Mildly offended (because I knew I needed a small, and because I own other "Japanese" smalls... I know what the size looks like), I bought the medium just to shut them up. Well, lo and behold, it was too big, and I've probably worn it less than five times in the year I've owned it. Well, it's time for AX again, so I decided I'd MAKE it wearable :) Still big, but with a bit more of a punky flair.
Fairly simple design, and probably one of my first projects without any outside help or instructions. All you need are your fabric scissors and maybe some tailor's chalk :)
I apologize in advance for any crappy pictures or instructions; my first how-to, so bear with me ^_^
-
 Rhonda G. favorited Two Column Slashed Back T Shirt
20 Aug 20:19
Rhonda G. favorited Two Column Slashed Back T Shirt
20 Aug 20:19
-
 cindy.bledsoe.12 favorited Two Column Slashed Back T Shirt
29 Jun 04:44
cindy.bledsoe.12 favorited Two Column Slashed Back T Shirt
29 Jun 04:44
-
 Modern Myth Angel favorited Two Column Slashed Back T Shirt
21 Sep 15:40
Modern Myth Angel favorited Two Column Slashed Back T Shirt
21 Sep 15:40
-
kassie g. favorited Two Column Slashed Back T Shirt
29 Mar 21:14
-
 blandine.ricouart favorited Two Column Slashed Back T Shirt
14 Jan 22:00
blandine.ricouart favorited Two Column Slashed Back T Shirt
14 Jan 22:00
-
 naya.x.black added Two Column Slashed Back T Shirt to clothes
20 Sep 21:53
naya.x.black added Two Column Slashed Back T Shirt to clothes
20 Sep 21:53
-
 Lady.Blasphemy favorited Two Column Slashed Back T Shirt
30 Aug 19:57
Lady.Blasphemy favorited Two Column Slashed Back T Shirt
30 Aug 19:57
-
 HantuPenanggal favorited Two Column Slashed Back T Shirt
15 Aug 21:20
HantuPenanggal favorited Two Column Slashed Back T Shirt
15 Aug 21:20
-
 Miseria favorited Two Column Slashed Back T Shirt
22 Jul 04:07
Miseria favorited Two Column Slashed Back T Shirt
22 Jul 04:07
You Will Need
-
 Step 1
Just a general "before" pic :)
-
Step 2
First, make any cuts to the neck or hem that you want. That way you know your limits when you start cutting up the back. I cut very close around the neck seam to preserve the label on the back of the shirt, but, as you will.
-
Step 3
Next, decide how big of a gap you want between your cuts. Obviously, the wider the gap, the smaller the cuts, the smaller your shirt stays, and the less skin or undershirt you'll be showing. My shirt had a weird cut to begin with (which could be blamed on a number of things: it was meant for cheap, mass production and overseas sales at a convention, it's Japanese and a label most often associated with punk style, I got a defunct shirt, etc.), but whatever the case, the design is about an inch off center. It's not noticeable when I'm actually wearing it, and I don't think cutting up will change it. I based my gap on the width of the label (2.5 inches) and added half an inch to either side, make the total gap about 3.5 inches.
-
Step 4
Now, decide on how far from the collar you want your cuts to start, and then length and amount of lines. You can draw them in with tailor's chalk or what have you, but I have a habit of free cutting. If you DO decide to cut without lines, be very careful, especially if you're working with a dark shirt.
-
 Step 5
Once you've done that, fold the BACK of your shirt down the middle of one of your sets of lines. Make SURE that the front of the shirt is hanging loose, and not caught in the path of where your scissors will be going. Also make sure that no other part of the shirt is caught either.
-
 Step 6
Begin cutting along the lines you drew, or where you envision your lines to be. I decided to make the lengths of my cuts different, because I didn't want them to be perfectly symmetrical, and to accommodate for the shirt's already uneven cut, but again, as you will :)
-
 Step 7
Once you've finished one side, do the same for the other, being careful again to not cut the front or any other parts of the shirt.
-
 Step 8
After you've finished cutting both sides, stretch each side so that the strips become rounded and thin out.
-
Step 9
Now that you've finished the back, you can work on the sleeves a bit if you want. I cut mine above the seams, and added a few cuts. If you want to do cuts to the sleeves, just follow the same procedure as the cuts for the back. For mine, I did uneven, non-parallel cuts. If you do the same, be VERY careful so that the cuts don't actually intersect.
-
Step 10
And then you're done :) Wear it! For a bit of color, layer it with a tank top or another t-shirt. I'll be wearing a red tank under mine to match the design on the front.