


About
Seasons change, but nail art is always in!
Trees can be a super fun nail art design for any season! This tutorial outlines how to do a straight-line tree on one nail, but once you have the technique down, you can add curvature to your branches and spread them out over multiple nails to create complex looks!
-
 kiki w. added Tree Nail Art to Makeup
31 Jan 15:49
kiki w. added Tree Nail Art to Makeup
31 Jan 15:49
-
Brenda M. favorited Tree Nail Art
21 Mar 04:35
-
 Kinhime Dragon added Tree Nail Art to Beauty
21 Jan 00:14
Kinhime Dragon added Tree Nail Art to Beauty
21 Jan 00:14
-
Esther B. favorited Tree Nail Art
11 Jan 10:14
-
 MunsterNCookie commented on Tree Nail Art
23 Dec 23:20
MunsterNCookie commented on Tree Nail Art
23 Dec 23:20
-
MunsterNCookie favorited Tree Nail Art
23 Dec 23:19
-
 Sarah Kim added Tree Nail Art to Beauty
18 Dec 18:49
Sarah Kim added Tree Nail Art to Beauty
18 Dec 18:49
-
Sarah Kim favorited Tree Nail Art
18 Dec 18:48
-
Annie J. added Tree Nail Art to Beauty
16 Dec 02:42
-
Annie J. favorited Tree Nail Art
16 Dec 02:41
-
 Step 1
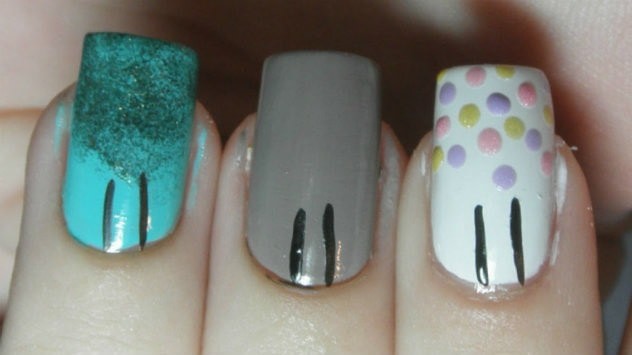
Apply base coat to your nails, then apply your base color to your nails. You can also add texture. Dots or sponging or plastic wrap texture applied to the upper 2/3 of your nail closest to your free edge can look like leaves! For this tutorial, I am showing you several options! On my ring finger, I have a base of Essie Where's My Chauffeur? and sponging in OPI Live And Let Die. On my middle finger, I simply have a base of OPI French Quarter For Your Thoughts (START WITH THIS ONE IF YOU'RE A BEGINNER!). And on my pointer finger, I have a base of OPI My Boyfriend Scales Walls with dots in three shades: Zoya Gie Gie, Zoya Piaf, and Zoya Julie. These are all options you could do, depending on the season you are trying to represent! =)
-
 Step 2
Once your base color/texture has dried for 5-10 minutes, use your black striper to create two straight lines up from your cuticle. These lines should run paralell to each other and go up about 1/3 of your nail from the cuticle. These form the sides of your trunk.
-
 Step 3
Add roots to your trunk by adding too small lines at an angle to the trunk near your cuticle.
-
 Step 4
Fill in your trunk and roots using long strokes of your striping brush.
-
 Step 5
Create your first two branches. I like to make sure that they aren't quite perpendicular to the trunk, a little above horizontal. You can make them thick if you want.
-
 Step 6
Add your last two branches.
-
 Step 7
Fill in your first branch by adding small branches on either side. You can add them wherever you want and at any angle.
-
 Step 8
Complete your tree by adding small branches to your other three branches. These can overlap! Also, you can add smaller branches on to your small branches, and so on and so on to make your tree larger and/or fuller. Once your tree is complete, you can add more texture, if you'd like.
-
 Step 9
Clean-up with acetone and an angled eyeliner brush. Once dry, apply top coat to seal in the design!


Comments


