


About
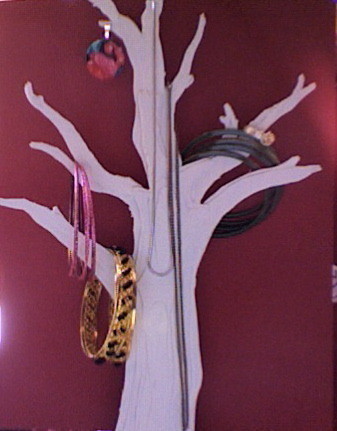
Re-use cardboard boxes and create yourself a pretty stand for your necklaces and bracelets!
My family eats a lot of cereal, so we have a lot of boxes. I thought of this project when I needed a jewelry stand but didn't want to buy one. Have fun!
-
 Kinhime Dragon favorited Tree Jewelry Stand
19 Mar 22:18
Kinhime Dragon favorited Tree Jewelry Stand
19 Mar 22:18
-
 tam b. favorited Tree Jewelry Stand
22 Feb 18:04
tam b. favorited Tree Jewelry Stand
22 Feb 18:04
-
 HylianWriter534 added Tree Jewelry Stand to To-Make List
08 Mar 05:58
HylianWriter534 added Tree Jewelry Stand to To-Make List
08 Mar 05:58
-
 Rachel D. favorited Tree Jewelry Stand
05 Jul 17:15
Rachel D. favorited Tree Jewelry Stand
05 Jul 17:15
-
 CalendarGirl entered her project Tree Jewelry Stand to Secondhand Chic Contest
28 May 02:17
CalendarGirl entered her project Tree Jewelry Stand to Secondhand Chic Contest
28 May 02:17
You Will Need
-
 Step 1
First you need to take out your cardboard. It is best if it isn't too thick, cereal boxes, granola bar boxes and kleenex boxes work. Decide how big you want your tree to be, then draw it onto on of your pieces of cardboard. Cut out two of these pieces and glue them together.
-
 Step 2
Next take your cardboard and cut pieces a bit smaller than your actual tree. Do that until the pieces are very small. Glue them together, onto your piece you already made, from big to small. This should create a 3-D effect on one side.
-
 Step 3
Cut a square of cardboard for the base and cut another for a support.
-
 Step 4
Paint your tree making sure you cover the sides as well. Then glue the support on and then glue the entire thing to the base. You may need to put something heavy on the back of the base. Now, put your jewelry on it and enjoy!


Versions


Posted by
Crafthazard


Posted by
erica j.

Posted by
Amber S.


Posted by
Kasey Kasket
Comments

