About
My first hat band for my top hat.
I had funky aisan-esque fabric that I was using for my outfit (in fact, I have more and will make a bodice or waistcoat in the future...). So I got ribbons in the various colors of that fabric and the teal/hawaian blue of my skirt and made this hatband.
I had been at a con just before that with a vendor who sold "kanzashi" (in reality just decorated combs and hair clips). In searching google, I came across an awesome tutorial at http://www.mookychick.co.uk/diy_ethic/kanzashi_tutorial.php and some youtube videos.
I did this all with hand sewing, so that's why it took so long.
Note- I made this before I joined, so most of the how to are ones that I made afterwards to show the steps.
More pics to come.
Tags
-
 Key West Witch added Top Hat Band Ribbons And Giant Kanzashi to Top Hats, Witch Hats, Hats & Fascinater’s
30 Jun 14:16
Key West Witch added Top Hat Band Ribbons And Giant Kanzashi to Top Hats, Witch Hats, Hats & Fascinater’s
30 Jun 14:16
-
 Amara Ann favorited Top Hat Band Ribbons And Giant Kanzashi
30 Apr 19:25
Amara Ann favorited Top Hat Band Ribbons And Giant Kanzashi
30 Apr 19:25
-
Step 1
Measure around the base of the hat (not the brim, but the base that goes around your head.
-
Step 2
I'm not positive on the widths, but had 4 widths of ribbon. The widest was gray, next widest was yellow, then electric teal, and the smallest were a set of thin ribbons in royal blue, red, and lime green.
I took the three widest ribbons and measured out the length of the measurement in Step one, and added a seam allowance (I did a french seam), and cut. More on the thin ribbons in a moment.
-
 Step 3
I pinned the yellow ribbon onto the gray so that the yellow ribbon was in the middle of the width of the gray.
I then pinned the electric teal ribbon onto the yellow, again so that the teal was in the middle.
I then hand sewed the teal and yellow ribbons down along their edges, so they wouldn't flap up.
-
 Step 4
I then took the royal blue, lime green, and red ribbons (which were the same size), and braided them together until I had a piece the same length of the hat band in process.
Then I sewed that down the middle of the electric teal ribbon.
-
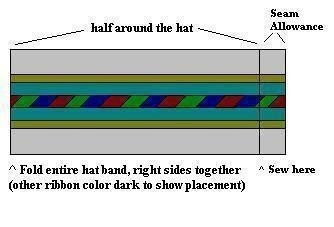
 Step 5
I then folded right sides together and sewed down the seam allowance. I did a french seam so the ribbons wouldn't fray.
-
Step 6
I then used the awesome tutorial at http://www.mookychick.co.uk/diy_ethic/kanzashi_tutorial.php to create a large sized kanzashi (but didn't make a center for it) from the brocade fabric.
-
Step 7
I created a base for the kanzashi with some scrap fabric of the skirt that this hat band was going with (to let it rest a little away from the actual hat). I just took a long strip and wrapped around into a solid cylinder.
I then sewed the kanzashi to one side of the base.
-
Step 8
I had a gear with a post, and the post fit through the center of the large watch face. So I put the gear into the watch face and pushed the rest of the post into the base, through the center of the kanzashi.
Then I used some embroidery thread to stabilize the gear.
-
 Step 9
I didn't use the gray ribbon any more, but I used all the other ribbons mentioned before plus some others (silver and gold organza, other colors in the same colors as the inspiration fabric ), and cut random long lengths.
I then folded them in half and sewed them onto the other side of the base of the kanzashi.
See this pic for a layout after Steps 8 & 9.
-
Step 10
I then sewed the kanzashi piece to the hat band, at the seam. I ended up placing another ribbon around the seam to strengthen it against the weight of the kanzashi.
-
Step 11
The hat band is just loose enough I can place the kanzashi at almost any point along the hat and just drape the ribbons aound the hat. I usually place it to one side or mostly to the back, but never in the front.


Comments