A Tonal Study
Extract from Beginner's Guide to Life Drawing • By Eddie Armer • Published by Search Press


About
Beginner's Guide to Life Drawing
I will now take you through a step by step of a life drawing made in pure tone in the manner of the Georges Seurat drawing. We are looking at tone without the use of line.
Use a hard wax crayon on either cartridge or a heavier grained paper. The response of the paper surface against the crayon is an integral part of this technique and so the rougher the paper, the more accentuated the granulated result.
How the subject is lit can be an important part of the composition. Use a bright light source, either natural (strong sunlight) or artificial (a spot lamp) to illuminate the figure. To create a dramatic image, direct a spotlight on to the life model to produce strong contrasting flesh tones. Depending on the angle of the light, you can pick out interesting contours along the body by the shadows cast.
Do not work on too large a scale; your choice of medium should always dictate the size that you need to work at. If you use this method on a very large format, not only will the grainy effect diminish, but the
task will become monumental.
Draw using both the tip and the side of the crayon and apply fine tone by using a gentle, circular motion to get an even coverage, especially in the
darker areas.
In order to accentuate the tones you are studying, narrow your eyes into
a squint and you will see with greater contrast and clarity.
The step-by-step project shown here was a two- hour pose in wax crayon on rough cartridge paper.
The room was dimly lit and so to create contrast, I used a spot lamp pointed to the model’s right, aimed towards her back. There was also a gentle natural light from the window behind her which can just be seen on the right side of her face.
-
 Robin C. favorited A Tonal Study
11 Aug 14:51
Robin C. favorited A Tonal Study
11 Aug 14:51
-
 DawnRedwood favorited A Tonal Study
19 May 15:03
DawnRedwood favorited A Tonal Study
19 May 15:03
-
 Siphokazi G. added A Tonal Study to Create
17 Apr 16:31
Siphokazi G. added A Tonal Study to Create
17 Apr 16:31
-
 Paul H. favorited A Tonal Study
12 Mar 10:22
Paul H. favorited A Tonal Study
12 Mar 10:22
-
 cole w. favorited A Tonal Study
28 Feb 05:54
cole w. favorited A Tonal Study
28 Feb 05:54
-
 Search Press published her project A Tonal Study
21 Aug 09:00
Search Press published her project A Tonal Study
21 Aug 09:00
You Will Need
-
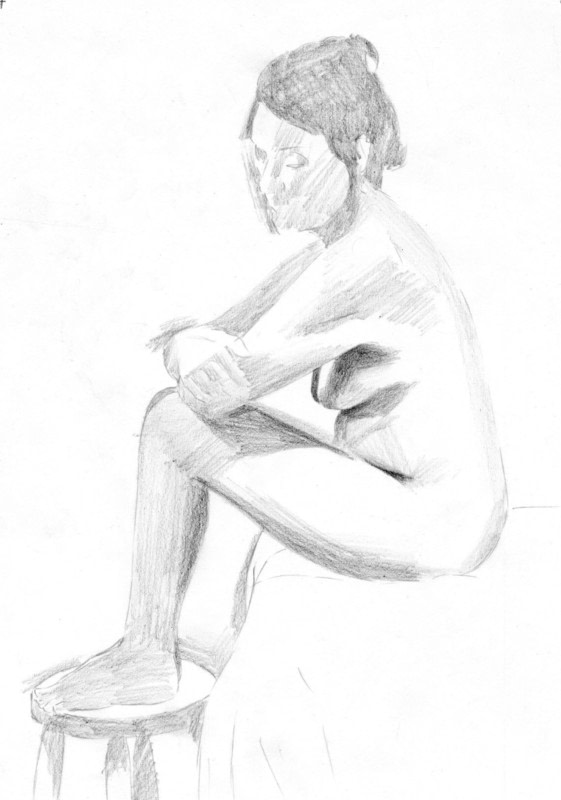
 Step 1
Lightly capture the outline and some key detail in tone, avoiding any hard lines. I have used a very light touch with the wax crayon, but have already started at this early stage to pick out the darkest areas and hardest ‘lines’, i.e. where the stomach rests on the thigh for example. In general my marks follow the flow of the body and I am not too concerned with getting a perfectly even tone, since as the work develops, the roughness will be disguised.
-
 Step 2
Once you are confident that you have everything in approximately the right place, start to strengthen your tones and develop the more prominent details. Use a light touch and an even pressure to reduce the chances of too much variation in the tone. The hair is the darkest area and so I have made steps to deepen the tone. I have applied heavier pressure to get a greater deposit of wax on the page, without committing to a solid black as yet. It is better that all the different tones develop together. Work on the leg and neck has continued and a hint of the background has started to appear around the forearm.
-
 Step 3
Decide which are the lightest and darkest areas of the model. To get a better idea, squint your eyes and the contrast becomes exaggerated. In this pose, the lightest areas are the top of the breast and parts of the face. The darkest are the hair and the shadows falling on the body. Now draw in the darkest tone and begin to add the mid tones. The drawing will evolve if you work across the picture, building up as you proceed. Do not start adding detail too early.
-
 Step 4
Some of the subtle tone differences and contours of the body are not apparent at first glance, but as your eye adjusts to the light, these subtleties become clearer. Be aware that during a long pose, the light will possibly shift and a variation in the strength of the light can occur if you are using daylight.
Draw in the darkest areas. In this study, they were on the underside of the leg. Taking the white of the paper as the lightest tone, you should now have a complete tonal range from light to dark.
The drawing is beginning to develop so hone in on specific areas. Here, the shadow on the top of the leg emerges as I use a gentle circular motion to apply the tone so as not to get hard lines. -
 Step 5
Add more of the background. Here, adding the dark background not only creates depth, but also throws forward the stark light of the highlighted table top and parts of the body. To restore the tonal balance, I darken the hair and add some detail to the face and mouth.
-
 Step 6
Rework the background using a light touch and a circular motion to create a smoother effect and disguise the initial roughly drawn marks. Work over the whole drawing, bringing areas to near completion. The hair is now finished and the stool beneath the model’s feet is taken a little further.
-
 Step 7
The subtle tonal variations and the muscle form are beginning to appear. The background continues to develop and subtle detail is added to the chair and drapery. The body tones have also been worked on and you can see that I have created a highlight to the shoulder simply by darkening the surrounding area.
-
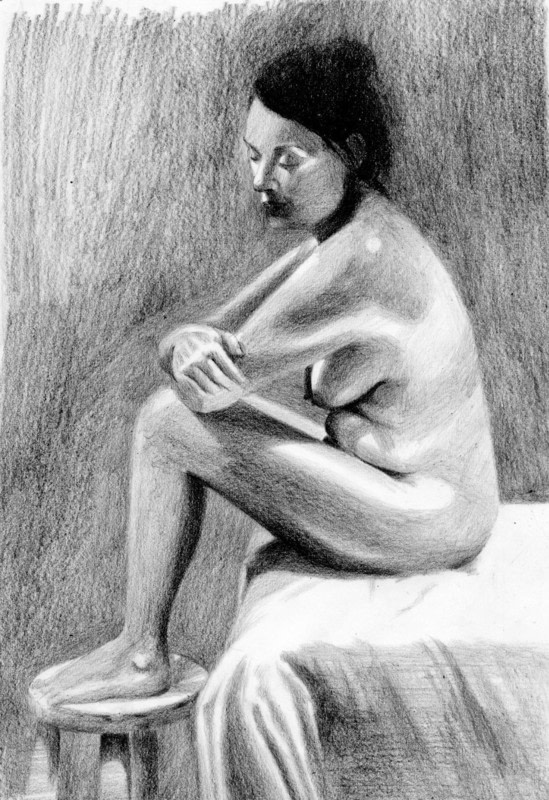
 Step 8
The finished drawing. I had taken this drawing as far as I wished. The area around the mouth and neck had become too dark and overworked, so I removed some of the surplus wax with a sharp scalpel, and drew into the image with the tip of the blade.