


About
Kawaii (cute) toast charms!
Let's make some kawaii (cute) toast charms! I made them before I took photos, so let me know if anything is unclear. Thank you for making this a Featured Project!
Tags
-
 Sveta favorited Toast Charms
04 Dec 18:02
Sveta favorited Toast Charms
04 Dec 18:02
-
 Sabrina Dee Berry entered her project Toast Charms to TokyoTreat
05 Apr 13:53
Sabrina Dee Berry entered her project Toast Charms to TokyoTreat
05 Apr 13:53
-
 ElizabethJuddTaylor added Toast Charms to Blythe
04 Nov 16:53
ElizabethJuddTaylor added Toast Charms to Blythe
04 Nov 16:53
-
Sabrina Dee Berry entered her project Toast Charms to StickerApp
04 Nov 12:53
-
Sabrina Dee Berry entered her project Toast Charms to Alphabet Suitcase
27 Aug 13:59
-
 Stacey F. favorited Toast Charms
29 Mar 17:29
Stacey F. favorited Toast Charms
29 Mar 17:29
-
Sabrina Dee Berry entered her project Toast Charms to Bug Bingo & DIY Board Games
17 Dec 00:13
-
 bemeself favorited Toast Charms
14 Dec 20:25
bemeself favorited Toast Charms
14 Dec 20:25
-
Sabrina Dee Berry entered her project Toast Charms to Secret Santa
08 Dec 03:56
-
 judithchen added Toast Charms to craft ideas
20 Oct 05:59
judithchen added Toast Charms to craft ideas
20 Oct 05:59
You Will Need
-
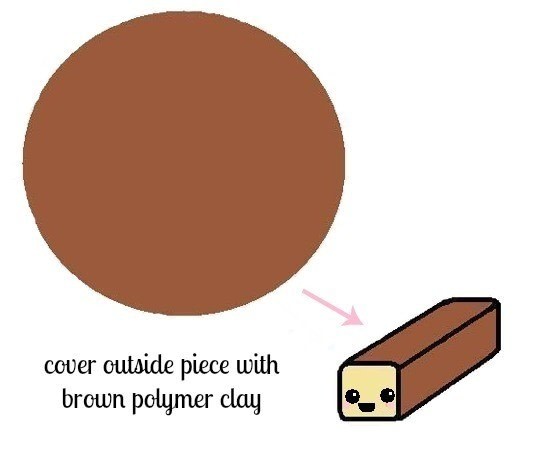
Step 1
Start off with light brown and dark brown clay (the two colors shown in the picture above). Take a small amount of each and warm the clay up by rolling it out, squishing it, rolling it in a ball, etc.
-
 Step 2
Roll the light brown clay into a log about 1/2 an inch for smaller toasts, or slightly bigger if you choose.
The log doesn't have to be long; an inch long piece will make about 8 charms. Gently flatten the circle log into a square shape.
-
 Step 3
Next, take the dark brown clay and roll it out like you would cover a cake. It has to be big enough to wrap around the length of the log. Do not roll it out too thin as it might tear, and it will not be visible as part of the toast after. About 1/16 of an inch or so is fine.
After you wrap it around the light brown log, and smooth it out so there are no air pockets. Cut off any excess. The light brown log should be visible on both ends.
-
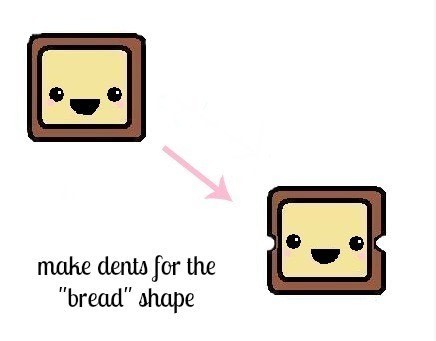
 Step 4
Next, wherever that overlap was when you put the dark brown clay on, that will be one side of the dent for the "bread" shape, and the opposite side for the other.
Take a toothpick, and use the length to gently dent in the clay as shown in the picture. Do not apply too much pressure or you may end up with a squished toast.
-
 Step 5
Time to slice them up! Cut the loaf into toasts with a knife. Then attach wire to the tops to make them into charms.
Bake them in the oven according to your clay instructions. I did mine at 275 F for about 25 minutes. Remember, when they come out of the oven they will be very hot, so be careful.
-
 Step 6
The fun part! Paint on whatever expressions you want, or jam, or anything you want with acrylic paint.
After that dries, remember to apply a thin coat of glaze, and let it dry. You can turn them into cell phone charms, bracelets, necklaces, etc.


@Loopy - the mouths and eyes don't go all the way through. I just painted them on after.
would you be able to use fimo instead of clay?