
Tiger Lily
Extract from Stitch 'n Bitch Superstar Knitting: Go Beyond the Basics • By Debbie Stoller • Published by Workman


About
I always take a few extra steps for maximum cuteness when designing a stuffed animal.
I always take a few extra steps for maximum cuteness when designing a stuffed animal. I look at photos of the animal I’m inspired by, pick out its defining characteristics, draw a sketch, work out the shape of each body part and, finally, I detail the face to give the toy loads of personality. Throughout the years, I’ve learned some tricks for making a toy look great, such as using mattress stitch for the seams to make them look tidier. Also, when stuffing the pieces, use filler that is one-third bigger than the body part, roll it in your hands until it’s the same shape and size as the part, then carefully stuff the part. Follow these tips and you’ll have a totally adorable tiger toy that would make an awesome baby or toddler gift. If you’re making this for a young baby, you may want to replace the bead eyes with embroidery.
Size
Approx 9" tall
Materials
Brown Sheep Nature Spun Worsted (100% wool; 100g/245 yd)
A: 1 ball (or approx 25g) #730 Natural
B: 1 ball (or approx 25g) #601 Pepper
C: 1 ball (or approx 25g) #N17 French Clay
D: 1 ball (or approx 25g) #307 Lullaby E:1 ball (or approx 10g) #522 Nervous Green
US 6 (4mm) needles
Size E/4 (3.5mm) crochet hook
Polyester fiber stuffing
1 pair safety eyes or 1/4" buttons
Small amount of pink yarn for embroidering face
One or two 3/8" buttons for dress
Tapestry needle
Gauge
22 sts and 32 rows = 4" in St st
Project from STITCH ‘N B* SUPERSTAR KNITTING by Debbie Stoller. Published by Workman Publishing.
Tags
© 2024 Debbie Stoller / Workman · Reproduced with permission.
-
 Ms Dorito added Tiger Lily to Plushie
12 Jun 17:24
Ms Dorito added Tiger Lily to Plushie
12 Jun 17:24
-
 Yannick P. favorited Tiger Lily
04 May 05:35
Yannick P. favorited Tiger Lily
04 May 05:35
-
 C.J. M. added Tiger Lily to Knit
15 Feb 20:17
C.J. M. added Tiger Lily to Knit
15 Feb 20:17
-
C.J. M. favorited Tiger Lily
15 Feb 20:17
-
 Sylvia B. favorited Tiger Lily
19 Mar 16:52
Sylvia B. favorited Tiger Lily
19 Mar 16:52
-
Karen P. favorited Tiger Lily
09 Feb 06:17
-
 Jennie C. added Tiger Lily to Orva stuff
29 Jul 20:09
Jennie C. added Tiger Lily to Orva stuff
29 Jul 20:09
-
Jennie C. favorited Tiger Lily
29 Jul 20:08
-
 debbie.irwin.7399 favorited Tiger Lily
03 Jun 03:16
debbie.irwin.7399 favorited Tiger Lily
03 Jun 03:16
-
debbie.irwin.7399 added Tiger Lily to TIGER LILY
03 Jun 03:15
-
Step 1
Leg (MaKe 2)
Beg at sole with A, CO 10 sts.
Row 1 (wS): Purl.
Row 2: K1, *m1, k1; rep from * to end—19 sts.
Rows 3, 5 and 7: Purl.
Row 4: K4, *m1, k3; rep from * to end—24 sts.
Row 6: Knit.
Row 8: K8, [ssk] twice, [k2tog] twice, k8—20 sts.
Row 9: P6, [p2tog] twice, [p2tog tbl] twice, p6—16 sts.
Row 10: K7, k2tog, k7—15 sts.Break off A and join C. For rem of leg, work stripes of 2 rows C and 2 rows B.
Rows 11–13: Work in St st.
Row 14: K2, m1, k11, m1, k2—17 sts.
Rows 15–25: Work in St st.
Row 26: K1, *k2tog; rep from * to end—9 sts.Break off yarn. Thread end through rem sts and pull tight to gather. Sew back leg seam and sole, leaving an opening. Stuff and sew closed.
-
Step 2
Body
Beg at neck edge with B, CO 16 sts.
Row 1 (wS): Purl.
Row 2: K1, *m1, k1; rep from * to end—31 sts.
For rem of body, work stripes of 2 rows C and 2 rows B.
Rows 3–5: Work in St st.
Row 6: K8, m1, k15, m1, k8—33 sts.
Rows 7–13: Work in St st.
Row 14: K15, m1, k3, m1, k15—35 sts.
Rows 15–17: Work in St st.
Row 18: K3, m1, k1, m1, k27, m1, k1, m1, k3—39 sts.
Row 19: Purl. ROw 20: K16, ssk, k3, k2tog,
k16—37 sts.
Rows 21–23: Work in St st.
Row 24: K15, ssk, k3, k2tog, k15—35 sts.
Rows 25–27:
Work in St st.
Row 28: K1, *k2tog; rep from * to end—18 sts.
Row 29: Purl.
Row 30: *K2tog; rep from * to end—9 sts.
Break off yarn. Thread end through rem sts and pull tight to gather. Sew back seam to neck edge, leaving neck edge open. Stuff body. -
Step 3
Right Arm
Beg at paw with A, CO 6 sts.
Row 1 (wS): Purl.
Row 2: K1, *m1, k1; rep from * to end—11 sts.
Row 3: Purl.
Row 4: [K2, m1] twice, k3, [m1, k2] twice—15 sts.
Rows 5–7: Work in St st. ROw 8: K1, [ssk] twice, [k2tog] twice, k6—11 sts.Break off A and attach C. For rem of arm, work stripes
of 2 rows C and 2 rows B.Rows 9–13: Work in St st.
Row 14: K5, m1, k3, m1, k3—13 sts.
Rows 15–23: Work in St st. ROw 24: K1, *k2tog; rep from * to end—
7 sts.Break off yarn. Thread end through rem sts and pull tight to gather.
Sew arm seam, leaving an opening. Stuff and sew
closed. -
Step 4
Left Arm
Work same as right arm except work rows 8 and 14 as foll:
Row 8: K6, [ssk] twice, [k2tog] twice, k1—11 sts.
Row 14: K3, m1, k3, m1, k5— 13 sts. -
Step 5
Head
Beg at back of head with C, CO 7 sts. Work in stripes of 2 rows C and 2 rows B.
Row 1 (wS): Purl.
Row 2: K1, *m1, k1; rep from * to end—13 sts.
Row 3: Purl.
Row 4: K1, *m1, k1; rep from * to end—25 sts.
Rows 5–7: Work in St st.
Row 8: [K2, m1] 4 times, k9, [m1, k2] 4 times—33 sts.
Rows 9–18: Work in St st (last row should be C).
Row 19: With C, purl.
Row 20: With C, k8, [k2tog] twice, k9, [ssk] twice, k8—29 sts.Break off C and work rem of nose with A. ROw 21: Purl.
Row 22: K1, [k2tog] 6 times, k3, [ssk] 6 times, k1— 17 sts.
Rows 23–25: Work in St st. ROw 26: K1, *k2tog; rep from * to end—9 sts.Break off yarn. Thread end through rem sts and pull tight to gather. Attach safety eyes or button eyes. Sew seam, leaving an opening. Stuff, adding extra to nose and cheeks to make them stick out, and sew closed.
-
Step 6
Ear (Make 2)
With C, CO 9 sts.
Row 1 (RS): Knit. ROw 2: K1, ssk, k to end—8 sts.
Rows 3–8: Rep rows 1 and 2—5 sts after row 8.
Row 9: Knit. ROw 10: [Ssk] twice, k1—3 sts.Break off yarn. Thread end through rem sts, pull tight and secure end.
-
Step 7
Tail
With B, CO 9 sts.
Beg with a WS row, work 32 rows in St st stripes of 2 rows B and 2 rows C—16 stripes.
Break off C and attach A. Work 5 rows in St st.
Break off yarn. Thread end through sts and pull tight to gather. Sew seam.
-
Step 8
Finishing
With pink yarn, embroider nose and mouth.
Optional: Embellish stripes on head with duplicate st (see photo for placement).
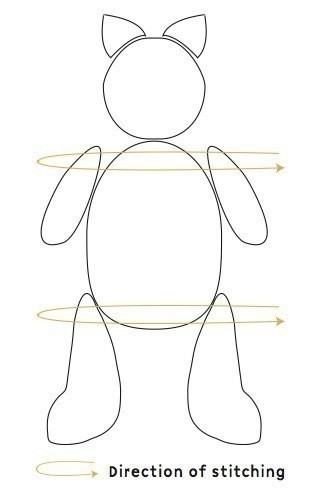
Sew CO edge of ears to head. Sew head securely to open neck edge of body. Referring to diagram, thread approx 24" length of yarn through left arm approx 1⁄4" from top, through body at shoulder, and through right arm; then again through arm, body, and left arm; pull tight. Repeat so yarn passes through each arm 3–4 times. Pull yarn tight so arms are secure, then fasten off yarn. Attach legs at lower edge of body in the same way as the arms. Sew tail to tiger’s bum.
-
Step 9
Dress
Front
With D, CO 27 sts.
Row 1 (wS): P3, *k1, p4; rep from * to last 4 sts, k1, p3.
Row 2: Knit.
Rows 3–20: Rep rows 1 and 2.
Row 21: Rep row 1.
Row 22: K1, *k2tog, k1, ssk; rep from * to last st, k1— 17 sts. Drop D and pick up E.
Rows 23–24: With E, work in St st. Drop E and pick up D.
Rows 25–31: With D, work in St st. BO.Back
Work same as Front through row 31.
Row 32: Knit. BO. -
 Step 10
Finishing
Sew side seams up to E stripe. With E, starting at side seam, work 1 rnd sc around front and back bodices, making a button loop on one or both back shoulders. Sew button(s) to front. Sew other shoulder seam if necessary.


i just wish i could make it