
About
Crochet a little red devil
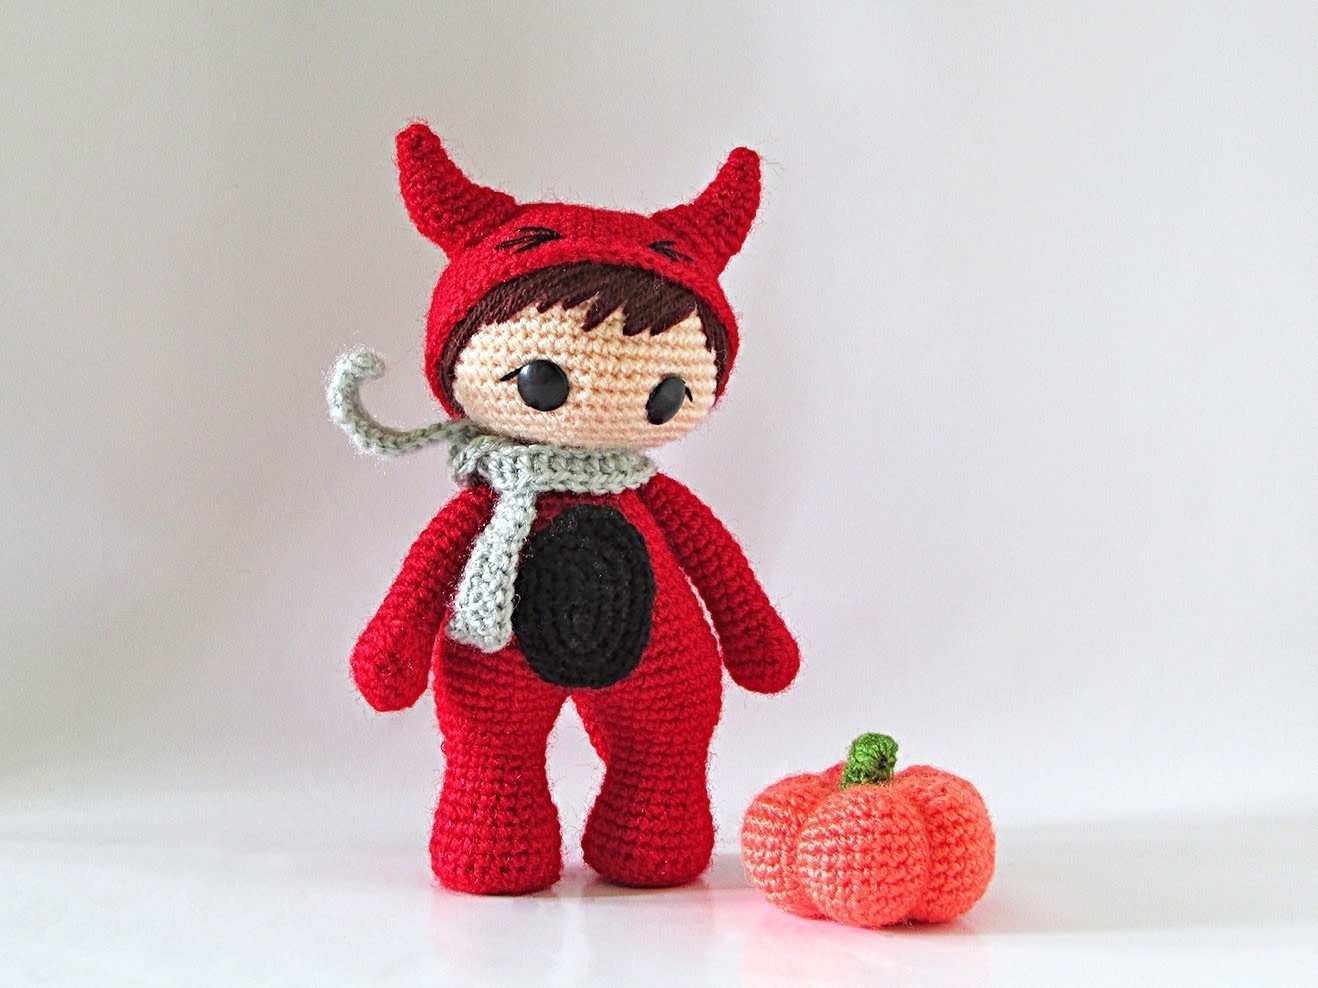
Does this little kid remind you of a little trouble-on-two-legs in your life? If your answer is yes, why not make this little amigurumi devil for your darling little pain in the butt! The pattern for this 7 inch amigurumi includes instructions and step-by-step pictures on how to embroider amigurumi hair.
Tags
-
 Ms Dorito added The Little Red Devil to Plushie
12 Jun 17:46
Ms Dorito added The Little Red Devil to Plushie
12 Jun 17:46
-
 wendi.wagner favorited The Little Red Devil
13 Feb 03:09
wendi.wagner favorited The Little Red Devil
13 Feb 03:09
-
 Alex Z. added The Little Red Devil to Интересное
12 May 15:27
Alex Z. added The Little Red Devil to Интересное
12 May 15:27
-
 Kazuma M. favorited The Little Red Devil
17 Jan 07:47
Kazuma M. favorited The Little Red Devil
17 Jan 07:47
-
 lynn.wagner.501 favorited The Little Red Devil
18 Aug 11:50
lynn.wagner.501 favorited The Little Red Devil
18 Aug 11:50
-
lynn.wagner.501 added The Little Red Devil to Crochet
18 Aug 11:49
-
 jeanetteedwardswasthomas added The Little Red Devil to Crochet
04 Mar 07:53
jeanetteedwardswasthomas added The Little Red Devil to Crochet
04 Mar 07:53
-
 ZombieUnicorn favorited The Little Red Devil
14 Jan 21:40
ZombieUnicorn favorited The Little Red Devil
14 Jan 21:40
-
 Agnes d. favorited The Little Red Devil
29 Jun 12:29
Agnes d. favorited The Little Red Devil
29 Jun 12:29
-
 Haley G. favorited The Little Red Devil
11 Jun 15:02
Haley G. favorited The Little Red Devil
11 Jun 15:02
-
Step 1
LEG (make 2)
Cut out a long length of red yarn, thread a needle and keep it aside.
Round 1: With red yarn, 8 sc in a magic ring. (8)
Round 2: inc in all 8 st. (16)
Round 3: (sc in the next st, inc) repeat 8 times. sl st into the back loop of the next st to join. (24)Make sole: On a small plastic sheet, lay the circle you just made. Trace an outline around it and cut out the base. Check if it stays within the circle. Trim further if required. Make 2 holes a few millimeters apart in the center (Pic 1). Repeat for the other shoe. Keep these aside.
Round 4: ch 2 and working in BLO, hdc in all 24 st. sl st in the next st and mark it as the end of the round. (24)
Round 5: sc in all 24 st. (24)Insert sole: Place the plastic sole inside the shoe. With the yarn needle and red yarn, and holding both the pieces together, insert needle from inside to out from the hole (Pic 2) and from outside to in from the other hole (Pic 3). Knot the yarn ends together to secure the plastic sole (Pic 4).
Round 6-7: sc in all 24 st. (24)
Round 8: (sc in the next st, dec) repeat 8 times. (16)
Round 9-13: sc in all 16 st. (16)
Round 14: (sc in the next st, inc) repeat 8 times. (24)
Round 15-17: sc in all 24 st. (24)
Fasten off. Make the other leg but do not fasten off. -
 Step 2
BODY
Round 1: In this round, we will join the legs. Hold both legs together with the ‘working’ piece on the right. Insert hook in the second leg and make an sc (Pic 5). Continue making sc in the remaining 47 st around both legs. (48)
Round 2: inc in the next 2 st, sc in the next 20 st, inc in the next 4 st, sc in the next 20 st, inc in the last 2 st. (56)
Round 3-4: sc in all 56 st. (56)
Round 5: (sc in the next 5 st, dec) repeat 8 times. (48)
Round 6: sc in all 48 st. (48)
Round 7: (sc in the next 4 st, dec) repeat 8 times. (40)
Round 8: sc in all 40 st. (40)
Round 9: (sc in the next 3 st, dec) repeat 8 times. (32)
Round 10-14: sc in all 32 st. (32)
Round 15: (sc in the next 2 st, dec) repeat 8 times. (24)
Round 16: (sc in the next st, dec) repeat 8 times. (16)
Round 17-18: sc in all 16 st. (16)
Fasten off, weave in yarn end.
Stuff body firmly, thoroughly filling in the pelvis and buttock areas. It is important to stuff well to give the body a pudgy look. -
Step 3
ARM (make 2)
Round 1: With red yarn, 6 sc in a magic ring. (6)
Round 2: inc in all 6 st. (12)
Round 3: (sc in the next st, inc) repeat 6 times. (18)
Round 4: sc in all 18 st. (18)
In the next round, we will shape thumb with a bobble stitch. If you are unfamiliar with this stitch, a how-to is included at the end of this section.
Round 5: (sc in the next st, dec) repeat 3 times, bobble stitch in the next st, dec, (sc in the next st, dec) repeat 2 times. (12)
Round 6: sc in all 12 st. (12)
Round 7: (sc in the next 2 st, dec) repeat 3 times. (9)
Stuff.
Round 8-19: sc in all 9 st. (9)
Stuff till you reach the last 2 rounds. Leave these two rounds unstuffed. Pinch the top of the arm flat and sew close top opening. Pin both arms on either side of the body, 2-3 rounds below the neck opening, and sew in place. -
Step 4
HEAD
Round 1: With light peach (or the flesh color of your choice), 8 sc in a magic ring. (8)
Round 2: inc in all 8 st. (16)
Round 3: (sc in the next st, inc) repeat 8 times. (24)
Round 4: (sc in next 2 st, inc) repeat 8 times. (32)
Round 5: (sc in next 3 st, inc) repeat 8 times. (40)
Round 6: (sc in next 4 st, inc) repeat 8 times. (48)
Round 7: (sc in next 5 st, inc) repeat 8 times. (56)
Round 8-16: sc in all 56 st. (56)
If using safety eyes with washer, insert eyes between Round 14 and 15, with an interspace of 8 st.
Round 17: (sc in the next 5 st, dec) repeat 8 times. (48)
Round 18: (sc in the next 4 st, dec) repeat 8 times.(40)
Round 19: (sc in the next 3 st, dec) repeat 8 times. (32)
Round 20: (sc in the next 2 st, dec) repeat 8 times. (24)
Round 21: (sc in the next st, dec) repeat 8 times. (16)
Fasten off, leaving a long tail to sew. Stuff.
If using sew on eyes, attach eyes between Round 14 and 15, with an interspace of 8 st. -
Step 5
HAT
Round 1-7: With red yarn, follow Round 1 to 7 of the head.
Round 8-16: sc in all 56 st. (56)
Round 17: sl st in the next st, ch 2 and hdc in all st around. Sl st to the beginning of the round to join. (56)
Fasten off, leaving a long tail. -
 Step 6
Embroider Hair
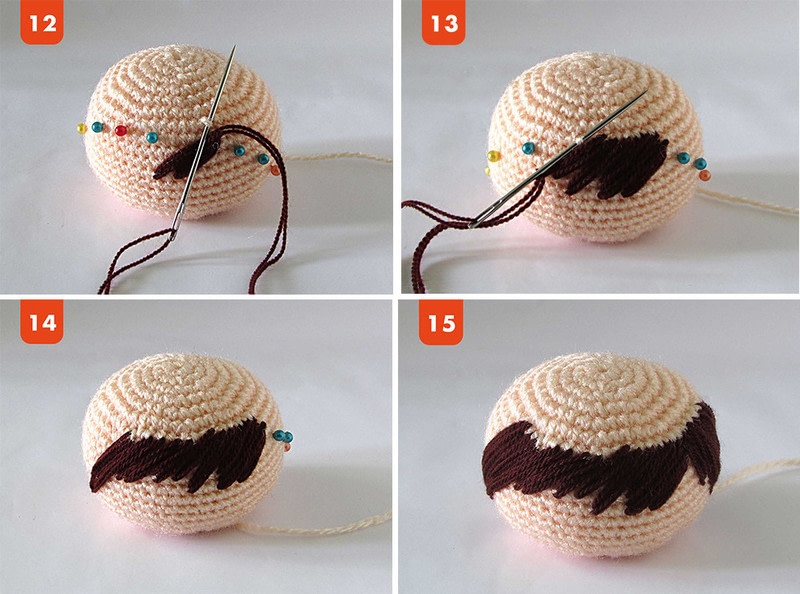
Slip hat on the head and mark the area falling outside the hat with pearl headed pins (Pic 6). The area falling outside this ‘line’ (towards the face and not the scalp area) is where you will be embroidering hair (Pic 7). Since the hat will be covering most of the head, you don’t need to embroider hair inside of this line. -
 Step 7
Thread a yarn needle with fingering weight crochet thread in dark brown. Insert needle from the neck opening (leaving a small length of tail behind) and bring it out a little above the pin on the right side of the face. From here on, make slanting lines of varying lengths until you cover the left side of the head (Pic 8-14).
-
 Step 8
Repeat this on the right side of the head (Pic 15).
After you embroider the last ‘strand’ of hair, insert needle in and bring it out from the neck opening. Tie yarn tails together to secure. Cut off excess yarn. Slip hat on head and sew on head.
-
Step 9
HORN (make 2)
Round 1: With red yarn, 4 sc in a magic ring. (4)
Round 2: (sc in the next st, inc) repeat 2 times. (6)
Round 3: (sc in the next 2 st, inc) repeat 2 times. (8)
Round 4: (sc in the next 3 st, inc) repeat 2 times. (10)
Round 5-7: sc in all 10 st. (10)
Round 8: inc in the next 4 st, sc in the next 6 st. (14)
Round 9: (sc in the next st, inc) repeat 4 times, (sc in the next st, dec) repeat 2 times. (16)
Round 10: sc in all 16 st. (16)
Fasten off, leaving a long tail. Stuff lightly and sew horns on the hat between Round 7 and 13, with an interspace of 12 st. -
 Step 10
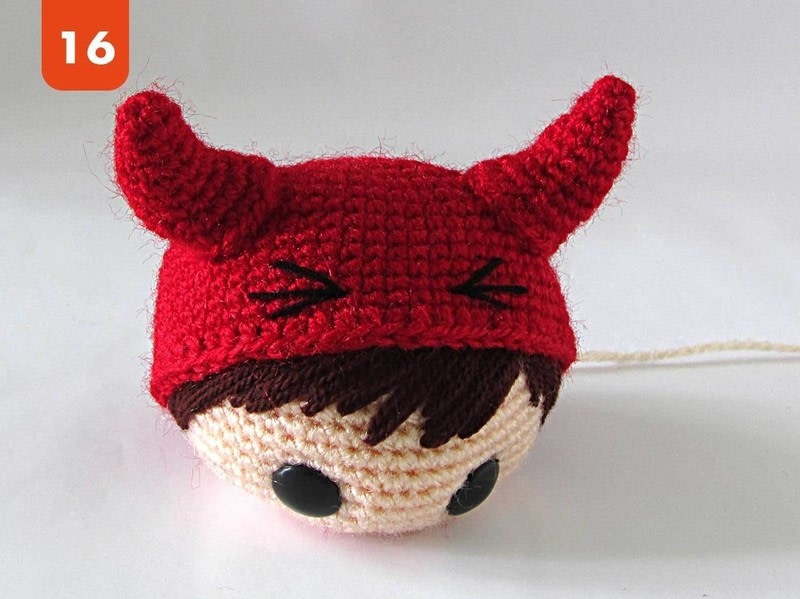
Make Eyes on the Hat: Embroider eyes on the hat as shown in Pic 16.
-
Step 11
TAIL
Round 1: With red yarn, 3 sc in a magic ring. (3)
Round 2: inc in all 3 st. (6)
Round 3: (sc in the next st, inc) repeat 3 times. (9)
Round 4: (sc in the next 2 st, inc) repeat 3 times. (12)
Round 5: (sc in the next 3 st, inc) repeat 3 times. (15)
Round 6: sc in the next 3 st, sk the next 5 st, sc in the next 2 st, sk the next 5 st, join with a sl st to the beginning of the round. (5)
Round 7-17: sc in all 5 st. (5)
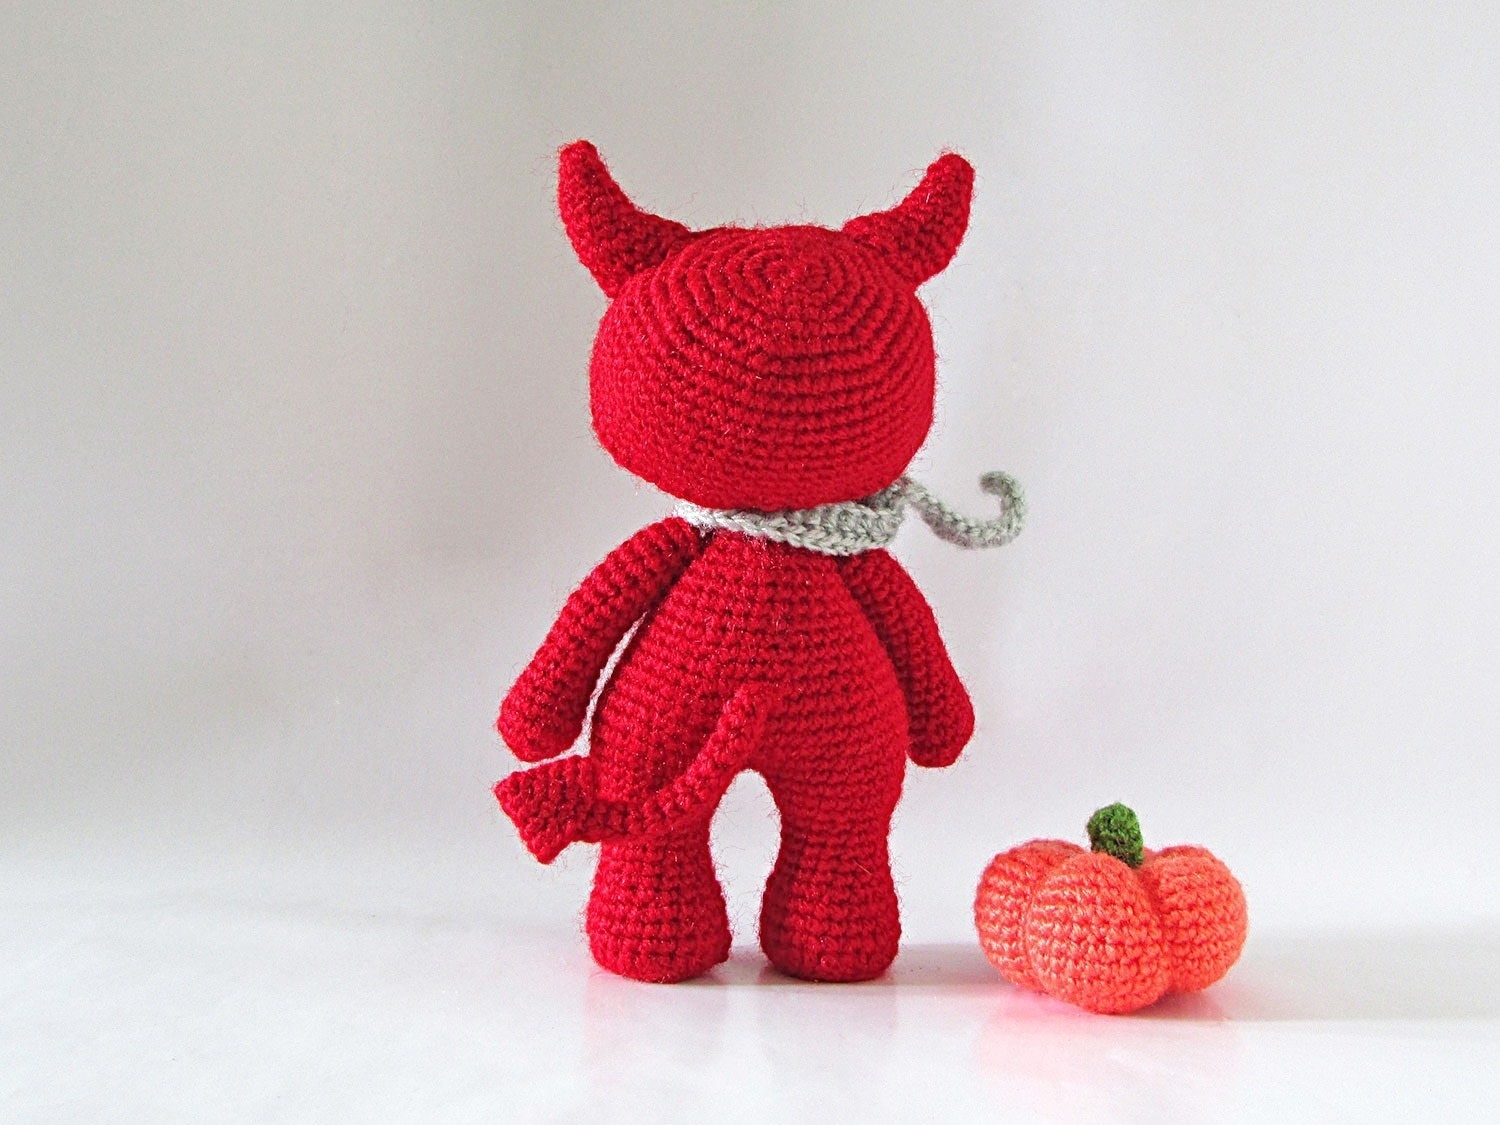
Fasten off, leaving a long tail. Sew on the seat of the jumper. -
Step 12
FRONT PATCH
Round 1: With black yarn, ch 5. Start in second ch from hook. sc in next 3 st, 3 sc in last st. Continuing on the other side of the foundation chain, sc in next 2 st, inc in last st. (10)
Round 2: inc in first st, sc in next 2 st, inc in next 3 st, sc in next 2 st, inc in last 2 st. (16)
Round 3: inc in first st, sc in next 4 st, inc in next 4 st, sc in next 4 st, inc in the last 3 st. (24)
Round 4: inc in the first 2 st, sc in the next 7 st, inc in the next 4 st, sc in the next 8 st, inc in the last 3 st. (33)
Fasten off, leaving a long tail. Sew in place. -
Step 13
SCARF
With light grey yarn, ch 61. Start in third ch from hook and hdc 58. (58)
Tie scarf around neck.