


About
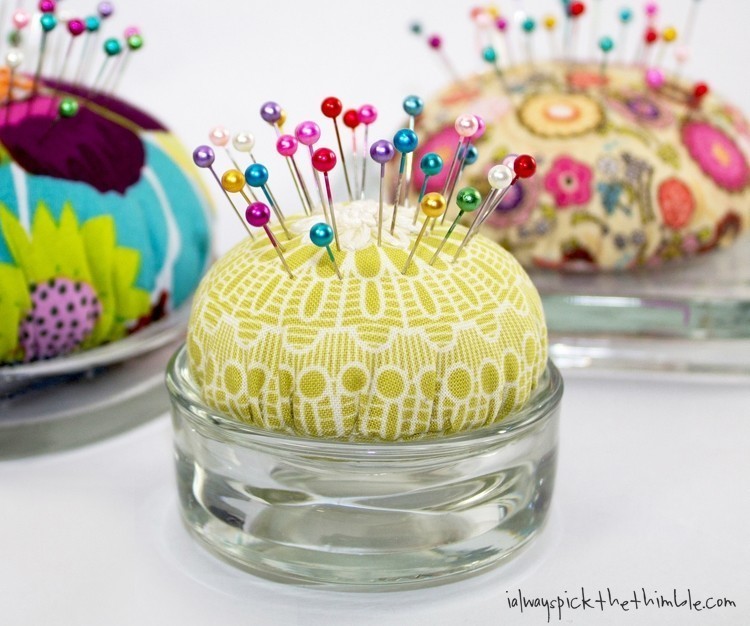
Dress up a plain pincushion with a glass tea light or glass candle plate base.
Sew this easy round fabric pincushion, then place it inside a glass candle plate or tea light base for a pretty glass base that sits nicely beside your sewing machine.
-
 Key West Witch added Tea Light And Candle Plate Pincushions to Sewing
29 Jun 17:34
Key West Witch added Tea Light And Candle Plate Pincushions to Sewing
29 Jun 17:34
-
 Irene D. favorited Tea Light And Candle Plate Pincushions
13 Apr 13:58
Irene D. favorited Tea Light And Candle Plate Pincushions
13 Apr 13:58
-
 Sarah Sylvia S. favorited Tea Light And Candle Plate Pincushions
19 Jul 07:12
Sarah Sylvia S. favorited Tea Light And Candle Plate Pincushions
19 Jul 07:12
-
 Linda H. favorited Tea Light And Candle Plate Pincushions
16 Jan 20:14
Linda H. favorited Tea Light And Candle Plate Pincushions
16 Jan 20:14
-
 Kaiulani W. favorited Tea Light And Candle Plate Pincushions
12 Jun 05:30
Kaiulani W. favorited Tea Light And Candle Plate Pincushions
12 Jun 05:30
-
 jhuty.chowdhury favorited Tea Light And Candle Plate Pincushions
18 May 08:49
jhuty.chowdhury favorited Tea Light And Candle Plate Pincushions
18 May 08:49
-
 Carla B. favorited Tea Light And Candle Plate Pincushions
26 Apr 04:23
Carla B. favorited Tea Light And Candle Plate Pincushions
26 Apr 04:23
-
 Sarah W. favorited Tea Light And Candle Plate Pincushions
24 Apr 01:06
Sarah W. favorited Tea Light And Candle Plate Pincushions
24 Apr 01:06
-
 Libby W. favorited Tea Light And Candle Plate Pincushions
22 Apr 19:15
Libby W. favorited Tea Light And Candle Plate Pincushions
22 Apr 19:15
-
 Karen R. published her project Tea Light And Candle Plate Pincushions
10 Feb 19:50
Karen R. published her project Tea Light And Candle Plate Pincushions
10 Feb 19:50
-
 Step 1
Tea lights and candle plates and come in a variety of sizes and thicknesses and these cutting instructions allow for whatever size you use. First, you will want to determine what size you need the base of your pincushion to be.
Cut out a fabric base that is 1/4" larger all the way around than the desired finished size. (The picture above shows me tracing around the outside of the tea light for the fabric base, because the edge was 1/4" bigger than the size I wanted the finished pincushion to be.)
Cut out a fabric top 1" larger all the way around than the desired finished size.
-
 Step 2
Using a 1/4" seam, baste around the outside edge of the fabric top. I usually sew another row of basting around the outside, just in case a thread brakes while gathering.
-
 Step 3
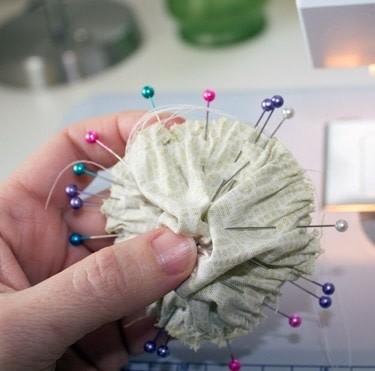
Divide the fabric top and the fabric bottom into 4 even quarter sections by folding the circle in half, then folding it in half again. I marked these 4 locations (think 12:00, 3:00, 6:00, 9:00 o'clock) using purple pins, but you can just use a pen or marking pencil.
Pull the bobbin thread to gather the top to the same size as the base.
With right sides of the fabrics together, align the purple pins and pin the fabric top to the bottom. Try and space all the gathers out as evenly as possible to get a smooth gathered edge.
Using a 1/4" seam, sew around the outside edge, leaving a 1-2" opening for stuffing. Try and sew as round of a circle as you can. If you leave in the pins, sometimes it creates funky stitching lines. After taking out the pins, flip it over and sew again around the edge to tidy it up if necessary. To help remember to leave an opening, I use white pins to mark the beginning and end where I want to stop sewing.
-
 Step 4
Turn inside out and stuff. I stuff mine pretty firmly and it takes a bit of pushing, shoving and cajoling (swearing) with the batting to get it to look relatively smooth. Make sure you set the pincushion into the glass plate or tea light a few times while stuffing to verify the size and shape is what you want.
-
 Step 5
Hand sew the opening closed.
-
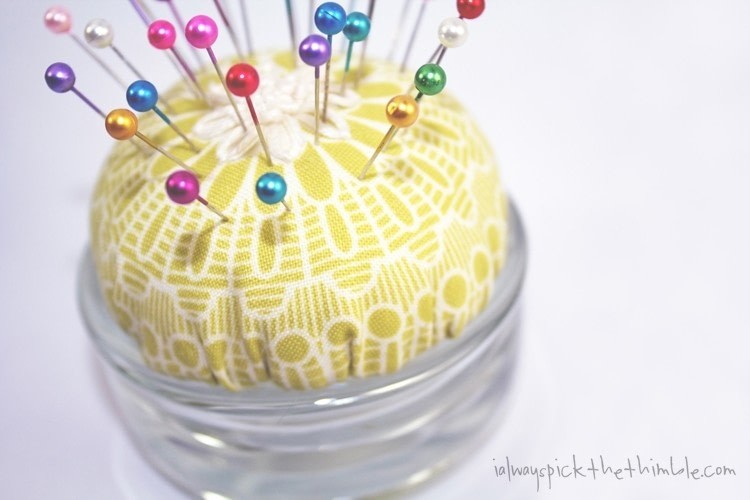
 Step 6
Place some glue on the sides or rim of the candle plate and hold the pincushion down for about 5-10 minutes to let it set.
Full disclosure....the E6000 dries clear, but you might see it through the glass depending on the type of glass plate you use. There are TONS of candle plates that aren't clear that would hide the glue and seams better than a clear plate would, but I really liked the look of the glass and so that's what I used that for my pincushions.