


About
MacGuyver an old sweater into an awesome pair of sweater boots!
As far as I’m concerned, there’s nothing the DIY movement can’t do. It seems to be able to turn anything into anything, kinda like if MacGyver really got into sewing. Well, one of the DIYers favorite upcycling materials is a bulky old sweater, and today through the magic of craftiness, it’s going to be transformed into a pair of super cute sweater boots! Ha. Bet MacGyver never pulled that one off... (Note: not that I’m dissing MacGyver. In any way.)
-
 Chelsie K. added Sweater Boots!! to Slippers
19 Jun 09:24
Chelsie K. added Sweater Boots!! to Slippers
19 Jun 09:24
-
 R@iNB0w CH@RiZ@RD!! favorited Sweater Boots!!
03 May 05:58
R@iNB0w CH@RiZ@RD!! favorited Sweater Boots!!
03 May 05:58
-
Tashianna S. favorited Sweater Boots!!
11 Apr 13:22
-
Gina g. added Sweater Boots!! to Fashion
29 Jan 09:19
-
Gina g. favorited Sweater Boots!!
29 Jan 09:18
-
 Crystal added Sweater Boots!! to Sewing Projects~
18 May 16:30
Crystal added Sweater Boots!! to Sewing Projects~
18 May 16:30
-
 Kevin Huggins favorited Sweater Boots!!
28 Jan 09:41
Kevin Huggins favorited Sweater Boots!!
28 Jan 09:41
-
 Sveta favorited Sweater Boots!!
04 Dec 17:49
Sveta favorited Sweater Boots!!
04 Dec 17:49
-
Blondell K. favorited Sweater Boots!!
11 Mar 19:30
-
Ariana J. favorited Sweater Boots!!
28 Jan 16:13
You Will Need
-
 Step 1
So, to make our fantastic sweater boots, you’ll need:
Cheap pair of flat shoes (used for the base)
An old sweater with big bulky sleeves
A hot glue gun
Cutaway stabilizer
Water-soluble stabilizer
Embroidery design
Buttons for embellishment
Needle and thread
Scissors
-
 Step 2
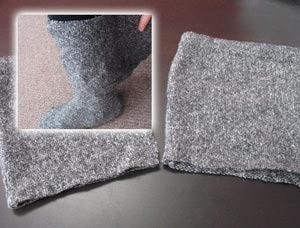
To start, cut the sleeves off right where they meet up with the sweater. You should have two long tubes. Put the rest of the sweater aside for now.
-
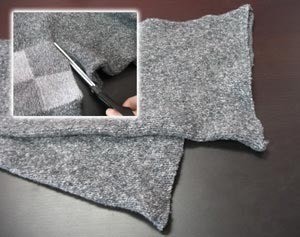
 Step 3
Before we start gluing anything, we need to shape our knit into a “boot”-like shape, which you’ll mock up on your own foot.
Take a sleeve and turn it inside out. Slide it onto your leg so the cuff of the sleeve is up your calf and the open wider end is down by your foot. Keep the seam of the sleeve on the back side of your leg, so it lines up with your heel.
Slip on your flat shoes and stretch the open end of the sleeve around the edges of the shoe.
-
 Step 4
As you can see, just stretching the sleeve over the shoe creates feet that just look like giant triangles. We need nice shaped boots. Keeping the sweater knit pulled over the toe, pinch the excess back towards your ankle so it forms to the shape of your foot. Pin this excess in place. You’ll find you’ll have to pull the most excess from the back, heel and bottom of your foot to get it to form a nice shape.
-
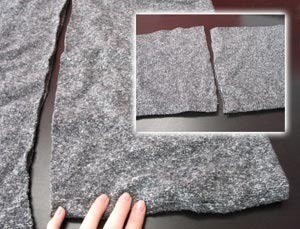
 Step 5
Once you have your shape pinned in place, cut off the excess left behind. (Stretch your shape over your shoe again before you cut to make sure it can still fit!)
I found there was a lot of excess down by my heel in order to get it to shape nicely, so I cut off some of the knit there too. It’ll help me know where the edge of the knit should be on the shoe when we glue it later.
Repeat this again on your other boot, so you have two pinned and shaped boot forms.
-
 Step 6
Remove the shoe and carefully slide off the boot shape without disturbing the pins. You should have two wonky boot-like shapes all pinned up the side. Take your boot shapes under your sewing machine and sew a seam down the newly trimmed edge. Be sure to make your seam wide enough to catch both sides of your stretchy knit.
-
 Step 7
Keep your shape inside out, and place your shoe inside the form, heel inside the knit. The back seam should be on the same side as the heel, as shown. Shuffle the knit around a bit so it’s stretched evenly around your shoe.
-
 Step 8
It’s time to heat up that glue gun and go to town! Run a line of glue just above your rubber heel, and glue down the edge of the knit. Start back at the heel to make sure the seam is centered, and then work your way around the shoe. I’d recommend taking in a little excess around the sides of your shoe - it’ll help with the nice formed shape.
Although these won’t be winter-worthy boots, the hot glue is a surprisingly sturdy way of attaching the knit. Once it’s dry, your knit won’t come off easily
-
 Step 9
This is my shoe with the knit glued all the way around the shoe. If you like, you can snip off the excess knit above the glue line before we flip it right side out.
-
 Step 10
Carefully turn your boot right side out again. These cheap, bendable shoes are best for this, because you can kinda fold it in half to better get it right side out.
Slip on your little booties to test the fit. Wonderful! I now have cute little sweater boots formed just for my feet! But wait, we’re not done yet. Right now, the top of the boot is just the ugly old cuff of the sweater. I have better plans...
-
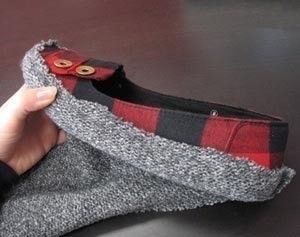
 Step 11
Grab that sweater again, and snip off about 6-10 inches of the bottom. We’re going to use this part to make cuffs for our boots. Once you’ve cut this piece off the bottom, snip it in two.
-
 Step 12
We’re going to use the finished bottom edge of the sweater as the bottom of our cuff. Take one of your snipped pieces and wrap it around your boot. It’s up to you how tall you want your boot to be, and how long you want the cuff to be. You can have a tall boot and a short cuff, or a short boot with a long slouchy cuff. I opted for the middle ground.
Mark your cuff with pins, and trim it to the size you want. You need the top to match the width of your boot, but I flared out the bottom a bit. I also trimmed the height of my boot a bit. Do this for both cuffs.
-
 Step 13
Before we sew our cuff together, we’re going to add a bit of embroidery! I’m going to add a small fleur de lis to the middle of my cuff that will face outwards.
Now, to embroider on stretchy, chunky knit takes a few special steps. You’ll need a layer of cutaway stabilizer under your knit, then the knit fabric, and then a layer of water-soluble stabilizer on top. The top layer of stabilizer will keep the stitches from sinking into the knit. Also, be extra careful not to stretch your knit too much when you hoop it, otherwise it’ll bunch up again after it’s embroidered and unhooped.
-
 Step 14
I embroidered both my cuffs with some pretty fleur accents, and then unhooped them. To remove the top stabilizer, don’t soak it, but gently tear it away. You may need a little tweezers to get all the little pieces out. Trim the excess cut-away stabilizer on the back too.
-
 Step 15
Now we can stitch them into cuffs. Fold your fabric right sides together (so the embroidery is facing in) and sew a seam up the side on both pieces.
-
 Step 16
To attach the cuff, we want to sew it to the top so it can fold over and display its pretty embroidery. Turn your cuff right side out, with the embroidery visible to the world, and tuck it inside your boot, with the embroidery facing the side where you want it to be on the outside of the boot. Line up the top of the cuff with the top of the boot and pin it in place all the way around, making sure the back seams are together.
Once it’s all pinned in place, sew a seam to secure the two together.
-
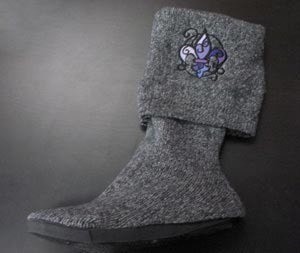
 Step 17
Flip your cuff right side out. Now you have a pretty sweater boot with a pretty cuff! It looks kinda slouchy and weird just sittin’ on my desk, but just wait ‘til you get them on…
-
 Step 18
As one last little touch, I’m going to sew a button to my cuff to keep the two layers from shifting too much, and just ‘cause it looks cute
-
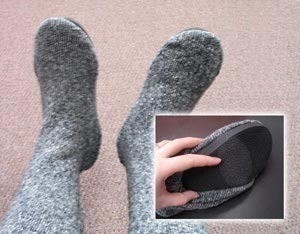
 Step 19
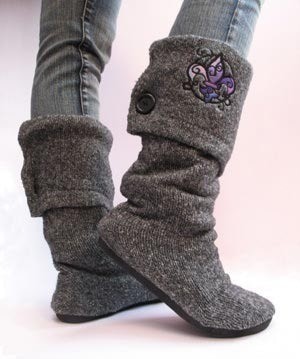
Slip on your slouchy sweater boots, and tromp around your home in style! They’re super cute with a pair of jeans, leggings, or a skirt.
-
 Step 20
Simple embroidery adds a dash of color and charm to your comfy boots, and lets you personalize them to your own styles or whims.


Versions
See all 25 »


Comments


