

About
Introduction to The Glossy Project
I am starting 2010 with an art project
called The Glossy Project.
The Glossy Project is a monthly challenge I have started
as a way to merge my love of design and fashion with
textile and mixed media art.
For this year, the theme will be the cover of Boho,
Vogue (US edition), Oprah and Bust magazine and the
design is always embroidered.
The embroidery technique is one I have been using
and teaching for years now.
I call this stitch,The Glossy Back Stitch.
It is similar to the traditional back stitch,
but the stitch length varies.
-
 Katie M. added Stitched Glossy to List 1
20 Dec 17:55
Katie M. added Stitched Glossy to List 1
20 Dec 17:55
-
Katie M. favorited Stitched Glossy
20 Dec 17:55
-
 Sarah Sylvia S. favorited Stitched Glossy
23 Jul 09:51
Sarah Sylvia S. favorited Stitched Glossy
23 Jul 09:51
-
 Chudames favorited Stitched Glossy
07 Apr 19:54
Chudames favorited Stitched Glossy
07 Apr 19:54
-
 Katie B. added Stitched Glossy to DIY art
07 Mar 06:16
Katie B. added Stitched Glossy to DIY art
07 Mar 06:16
You Will Need
-
 Step 1
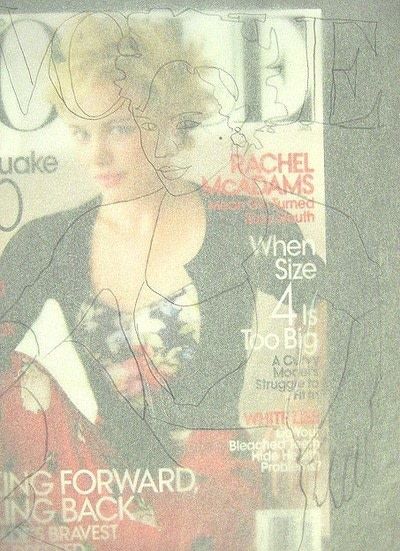
Trace your image using tracing paper.
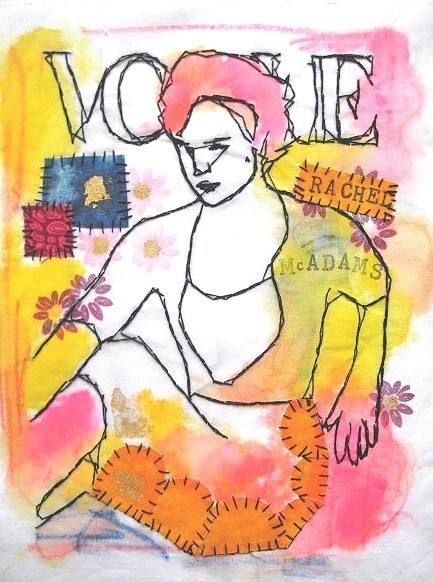
I am starting this project with the January issue of Vogue (US edition).
(You can also use your original drawing or a photograph) -
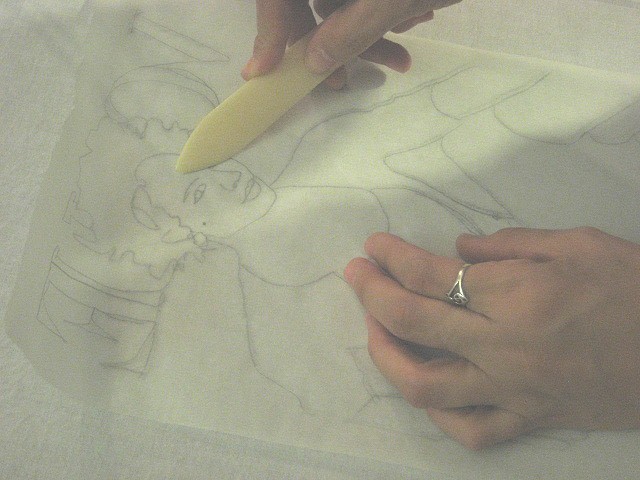
 Step 2
Place the tracing on your fabric. Then use a bone folder or a spoon to burnish the pencil marks onto the back of your fabric.
-
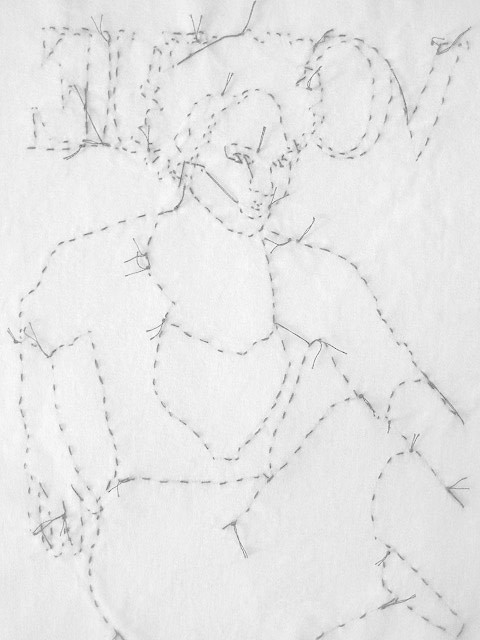
 Step 3
When you are done, it will look something like this.
-
 Step 4
Then iron an iron-on interfacing or
stabilizer over the design.
This will prevent the pencil markings from rubbing off as
you work and it will also make the
fabric a little heavier and stronger.Now start to embroider it.
-
 Step 5
What distinguishes a Glossy from other types of embroidery is the use of The Glossy Back Stitch.
Unlike traditional embroidery, this stitch is worked on
the back-side of the fabric.
The Glossy Back Stitch is similar to the traditional back stitch.
The difference is that you can change the length of each
stitch as you embroider your image.
Doing so results in a jagged and impressionistic design on the right-side of the fabric.
That's exactly the goal of this technique.Continue to embroider your image.
-
 Step 6
When the entire piece is embroidered, it will look something like this.
-
 Step 7
All the knots and loose threads will be visible on the side you've stitched on. Turn it to the right-side and it looks like this.
-
 Step 8
At this point, you can leave it as is, or if you want to lightly gesso your Glossy. Now you are ready to paint, applique, sew, bead, cut in to, quilt, collage, watercolor, gold leaf or embellish it any way you want.


Comments


 1
Watercolor Art »
Watercolor Paints Made From Make Up
1
Watercolor Art »
Watercolor Paints Made From Make Up
