


About
one little cheeky monkey
easy quick and fun .one cute toy for your little ones
Tags
-
 Denise M. favorited Sock Monkey
26 May 09:04
Denise M. favorited Sock Monkey
26 May 09:04
-
 Alex B. favorited Sock Monkey
19 Apr 01:40
Alex B. favorited Sock Monkey
19 Apr 01:40
-
 Jue G. added Sock Monkey to Sock toys
26 Dec 21:51
Jue G. added Sock Monkey to Sock toys
26 Dec 21:51
-
Amy T. favorited Sock Monkey
06 Aug 21:08
-
 rachel lydia chaters entered her project Sock Monkey to Origami Stars Folding Papers
18 Feb 16:23
rachel lydia chaters entered her project Sock Monkey to Origami Stars Folding Papers
18 Feb 16:23
-
rachel lydia chaters entered her project Sock Monkey to Creative Lettering And Beyond
27 Oct 09:46
-
Helen C. favorited Sock Monkey
28 Jun 19:28
-
 Chris D. favorited Sock Monkey
29 Apr 02:51
Chris D. favorited Sock Monkey
29 Apr 02:51
-
rachel lydia chaters entered her project Sock Monkey to Selfie Toaster
19 Nov 17:39
-
Rebecca M. favorited Sock Monkey
14 Jun 15:10
-
 Step 1
eye and ear template
-
 Step 2
Cut the eye from white felt by following the pattern above. Mark the button eye position.
If your socks have folded cuff, remove the stitches carefully and don’t accidentally cut the sock. Flatten the fold to have a longer length. -
 Step 3
Turn the sock to wrong side, align sock as per photo below. Press with warm iron.
-
 Step 4
Draw pattern on the sock with erasable fabric marker. Since not all socks are the same, I can’t make a standard pattern for you to trace.
-
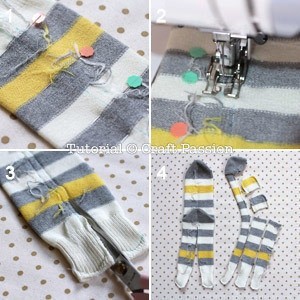
 Step 5
1. Align the stripes on both layers, pin.
2. Sew it with sewing machine, best if you have walking foot so both layers walk together. You can use hand sewn too.
3. Cut as per pattern.
4. Cut all pieces out. -
 Step 6
There will be an opening created between the legs. Use this opening to turn the sock right side out.
-
 Step 7
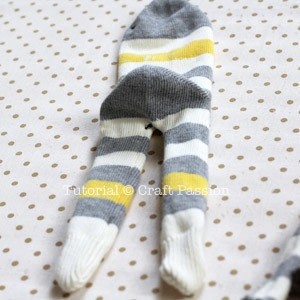
1. Insert the thumb into the leg till the feet end. “Pinch” the feet end with your thumb and index finger.
2. Push the index finger into the sock while thumb withdrawing from the sock to turn the sock right side out.
3. When the feet surface to the opening, pull the whole leg right side out.
4. Repeat the same to the other leg. -
 Step 8
Finally, turn the body out. Smooth out all the seam line.
Turn the rest of the body parts, except the tail. -
 Step 9
Stuff the legs with poly-fill stuffing
-
 Step 10
Fill the body round and to the firmness you like.
-
 Step 11
1. Sew slip / ladder stitch on the opening about 1/8″ from the raw edge. Let the thread loose and don’t pull it yet.
2. After finish slip stitch the opening, pull the thread to close the opening.
3. With the needle still on the sock, wrap 2 to 3 rounds of thread on it, pull the needle through while pressing the wrapping thread with your finger.
4. Insert the needle some where near by and come out from the other side. Pull the thread and cut it close to the sock. The thread will be hidden in the sock neatly. Always do this when you sew. -
 Step 12
1. Stuffed monkey arms waiting to be sewn.
2. Run stitches about 1/4″ from the raw edge.
3. Pull the thread to gather a bit, push the raw edge into the arm.
4. Tighten up the opening by pulling the thread fully, make a few stitch across, knot and cut thread. -
 Step 13
1. Stuff the ear with small amount of poly-fill. Fold the raw edges in and slip stitch.
2. Pull the thread to close the opening. Knot.
3. Fold the ear vertically and slip stitch the opening seam line.
4. The finished ear looks like this. -
 Step 14
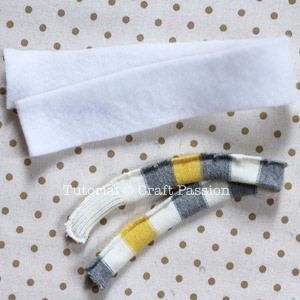
Cut a piece of batting or thick aquarium filter pad, 3 times the width of the tail and the length when it is stretched or partially stretched.
-
 Step 15
Fold the batting three times and sew the end to the seam line of the tail end (wrong side).
Whip stitch the folded batting in place until the other end.
Sew the batting again to tail seam allowance about 1/4″ below the raw edge.
(Note: I used this method since stuffing with poly-fill to a long narrow tail is difficult and uneven.) -
 Step 16
1. The batting and the tail before turning.
2. Insert finger into the sock and pull the tail right side out, portion by portion. Only turn the sock not the batting.
3. Repeat (2) until you reach to the end. Continue with the turning by inserting the batting into the tail until it fully gets into it.
4. Adjust the batting so that it looks neat. Fold the raw edge in and stitch it up just like the arms method. -
 Step 17
Body, arms, ears, tail, mouth, felt eye and button eyes are all set to be assembled into a sock monkey.
Divide the body into half, with top half being the face of the monkey where eyes and mouth are sewed to. -
 Step 18
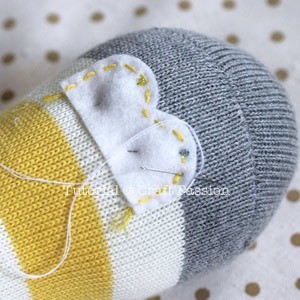
Position the felt eye with the center point align to the middle of the face portion. Pin it and sew with blanket stitch.
You may want to decorate the felt eye with a line of running stitch with 6 strands of embroidery floss before sewing it on the face. -
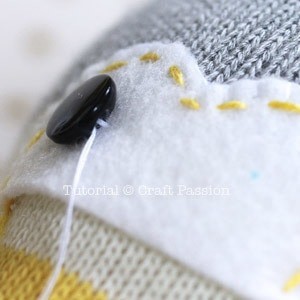
 Step 19
Sew the button eyes to the marked positions of the felt.
To make the eyes attach to the face closely, insert your needle as deep as possible into the face, turn and come out to another point of the same eye. Pull thread tightly so that the eye attach closely to the face. -
 Step 20
1. Mark the mouth on the face with erasable fabric marker. The shape is rounded corner rectangular, with bottom align to the face’s border and top covers a little on the felt eye.
2. Fold and baste the raw edge of the mouth, then pin it in place. Slip stitch around until you are about 1″ away from the starting point.
3. Stuff the mouth fully. Continue to slip stitch to the starting point to complete the mouth.
4. Embroidery branch stitches across the middle of the mouth. Tips: look out for the toe seam line of the sock, this is where the middle is. -
 Step 21
1. Sew ears on the side of the face with slip stitch around (front and back of the ear).
2. The front of the ear is aligned to the side line of the monkey.
3. Position of tail.
4. Sew it with slip stitch around too -
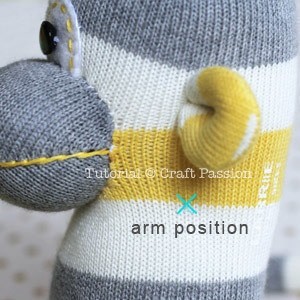
 Step 22
Sew the arm on the marked position with slip stitch around. Knot the thread and insert the needle to the other side of the arm position. Pull the thread so that arm “squeezes” into the body, knot to secure the shape.
Sew another arm with slip stitch.
If you think that the arms are not “sunken” enough, pass the needle to the other side, pull the thread to get the result you want, knot the thread securely. -
 Step 23
Provided you stuff you monkey very dense, sometime, you may find the monkey head is a little tall and pointy, this is normal due the shape of the adult sock. I found that kid’s and toddler’s sock do’t have this problem.
If you are happy with it, then it is OK. But, if you want to make the monkey head round like the one I made, the following step will be helpful. -
 Step 24
1. The original pointy head due the toe compartment of the sock.
2. Pinch the top of the head to judge how much you want to sew to make it rounder. Mark the space with erasable marker. Gradually decrease the width from center towards the front and the back.
3. Join both lines with slip stitch.
4. Here is it, a rounder head for the monkey.


Comments

