About
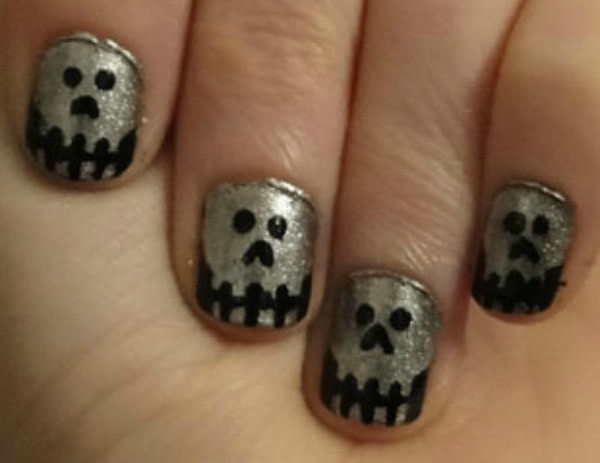
Simple skull nail art, perfect for beginners.
I painted skulls on my nails, a few years ago, before a trip. I've been painting my own nails for many years, so I wanted to try some basic nail art. These can be more colorful or kept neutral colors. The design is simple, but you can make it more complicated just by using other colors of polish.
Tags
-
 Karma M. added Skull Nails to Isis <3
13 Jul 20:54
Karma M. added Skull Nails to Isis <3
13 Jul 20:54
-
Mary K. favorited Skull Nails
12 Apr 00:55
-
 Kit McSmash favorited Skull Nails
07 Apr 13:02
Kit McSmash favorited Skull Nails
07 Apr 13:02
-
 Crafty Lady Abby published her project Skull Nails
05 Mar 19:30
Crafty Lady Abby published her project Skull Nails
05 Mar 19:30
-
Step 1
Paint your nails with the clear top coat. This will protect your nails from the colored polish. Let it dry for a few minutes. This normally dries quickly, as it is the 1st coat of many.
-
Step 2
Paint your nails with 1 even coat of black polish. Let this dry completely for about 30 minutes.
-
Step 3
With the silver nail polish, paint a straight line down your nail. Paint one on either side of the center line. You want to leave some of the black exposed at the bottom sides of the nail, for jaw definition. Fill in the sides half way down the nail and curve into the middle lines. Let this coat dry and repeat.
-
Step 4
Using the piece of plastic and the black polish brush, dot some black polish on to the plastic. DO NOT POUR IT! It will start to dry before you are able to use it all and become unusable. You want to make a small pool of polish, so you can dip your dotting tool (or toothpick) in it. You will do this several times through out the decoration process, as you will use up this polish while decorating your nails.
-
Step 5
With the rounded top of the dotting tool (or toothpick), dip it into the pool of paint. Just a little bit will do. you can always add more polish if needed, but never less...or at least that is very hard to remove. You will dip every time your polish runs low on your tool. You will use the black polish for all the facial details.
-
 Step 6
On each nail, make two dots for eyes. You want these in the upper 1/3 of the nail, closest to the cuticle. I did this on all the nails before moving to the nose.
-
 Step 7
Using the pointed end of the dotting tool and the black nail polish, you will finish the design. The pointed tip is more precise than the rounded tip. On each nail, make two lines for the nose. The nose will be a bit heart shaped.
-
 Step 8
On each nail, draw three vertical lines for the teeth.
-
 Step 9
On each nail, draw a horizontal line through the vertical lines, to define the teeth. You are done with the decoration on all of the nails, but the thumb.
-
 Step 10
On the thumb, make curved lines at the top of the teeth to define them more. The reason that this is for the thumbs only, is that they are larger than the other fingers and easier to fit more details on.
On the thumb, either make curves along the bottom edge of the nail to define the teeth, or make a straight black line. I was able to curve this hand, my left thumb, but not the right, as my left hand isn't as steady as my right hand.
-
 Step 11
OPTIONAL:
This is to add a flower to the skull on the thumbs. With the red polish, dot some on the plastic piece. Load your fine tip dotting tool with it. Make a dot for the center of the flower. Make 6 dots around that for petals. Let dry for a few minutes.
With the black polish, make a dot in the center. Make 3 elongated dots for leaves. Draw a curved line for a vine. -
Step 12
After the details have dried for 1-2 hours (since they are thick, they take longer to dry), carefully apply the clear top coat. Let this dry for another 1-2 hours and apply another coat. Let dry for another 1-2 hrs.
-
Step 13
After the polish is completely dry, you can remove any polish on the skin. You can either use a cotton swab and nail polish remover, or soap and water. I haven't removed the excess polish yet. I like to do that the next day if possible, so my polish has fully cured and hardened.