

Polymer Clay Simple Bear
Extract from Polymer Clay Bears (Twenty to Make) • By Birdy Heywood • Published by Search Press

About
Make a polymer clay bear.
The Simple Bear is the basis for all the other bears in the book. He is shown here with two friends. The larger blue bear has a brown snout and a very big nose. He also has little brown matching pads on his paws, which are created by squashing tiny flattened balls of brown clay into place.
He has larger ears and his eyes are closer together. The little pink bear has a tiny, round nose made from deep pink clay. Her ears have been placed further down and she holds a blanket made from flattened white clay. The claws were created using a cocktail stick to make the indentations.
Buy this book direct from Search Press by visiting us at www.searchpress.com.
Tags
© 2024 Birdy Heywood / Search Press · Reproduced with permission.
-
 Victoria T. favorited Polymer Clay Simple Bear
18 Mar 06:53
Victoria T. favorited Polymer Clay Simple Bear
18 Mar 06:53
-
 Glen C. favorited Polymer Clay Simple Bear
10 May 05:49
Glen C. favorited Polymer Clay Simple Bear
10 May 05:49
-
 Alice N. added Polymer Clay Simple Bear to Other
04 Mar 23:58
Alice N. added Polymer Clay Simple Bear to Other
04 Mar 23:58
-
 Dee D. added Polymer Clay Simple Bear to mini
05 Feb 07:01
Dee D. added Polymer Clay Simple Bear to mini
05 Feb 07:01
-
Marrian favorited Polymer Clay Simple Bear
24 Jul 18:47
-
 MysticRose29 added Polymer Clay Simple Bear to Polymer Clay Ideas
30 Mar 16:02
MysticRose29 added Polymer Clay Simple Bear to Polymer Clay Ideas
30 Mar 16:02
-
 abaigeal m. favorited Polymer Clay Simple Bear
17 Mar 01:22
abaigeal m. favorited Polymer Clay Simple Bear
17 Mar 01:22
-
 DocDoolittle favorited Polymer Clay Simple Bear
24 Feb 18:42
DocDoolittle favorited Polymer Clay Simple Bear
24 Feb 18:42
-
Carly H. favorited Polymer Clay Simple Bear
23 Feb 20:29
-
Michelle S. added Polymer Clay Simple Bear to Polymer clay
24 Nov 18:42
You Will Need
-
 Step 1
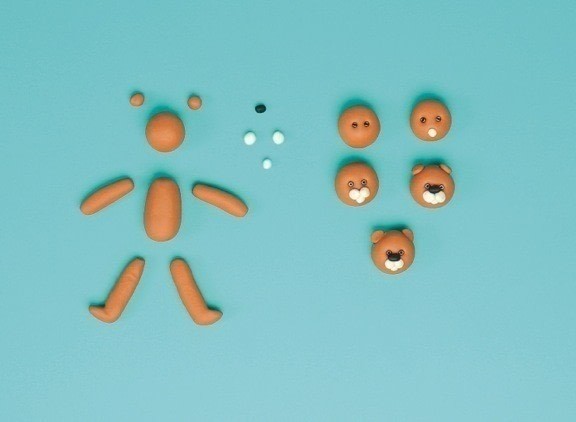
Divide the clay and form the shapes as shown above.
-
Step 2
Attach the legs to the body by pressing firmly, taking care not to distort the tops of the legs.
-
Step 3
Attach the arms.
-
Step 4
Push the blunt end of the half cocktail stick into the top of the body, leaving a little protruding, as shown (right).
-
Step 5
Insert the glass beads as eyes, using the cocktail stick.
-
Step 6
Add the chin followed by the cheeks as shown above.
-
Step 7
Attach the little black nose.
-
 Step 8
Place the head firmly down on the protruding cocktail stick to attach it to the body.
-
Step 9
To make the ears, press the little balls firmly on the head, then pinch them to flatten them slightly.
-
Step 10
Use the knitting needle to create the ear holes.
-
Step 11
Bake your bear at the recommended temperature on a ceramic tile or baking tray.


sculpting again..its been to long.
pj
I love this one! Very easy to make and my friends LOVE them...now i've got to make them all one!
So, so cute.
CO + K User
Very cute.