


About
Selfmade Rainsticks – perfect for children!
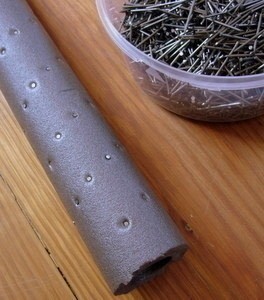
I’m a teacher for early music and arts education, and here’s a tutorial for selfmade rainsticks which I developed. My little students are 3 to 6 years old, and I didn’t want them to use a hammer and sturdy cardboard tubes (it would have taken too long; we have only one hour per week). At the hardware store, I found the perfect material: insulation tubes made of foam! They’re not expensive, and the little ones can easily stick the nails into the foam.
It’s great for small groups of children, and the rainsticks sound wonderful!
Tags
-
 Sallysaurus Rex added Selfmade Rainsticks to Childish Diversion
01 Apr 21:30
Sallysaurus Rex added Selfmade Rainsticks to Childish Diversion
01 Apr 21:30
-
 Step 1
Cut the long foam tubes in half. Now take the wire nails and stick them into the foam (if you like, you can draw a spiral around the tube and use it as a guide). Tell the children to leave at least a thumb-tip wide space between the nails.
-
 Step 2
With the cutter knife, cut a round plug from the foam… (Do this while the children are busy with the nails.)
-
 Step 3
…and stick the plug into one end of the tube. Fixate it with 3-4 wire nails.
Into the other side of the tube, pour half a cup of rice or gravel. Close this side with another plug. -
 Step 4
Cut the plaster bandages to the length of the tubes. Pull a bandage through a bowl with water and flatten the bandage on the tube. Repeat until the tube is covered with two layers of plaster.
-
 Step 5
After the plaster has dried, paint the tubes with acrylic paint
Alternatively, you can cut a large sheet of paper and wrap it around the tube, attach it with some wire nails. The paper can be painted before or after, using paint or felt-tip pens.
Have fun!


good that you're asking! It's not a safety issue, but we have only one hour per week for our lessons. So if I started to pass out hammers and nails, it would be impossible to get the sticks done within the time. The plaster bandages could only be used because we had an additional catch-up lesson.
Those kids are used to working with drills and saws as well