


About
Crease and fold a sakura lampshade.
I designed this light fixture as a kusudama—a type of modular origami that creates a ball, star, or orb from many different pieces. I’ve found that with large-enough units, the open sides of this kusadama make it a great lampshade for LED bulbs. Most LED lights give off no heat and are safe to use with paper, but double-check before installing any light inside a paper fixture. Do not use this model with a regular lightbulb! It will heat up and create a fire hazard.
Paper Information
You can find paper that has been treated to be heat- and fireproof online or at specialty art supply shops. Folding from 7" (18cm) squares will make the
lampshade shown here, which is about 13" (33cm).
Tags
© 2024 Sok Song / Potter Craft · Reproduced with permission.
-
 Billy Jennings favorited Sakura Blossom Lampshade
04 Apr 05:27
Billy Jennings favorited Sakura Blossom Lampshade
04 Apr 05:27
-
 Lillian Mccleery favorited Sakura Blossom Lampshade
03 Apr 06:09
Lillian Mccleery favorited Sakura Blossom Lampshade
03 Apr 06:09
-
 Sveta favorited Sakura Blossom Lampshade
04 Dec 17:48
Sveta favorited Sakura Blossom Lampshade
04 Dec 17:48
-
 Galan T. favorited Sakura Blossom Lampshade
26 Sep 08:25
Galan T. favorited Sakura Blossom Lampshade
26 Sep 08:25
-
 Carolina R. favorited Sakura Blossom Lampshade
27 Dec 23:50
Carolina R. favorited Sakura Blossom Lampshade
27 Dec 23:50
-
 PurpleFr3ak48 added Sakura Blossom Lampshade to Pretty things
01 Sep 22:46
PurpleFr3ak48 added Sakura Blossom Lampshade to Pretty things
01 Sep 22:46
-
 Emma H. favorited Sakura Blossom Lampshade
29 Mar 13:06
Emma H. favorited Sakura Blossom Lampshade
29 Mar 13:06
-
 DehSpieller added Sakura Blossom Lampshade to To do
28 Nov 17:56
DehSpieller added Sakura Blossom Lampshade to To do
28 Nov 17:56
-
 Karen D. favorited Sakura Blossom Lampshade
06 Oct 01:13
Karen D. favorited Sakura Blossom Lampshade
06 Oct 01:13
-
 Dolly P. favorited Sakura Blossom Lampshade
19 Sep 11:34
Dolly P. favorited Sakura Blossom Lampshade
19 Sep 11:34
You Will Need
-
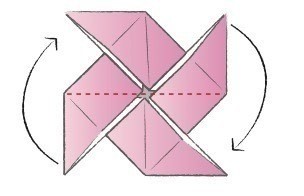
 Step 1
SAKURA UNIT (MAKE 30)
Start with the Windmill Base. Fold the left and right flaps in the opposite direction.
-
 Step 2
Mountain fold in half. Note: Make sure the points are
separated and not trapped inside. -
 Step 3
On the front layer, fold the left and right corners up.
-
 Step 4
On the front layer, fold the top corners down.
-
 Step 5
Repeat steps 3 and 4 on the other side.
-
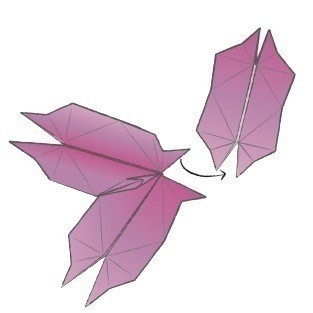
 Step 6
Gently open by pulling the 4 corners apart.
-
 Step 7
FINISHED SAKURA UNIT!
Note: Fold 29 more units before starting assembly.
-
 Step 8
SAKURA BLOSSOM LAMPSHADE ASSEMBLY
Insert top right flap of one unit into top left pocket of another unit to join.
Note: The full triangle flap will slide in the pocket. Once the flap is inserted make sure to push up the joint slightly to reinforce.
-
 Step 9
a Continue joining units until 5 2.b units are connected.
-
 Step 10
b
-
 Step 11
c
-
 Step 12
Connect a sixth unit to act as a “bridge” between the two clusters of 5.
-
 Step 13
e
-
 Step 14
Continue to connect more clusters as shown to create a sphere.


CO + K User
What goes in where?
I'd be happy if someone could help. ^_~
http://www.google.com/imgres?imgurl=http://www.origamishrine.com/gfx/base_windmill.gif&imgrefurl=http://www.origamishrine.com/base,windmill.html&h=520&w=520&sz=22&tbnid=TidRyVVdEhJZoM:&tbnh=131&tbnw=131&prev=/images%3Fq%3Dwindmill%2Bbase&zoom=1&q=windmill+base&usg=__YiHvkyH4u_3htBUxNcQvdhoaZVM=&sa=X&ei=rjCZTfj2B-7KiAKO3YjnCA&ved=0CC0Q9QEwAg