


About
How to Make a Ruffled Top from a Men's Shirt
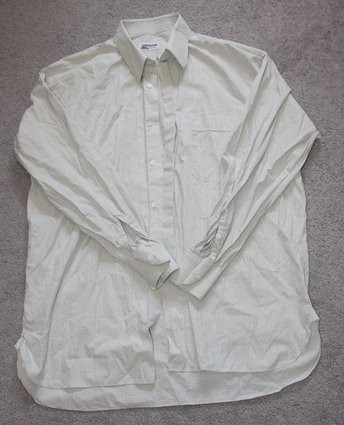
Tomorrow being Administrative Professionals' Day I wanted to create something that's fashionable yet doesn't scream "look at me!" (and is totally appropo for the office!). With Earth Day just around the corner as well, what could be more eco than upcycling? Steal a button-down from your guy's closet and give it a feminine makeover...that will make it a mainstay in yours.
Thank goodness there's someone around to redo all these stuffy men's shirts and breathe some girly life into them!
-
 Luna D. favorited Ruffled Top From A Men's Shirt
24 Apr 16:34
Luna D. favorited Ruffled Top From A Men's Shirt
24 Apr 16:34
-
 Key West Witch favorited Ruffled Top From A Men's Shirt
28 Sep 13:13
Key West Witch favorited Ruffled Top From A Men's Shirt
28 Sep 13:13
-
Rebecca C. favorited Ruffled Top From A Men's Shirt
12 Jul 19:32
-
 Shelly S. added Ruffled Top From A Men's Shirt to refashion
23 Aug 03:30
Shelly S. added Ruffled Top From A Men's Shirt to refashion
23 Aug 03:30
-
Shelly S. favorited Ruffled Top From A Men's Shirt
23 Aug 03:30
-
 Miss Captain Cosplay favorited Ruffled Top From A Men's Shirt
20 Apr 00:43
Miss Captain Cosplay favorited Ruffled Top From A Men's Shirt
20 Apr 00:43
-
 Laurinda P. favorited Ruffled Top From A Men's Shirt
11 Aug 03:13
Laurinda P. favorited Ruffled Top From A Men's Shirt
11 Aug 03:13
-
Laura Lou added Ruffled Top From A Men's Shirt to Wardrobe + Accessories
02 Aug 12:36
-
Amy k. favorited Ruffled Top From A Men's Shirt
29 May 19:56
-
 Regina K. favorited Ruffled Top From A Men's Shirt
05 Mar 04:16
Regina K. favorited Ruffled Top From A Men's Shirt
05 Mar 04:16
You Will Need
-
 Step 1
Put shirt on. Button 3rd and fourth buttons on shirt. Place one hand underneath your armpit; mark where armscye depth should be on the front of your shirt, as close to the side seam as possible. (I used a pin.) Take off the shirt and also mark the armscye depth for the other arm.
-
 Step 2
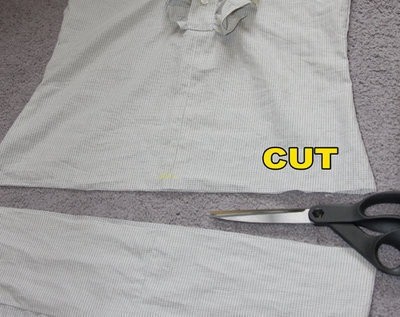
Lay your shirt on a flat surface and cut off the sleeves. Cut off the cuffs and discard; slit the sleeves down their side seams (as close to the seams as possible without going through any lapped seam detail). Remove the pocket with a seam ripper and discard.
-
 Step 3
Cut off the center button placard and buttonhole placard, below the fourth button, leaving enough allowance at the sides of each placard to fold under about 1/4". (If your placard is finished and bound, you won't need the folding allowance, but mine wasn't, so I have the extra step of finishing it below.) Cut the collar from the front of the shirt (as close to the collar underpiece as possible without going through it), and cut about 1" along the underpiece into the back of the shirt. (You won't remove the collar enitrely; you'll just be freeing it from the front of the shirt.)
-
Step 4
Turn shirt inside out and button remaining buttons on the shirt.
-
 Step 5
Sew Front Center Seam
Sew front together, down buttoned placard, so no seams show in the center front.
-
 Step 6
Trim buttoned placard off on the inside.
-
 Step 7
Adjust Fit
Take shirt off and lay it flat. Pin down sides, straight down from the pins you added at the armscye depth.
-
 Step 8
Turn shirt right-side-out and try it on. Adjust pins as necessary for a more tapered fit at the waist, and a freer fit at the hip. Make sure the armscye depth is still correct, and that you can get the shirt over your head. (If not, you'll have to add an invisible zipper later at the side seam.)
-
 Step 9
Take shirt off, turn inside out, and trace a "best-fit" line between your pins at the sides. Remove pins. Add 1" to the outside of the lines, and retrace the shape of the sides.
-
 Step 10
Cut shirt front from shirt back at the sides, cutting along the outside lines you drew in the previous step.
-
 Step 11
Trace shirt front onto shirt back. Draw lines on back about 3/8" to the inside of the lines you just draw. Cut shirt back on these lines.
-
 Step 12
Pin shirt front to shirt back.
-
 Step 13
(Your shirt front should now be about 3/4" larger than the back.)
-
 Step 14
Sew the Sides
Sew shirt sides together. (If you couldn't get the shirt over your head back in Step 8), do not sew the left side. This is where your side zipper will go. [And if you're left-handed and prefer your side zipper to be on the right, leave that side unsewn instead.])
-
 Step 15
Iron shirt and sleeves flat, paying special attention to the button placard still attached to the collar. (Optional: also iron zipper tape flat if you are using it.)15. (Optional) Insert side zipper according to package directions, (If you are unsure of how to insert an invisible zipper, there is a great tutorial here.)
Make the Ruffles -
 Step 16
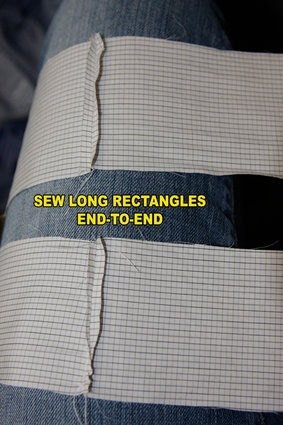
Lay your sleeves flat and cut two pieces from the sleeves, next to the angled sleeve seams. (These pieces will be your angled ruffles.) Cut on the grain, cutting a piece about 1.5" wide at its smaller end and 5.5" wide at the widest end. Trim any raw edges near the bound edge off. 17. Cut 2 long rectangles from each sleeve about 3" wide by the length of your sleeve. Square off the ends. These pieces will be your long ruffles.
-
 Step 17
Sew 2 long rectangles together, short end to short end. Repeat for the other 2 pieces.
-
 Step 18
Fold over the long edge of one of the pieces from the previous step about 1/4"; sew a scant 1/16" from the edge. Trim the raw edge next to your line of stitching. Fold over the stitched edges about 1/4" again; topstitch close to the edge to create a bound seam. Do the same for the other connected long rectangle piece.
-
 Step 19
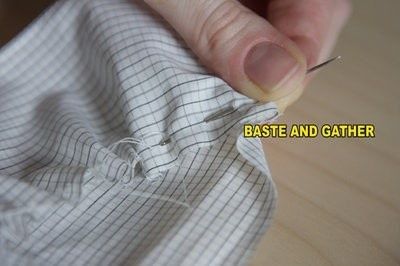
Using either a hand-sewing needle or a long basting stitch on your machine (or a gathering foot if you have it!), stitch long, basting stitches along the long raw edge of each long rectangle, and along the unbound raw edges of the angled ruffles.
-
 Step 20
Pull the thread to gather the pieces into ruffles.
-
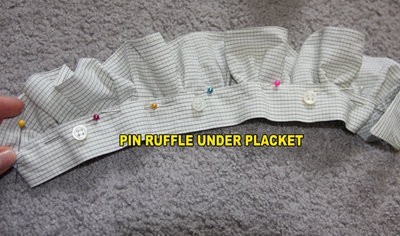
 Step 21
Finish the Collar
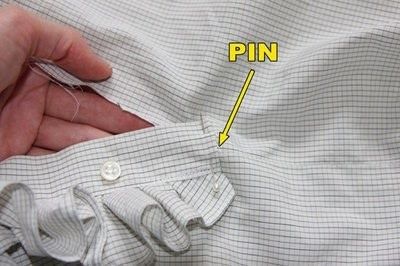
Pin one long ruffled rectangle under the button placket of your collar piece, matching the length by pulling on the basting thread.
-
 Step 22
Pin the angled ruffled piece underneath - the piece will only go down about 3/4 of the way of the placket. Fold the bottom of the placket under the long rectangle ruffle end about 1/4".
-
 Step 23
Topstitch the edge of the placket, through all layers to secure. (I chose to connect the top of the rectangle ruffle under my collar piece, but leave the top of the angled ruffle free, like "wings.")22. Repeat for the other side and the buttonhole placket.
-
 Step 24
We need to re-connect the collar to the shirt now - so start with the button placket side, and pin down overlapping the open hole in the front of the shirt. (Make sure the buttons are centered over the center front seam!) Pin the placket to the shirt, going straight upwards all the way to the collar area.
-
 Step 25
Pin the collar to the back of the shirt, overlapping the back of the shirt as much as you can by angling the collar downward. Between the top of the placket and the shoulder seam of the shirt, you're going to have excess fabric, so gather it and pin the collar over it.
-
 Step 26
Topstitch the button placket to the shirt. (I had to zigzag over the collar underpiece connection at the back of the shirt - there was a small gap that no amount of angling the collar was going to fix.)
-
 Step 27
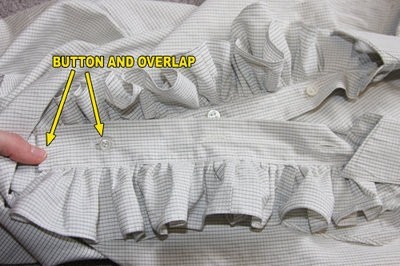
Place buttonhole placket end over end of button placket, and do up the bottom button.
-
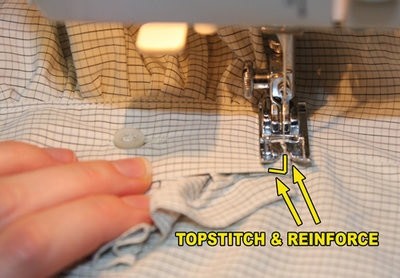
 Step 28
Topstitch end down, through all layers, and reinforce stitching.26. Un-button bottom button, and pin buttonhole placket to front of shirt in the same manner as you did the button placket. Topstitch through all layers.
-
 Step 29
Finish the Armscyes
Try on the shirt and draw the shape of the shoulder how you want it.
-
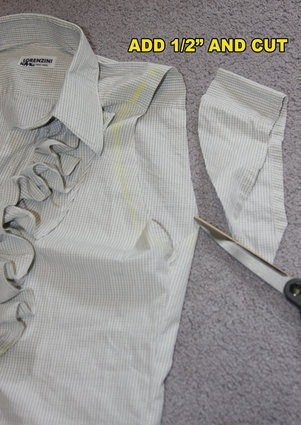
 Step 30
Take off the shirt, and cut the armscye shape about 1/2" on the outside of your markings. Trace the shape onto the other shoulder, and cut it out too.
-
Step 31
Turn under 1/2" of an inch, and stitch about 3/8" from the edge to finish, notching as you go. (If you want a more finished look, cut the armscye 3/4" outside of your markings, turn once and topstitch; turn again and topstitch to create a bound seam. I find this very difficult along a curve, as often the armscye becomes tighter and smaller the more times you turn the edge, and notching the inside on such a small seam allowance is quite difficult. If anyone has any tips, I'd love to hear them!)
-
 Step 32
Hem and You're Done!
Try on the shirt and mark where you want the hem to be.
-
 Step 33
Cut about 1/2" below this line, fold under, and stitch at a 3/8" hem on your machine.
-
 Step 34
Phew! A super-ruffly, super-feminine piece for the office. (As you can see, I also added 2 bust darts to make the feminine fit even better.)


PS: is that ok with you? xx
I also angled the collar downwards because it's a large man's shirt...so the collar is too big for me (and would be for most average-sized women). The angling allows the collar to appear smaller and as if the shirt fits. It's not completely necessary either, but provides a better fit. I hope that answers your questions!
xoxox
Carly
PLEASE!!