


About
Those who have made lanyards at scout camp will be familiar with the weaving used to make this bracelet.
Choose up to four different colors for an awesome bracelet! <br /><br />This is a tutorial I wrote up as part of my blog event Oc-Tute-ber. Visit all the tutorials here.
<a href="http://corgipants.blogspot.com/">http://corgipants.blogspot.com/</a>
-
 Meredith T. favorited Ribbon Lanyard Bracelets
29 Jun 02:37
Meredith T. favorited Ribbon Lanyard Bracelets
29 Jun 02:37
-
 rouge s. favorited Ribbon Lanyard Bracelets
26 Oct 21:50
rouge s. favorited Ribbon Lanyard Bracelets
26 Oct 21:50
-
 Sue C. favorited Ribbon Lanyard Bracelets
20 Oct 23:14
Sue C. favorited Ribbon Lanyard Bracelets
20 Oct 23:14
-
 Leeona added Ribbon Lanyard Bracelets to armband
15 Jun 15:10
Leeona added Ribbon Lanyard Bracelets to armband
15 Jun 15:10
-
 Veronica B. favorited Ribbon Lanyard Bracelets
16 Jan 14:55
Veronica B. favorited Ribbon Lanyard Bracelets
16 Jan 14:55
-
 TinyTessieG favorited Ribbon Lanyard Bracelets
27 Dec 16:18
TinyTessieG favorited Ribbon Lanyard Bracelets
27 Dec 16:18
-
 nicole.johnson.520 favorited Ribbon Lanyard Bracelets
26 Dec 10:49
nicole.johnson.520 favorited Ribbon Lanyard Bracelets
26 Dec 10:49
-
 Ichigo M. favorited Ribbon Lanyard Bracelets
16 Nov 03:24
Ichigo M. favorited Ribbon Lanyard Bracelets
16 Nov 03:24
-
 tiffany m. favorited Ribbon Lanyard Bracelets
28 Jun 15:08
tiffany m. favorited Ribbon Lanyard Bracelets
28 Jun 15:08
You Will Need
-
 Step 1
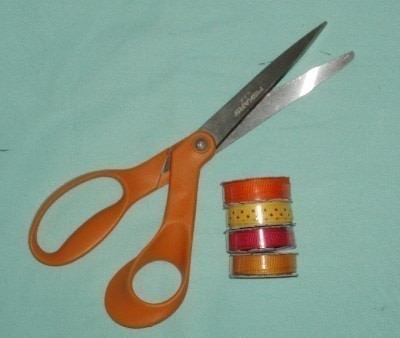
What you'll need:
4 pieces of ribbon, each 2 yards long (For this bracelet, I used 1/4 inch wide but you can use any size or combination of sizes)
Scissors
Needle and thread -
 Step 2
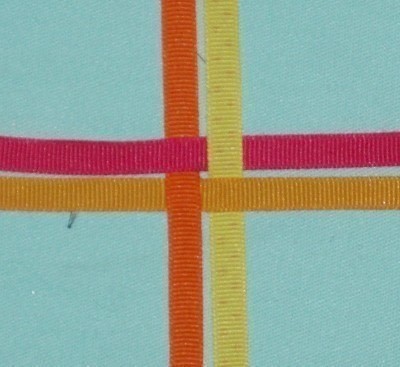
Overlap the centers of all four ribbons as shown here. Secure these together by either lightly tacking together with needle and thread of adding a drop of glue to each intersection.
-
 Step 3
To begin weaving, fold the first ribbon down over the one underneath it.
-
 Step 4
We work first in a counterclockwise direction so continue to fold down the next ribbon across the one beneath it.
-
 Step 5
And the next
-
 Step 6
And finally the last
-
 Step 7
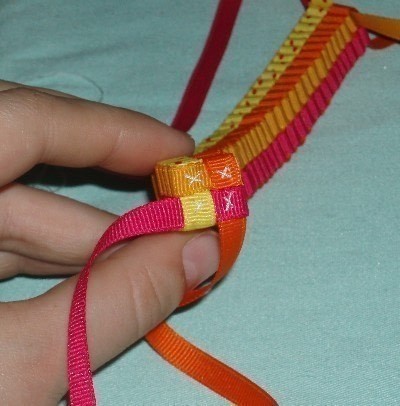
When you fold the last ribbon over, slip it under the loop of the first ribbon you folded down like so. Tighten all four ribbons.
-
 Step 8
After going around counterclockwise, reverse the pattern and fold the ribbons across working in a clockwise direction. Begin this round with the ribbon you just passed under the loop.
-
 Step 9
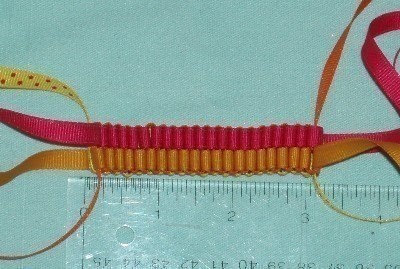
Continue repeating these two, tightening the ribbons after each round, until your weaving measures 3 1/2 inches long.
Then repeat on the opposite side of where you tacked your ribbons together. Stop when the entire piece measures 7 inches long.
-
 Step 10
To fasten both ends, sew a criss cross stitch through each of the four squares and cut the ribbon close to the weaving.
-
 Step 11
Then give the bracelet a full twist and butt the two ends up gainst one another. Whip stitch the edges together.
The bracelet will look small but it stretches to fit over your hand.
<br /><br />This is a tutorial I wrote up as part of my blog event Oc-Tute-ber. Visit all the tutorials here.
<a href="http://corgipants.blogspot.com/">http://corgipants.blogspot.com/</a>


Yours idea is MUCH cuter though - who knows? Maybe I can bring the craze back again! (Or not.)