


About
Another magazine recon project, and I still have a lot left... :D
It is actually really simple, all you need is looooots of patience... :D
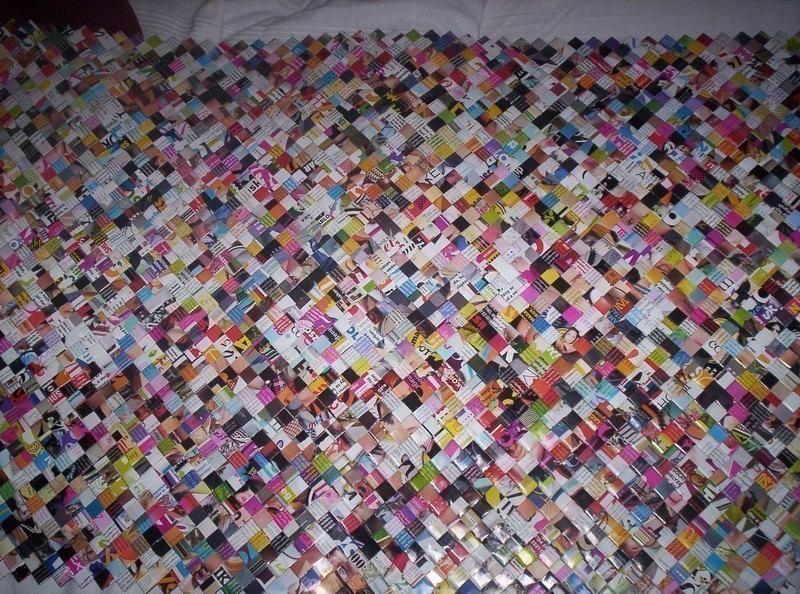
I made 29 rows, 101 pieces long each, so I used 2929 pieces, which are 11,5x5,2 cm (should have been10,5x5, but I can't measure properly) big... It took me about 3 moths, of course I wasn't making it 24/7... :D
So that's it with the numbers. :D
Here comes the tutorial, no pictures, my camera was dead until today, so I couldn't make any.
-
 Adrienne S. added Recycled Magazine Wall Art to Paper Flowers And Projects
29 Apr 21:09
Adrienne S. added Recycled Magazine Wall Art to Paper Flowers And Projects
29 Apr 21:09
-
 Angel F. favorited Recycled Magazine Wall Art
09 Jul 14:20
Angel F. favorited Recycled Magazine Wall Art
09 Jul 14:20
-
 mary t. favorited Recycled Magazine Wall Art
22 Feb 04:12
mary t. favorited Recycled Magazine Wall Art
22 Feb 04:12
-
 phoenix0365 added Recycled Magazine Wall Art to DIY CRAFTY COLLECTION
14 May 23:23
phoenix0365 added Recycled Magazine Wall Art to DIY CRAFTY COLLECTION
14 May 23:23
-
phoenix0365 favorited Recycled Magazine Wall Art
14 May 23:23
-
 Lauren A. favorited Recycled Magazine Wall Art
22 Feb 21:19
Lauren A. favorited Recycled Magazine Wall Art
22 Feb 21:19
-
 Yadira V. added Recycled Magazine Wall Art to Lovely
19 Nov 03:22
Yadira V. added Recycled Magazine Wall Art to Lovely
19 Nov 03:22
-
Yadira V. favorited Recycled Magazine Wall Art
19 Nov 03:22
-
 Sue W. favorited Recycled Magazine Wall Art
23 Aug 19:32
Sue W. favorited Recycled Magazine Wall Art
23 Aug 19:32
-
 kdoetsch favorited Recycled Magazine Wall Art
08 May 00:17
kdoetsch favorited Recycled Magazine Wall Art
08 May 00:17
-
Step 1
Fist of all, make a sample piece to make your work easier while cutting out the pieces. This sample should be made of something stronger than ordinary paper (I used the cover of the magazine most of the time, I lost the sample pieces like every 2 weeks... :D). Measure out a 10,5x5 cm rectangle, cut it out. There, you have your samle piece. :o)
-
Step 2
Now comes loooots of cutting. Take out your magazines, and start drawing the little pieces, with the help of your sample piece.
Try to use as much paper as you can, I could fit 6 little ractangles on a page. Of course you can cut more pages at a time, when I was lazy, I cut like 20 pages up together... :D After that, the rectangles will "mutate" a littlebit, but that doesn't really matter, you'll cut them up anyway. -
Step 3
When you have enough pieces, you can start making the chains. I won't write it down here, it's explained on lot's of sites, like here:
http://candywrapperpurse.blogspot.com
You just don't have to make rings of them.Make them as long as you want your completed thing to be. Same with the width, make as many chains you want.
-
Step 4
After you have your chains, you can start sewing them together.
This is actually my favorite part. :o)
I can't really explain how to sew it together, the site above gives you instructions, but it's really easy to figure out.
You can sew on both sides, but I actually just did one side of the whole thing. -
 Step 5
Now you have your big picture. :o)
Now take the big cardboard, and glue your mosaic on it, cut off the parts you don't need.
Now you can get it framed, or hang it up on the wall like this. :o)
I'd love to see if anyone did this, comments are welcome, thanks for looking. :o)


 1
Watercolor Art »
Watercolor Paints Made From Make Up
1
Watercolor Art »
Watercolor Paints Made From Make Up

So my pieces were 11.5x5.2, because I can't measure properly.
And I'd love to see how yours will turn out!:o)
@Kirky: Yeah, I'm known as a very patient person... XDXD
thx sooo muchh!!!!