


About
TUTORIAL : POUCH FOR IPOD NANO
I decided to make a case for my new iPod Nano, to stop it from getting scratched in the depths of my handbag. I wasn't entirely happy with my first attempt, although the sizing was good some of my seams and finishing could have been better. So I decided to treat that one as a prototype, and make a tutorial from my second go - so here goes:
Does your iPod long to live in a cute little pouch like this? Here's how to make one - it's pretty easy! You can click the photos to see them larger if you want.
-
 Meagan V. favorited Pouch For Ipod Nano
01 Sep 18:01
Meagan V. favorited Pouch For Ipod Nano
01 Sep 18:01
-
 Elentine added Pouch For Ipod Nano to Sewing
15 Jun 23:22
Elentine added Pouch For Ipod Nano to Sewing
15 Jun 23:22
-
ally s. favorited Pouch For Ipod Nano
18 Mar 02:32
-
 Munnazah C. added Pouch For Ipod Nano to Sew, sew, sew!
26 Oct 15:38
Munnazah C. added Pouch For Ipod Nano to Sew, sew, sew!
26 Oct 15:38
-
Munnazah C. favorited Pouch For Ipod Nano
26 Oct 15:37
-
 mochuelita added Pouch For Ipod Nano to Have to <3 <3
02 Oct 21:38
mochuelita added Pouch For Ipod Nano to Have to <3 <3
02 Oct 21:38
-
 Step 1
You will need: Two fabrics of your choice (I used a quilter's cotton for the outside and felt for the inside) ♥ 10cm of ribbon ♥ Thread ♥ Scissors/rotary cutter.
-
 Step 2
Cut one 24 x 8.5cm rectangle from each fabric. Place right sides together, and sew almost all the way around with an 8mm seam allowance. Leave about a 3cm opening on one of the short sides.
-
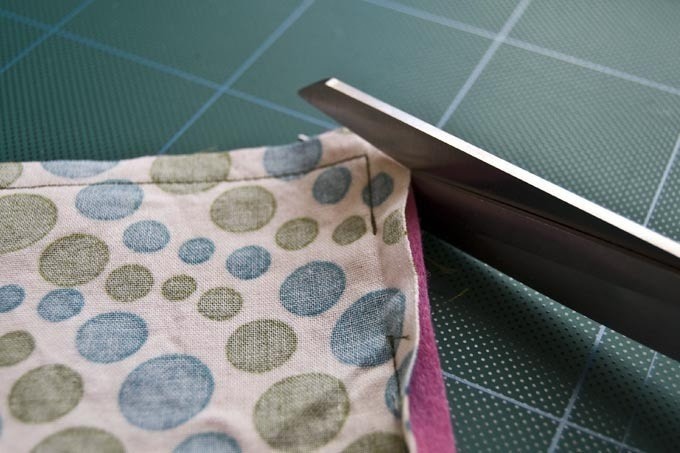
 Step 3
Snip the corners and turn inside out through the opening. Use a pointed object (like a knitting needle) to poke the corners out.
-
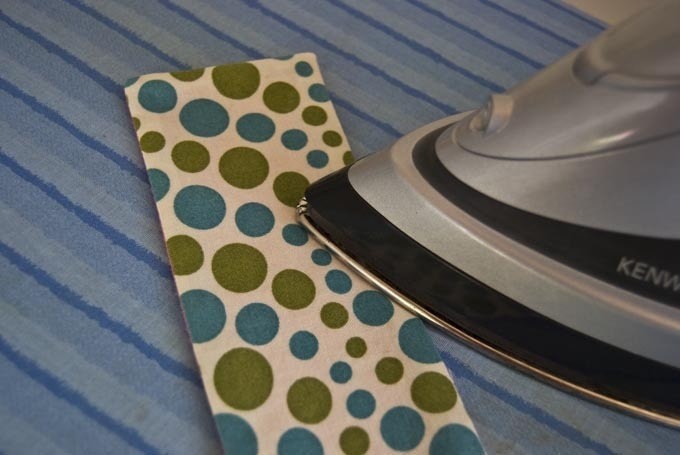
 Step 4
Iron out the seams well.
-
 Step 5
With a 3mm seam allowance, stitch across the short side to close the opening.
-
 Step 6
Next, place your iPod pretty much bang on centre of your rectangular piece to determine where you need the opening for the lead to go.
-
 Step 7
Mark the opening and sew a buttonhole. (Thank goodness for the automatic buttonhole function on my sewing machine, it means I am no longer scared of buttonholes!)
-
 Step 8
Fold at the buttonhole as shown in the photo. Insert one end of your ribbon about 2cm from the bottom.
-
 Step 9
Still with a 3mm seam allowance, start from the bottom and sew all the way around (sandwiching the ribbon between the layers), and thereby also topstitching the flap, until you reach the point where you need to insert the other end of the ribbon
-
 Step 10
This is where it gets a little fiddly, but don't worry. It's the trickiest part, but you're almost done! Stop sewing about 3cm from where you need to insert the ribbon. Sandwich the ribbon between the layers like you did on the other side.
-
Step 11
Making sure the ribbon is stretched taut across the fabric, sew until just before you reach the ribbon, then stop with the needle still down.
-
 Step 12
Now push the opposite side towards the presser foot, as shown in the photo, and continue stitching under the arch of the ribbon, until you reach the end. It's a bit fiddly, but you can do it! Now just snip off any loose threads.
That's it - you're done!


Versions

Posted by
RogueSister

Posted by
Laura C.


Posted by
Asgards_Princess


i'll makee one for my phone i think